The point of the lid switch is for the tub to stop spinning when the washer lid is opened. It is a safety precaution just in case someone decides to stick their hand inside the washer while the tub is spinning.
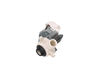
This is a replacement clutch assembly or cam kit for your washer. The clutch assembly is mounted on the drive shaft on the bottom of your washer. You may need to replace the clutch assembly if the spl...
This touch-up paint can be used on a wide variety of household appliances. It is most often used on washers, dryer, refrigerators, dishwashers, ranges, freezers, trash compactors, or microwaves. It is...
This knob is a genuine OEM replacement part used in dryers. It is a white, plastic knob found on the front panel on the dryer. It allows users to choose the drying cycle, adjust temperature settings, ...
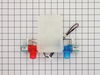
This part changes the transmission from agitation to spin mode. This actuator is for washers.
Actuator shifts the splutch and monitors the position of the splutch.
This water inlet valve attaches the water lines to the back of your appliance. The attaching solenoids on the valve open and close according to the desired temperature, or amount of water needed.
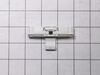
This part is the replacement lid latch or latch assembly for your top-load washer. The lid latch holds your washer door closed, and allows the washer to run its cycle. If the lid latch is damaged, you...
The hose clamp is used to hold the water hose in place which will prevent the hose from leaking water. Sometimes the clamp may lose its ability to latch on, causing a leaking washer. For the installat...
Sold individually. NOTE: The color on the screw may not be the same as the image, but will still function the same.
$11.80
In Stock
Questions And Answers for RTW4641BQ0
We're sorry, but our Q&A experts are temporarily unavailable.
Please check back later if you still haven't found the answer you need.
5 questions answered by our experts.
Sort by:
< Prev
1
Next >
Search filter:
Clear Filter
Your search term must have 3 or more characters.
Keep searches simple. Use keywords, e.g. "leaking", "pump", "broken" or "fit".
Sorry, we couldn't find any existing answers that matched.Try using some different or simpler keywords, or submit your new question by using the "Ask a Question" button above!
John
November 26, 2019
Suspension rod kit
For model number RTW4641BQ0
Hello John, Thank you for contacting us. I have researched the model you have provided and have found the part you are looking for is PartSelect Number PS11703288. Hope this helps!
Hi Francis,
Thank you for your question. If your washer will not rinse or drain, the part that fixes the issue most of the time is the lid switch. The lid switch is a safety device used to prevent the motor circuit from operating when the lid is open. If the lid switch fails, the washer may not rinse or spin. Before testing and removing the switch from the washer, please unplug it from the electrical outlet. First, verify that the switch is being operated mechanically. Inspect the levers and actuators to ensure they are not damaged or sticking. If it is being operated mechanically and no issues were found with the levers or actuators, you will need to test the switch with a multimeter for continuity. Remove the switch from the appliance and set your multimeter to Rx1 and touch the probes to the terminals. You should receive a reading of zero. If you do not get this reading, you will need a replacement lid switch. If the lid switch is fine, check and see if you have either a clogged drain pump or drain hose. If they are clogged, you will need to clean them. Also make sure that the drain hose is not bent or damaged. If either the pump or the drain hose are damaged, they will need to be replaced. We hope this helps! Good luck with the repair!
Washer will spin out water and then fill with water, starting the wash cycle over. And will do it again and again.
For model number RTW4641BQ0
Hi Paul,
Thank you for your question. If your washer is filling and draining at the same time, make sure that the drain hose is not shoved too far down in the standpipe. If it is, a vacuum will form that will cause the water to drain as the washer is filling with water. Raise the hose a few inches out from the standpipe and this should resolve the issue. If you have any questions, please let us know. We are open 7 days a week. We look forward to hearing from you!
Was this helpful?
Thank you for voting!
Kenny
August 15, 2023
When completing a load it refills and continues another washing cycle. I have recalibrated 3 times, one set allowed it to complete 3 loads then on the 4th it started having the same issue.
For model number RTW4641BQ0
Hello Kenny, thank you for the question. Check the drain hose for kinks or blockages. Clean the lint trap. Check the drain pump filter for clogs. Make sure the drain hose is properly connected to the washing machine and the drainpipe. If this does not help, we recommend replacing the control board, part number PS8768904. Good luck with this repair!
Hello; my Roper washer (RTW4641BQ0) is about 10 years old. It is making a grinding & clicking noise when agitating; otherwise it is functioning normally. Do you know what parts would be associated to this symptom?
For model number RTW4641BQ0
Hello Alicia, thank you for contacting us. We have concluded that the issue is with the drive clutch kit, part number PS10057144. We would recommend replacing it to fix the issue. Glad to be of assistance!
A detailed Service Technician Service Manual is hidden inside the machine on the front panel. It is hidden by the bleach dispenser input. It gives a list of fault codes and instructions for calibration after repair, resetting fault codes, and a manual test mode for stepping the machine through each mode on command. The Tachometer faile
... Read mored which would not let the machine come up to maximum spin speed. The tachometer is part of the solenoid actuator that shifts the transmission. It is not specifically called out in the manual. Any failure causes the lid lock light to blink which gives the appearance of a lid lock failure
The instructions that came with the part were worthless. Essentially, unplug, put in new part, plug it back in. I spent a considerable amount of time on the internet and finally found a video showing how to open the top. Unlike other models, it is held down by clamps in the back rather than clips in the front. Once finding this inform
... Read moreation the installation was simple. Remove the clamps and the back of the console, slide the top forward and lift, remove and replace the lock and reassemble. You don't even have to remove the hoses.
Well, first investigated and found loose nut on drive clutch. First take off the two screws with nut drive then cover off using a screwdriver blade to snap off the cover. Then socket ratchet to take off the nut on drive clutch. take off belt by slowly rotating the drive gear. two screws that hold the electronics to the upper drive clutch
... Read moreand put aside, so you can snap off the cover for drive clutch on upper part with screwdriver and off the parts come and install whole unit back as took it apart. Line up the new upper clutch so that is position as was before. (Using parts diagram helps a lot as www. partsselect.com has for you or Maytag.com.) Then put the electronic part board back on and the gear and nut. Make sure it is tight by several attempts to make sure it's snugged up good and then slowly roll belt back on the pulley and motor drive. Put your cover guard back on with two screws and done.


 Diagram and Parts List for Whirlpool")