


Models
>
RK777G*T9
RK777G*T9 Hotpoint Wall Oven - Overview
Sections of the RK777G*T9
[Viewing 2 of 2]

Keep searches simple, eg. "belt" or "pump".

Electronic Clock and Timer Kit
PartSelect #: PS233996
Manufacturer #: WB19X10006
This electronic clock replaces the mechanical clocks with a more reliable digital timer. As per the manufacturer, this part should be installed by appliance repair person.
$505.17
In Stock

Self Cleaning Dual Range Thermostat
PartSelect #: PS236059
Manufacturer #: WB21X5320
You won't find an "off" position on this dual range thermostat because the "off" function of this thermostat is controlled by the selector switch. This thermostat operates on a range of 150 degrees to...
No Longer Available

Questions And Answers for RK777G*T9
We're sorry, but our Q&A experts are temporarily unavailable.
Please check back later if you still haven't found the answer you need.
Common Symptoms of the RK777G*T9
[Viewing 1 of 1]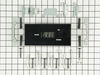
Keep searches simple. Use keywords, e.g. "leaking", "pump", "broken" or "fit".
Electronic Timer went out and Top Oven No Longer worked
There are about 12 wires behind the panel...and this was the second time I've replaced the electronic clock in the past four years. I replaced the analog clock four years ago with the digital version because the analog was no longer available, so I knew what I was in for. There are four screw (top of the frame and lower frame) to remove b
... Read more
efore the frame holding the clock will come out. First DISCONNECT the power! You've have to remove the clock control knobs, and the plastic lever on the self cleaning handle. The first time I ordered this replacement part from PartsSelect there was a diagram included on which wire goes where. This time there wasn't! So it gets a little complicated. Make sure you label all the wired before you disconnect the old clock panel. Anyway, remove the four nuts holding the old clock in place; put the new clock panel in; replace the four nuts. I'll be glad to talk anyone through the rest and I have photos of the whole repair.
Read less
Parts Used:
-
David from Owings Mills, MD
-
Difficulty Level:Difficult
-
Total Repair Time:1- 2 hours
-
Tools:Pliers, Screw drivers
60 of 73 people
found this instruction helpful.
Was this instruction helpful to you?
Thank you for voting!
Mechanical/electrical clock/timer not working
Followed the instruction provided except had to add a NEUTRAL LEAD which on the old part had been provided by the frame as it was metal/ electrical vs plastic/electronic . Used one of the extra Wire Extensions provided, drilled a hole in the clip connection and attached it to the metal frame holding in the replacement clock. The need for
... Read more
a NEUTRAL LEAD was not discussed in the instructions.
Read less
Parts Used:
-
Maxwell from RINGWOOD, NJ
-
Difficulty Level:A Bit Difficult
-
Total Repair Time:15 - 30 mins
-
Tools:Nutdriver, Pliers, Screw drivers
29 of 36 people
found this instruction helpful.
Was this instruction helpful to you?
Thank you for voting!
Old mechanical timer worn out.
This digital timer, GE Part # WB19X10006 (PartSelect PS233996) is called out by GE as the current replacement for the mechanical timer in the JB500G*J1 range. I had tried to get one some time ago from another dealer but was told it was discontinued and no longer available, so I was pretty happy to come across it in the PartSelect catalog.
... Read more
It comes with a number of mounting brackets and instructions to use the brackets that resemble the old parts, but when I did that the control buttons did not line up with the holes in the glass and were offset about 1/4" to the left. It was impossible to simply slide the timer over that far because it bumped into the underlying metal frame. I ended up using a longer set of brackets which lifted the timer about 1/2" off the glass, thereby avoiding interference with the frame, and bent the brackets sideways to line up with the holes in the glass. But then a transformer on the new timer stuck out about 1/4" too far in back to get the rear cover back on. I made two vertical cuts in the rear cover from the edge down past the timer and bent the resulting flap around the transformer. The resulting installation looks like it was made that way and works great.
It comes with a number of mounting brackets and instructions to use the brackets that resemble the old parts, but when I did that the control buttons did not line up with the holes in the glass and were offset about 1/4" to the left. It was impossible to simply slide the timer over that far because it bumped into the underlying metal frame. I ended up using a longer set of brackets which lifted the timer about 1/2" off the glass, thereby avoiding interference with the frame, and bent the brackets sideways to line up with the holes in the glass. But then a transformer on the new timer stuck out about 1/4" too far in back to get the rear cover back on. I made two vertical cuts in the rear cover from the edge down past the timer and bent the resulting flap around the transformer. The resulting installation looks like it was made that way and works great.
Read less
Parts Used:
-
Theodore from Atwater, CA
-
Difficulty Level:A Bit Difficult
-
Total Repair Time:1- 2 hours
-
Tools:Nutdriver, Pliers
26 of 32 people
found this instruction helpful.
Was this instruction helpful to you?
Thank you for voting!