


Models
>
RB735*03
RB735*03 Hotpoint Range - Overview
Sections of the RB735*03
[Viewing 1 of 1]
Keep searches simple, eg. "belt" or "pump".

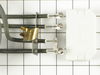
8 Inch Surface Burner
PartSelect #: PS244046
Manufacturer #: WB30X348
This surface element kit includes an 8 inch element, two wire, 2350 watt surface element, and a terminal block with all three-wire units. These high rise elements do not come with an attached trim ring.
$90.22
In Stock

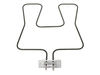
Tilt Lock Hinge Mounted Surface Burner Kit - 6"
PartSelect #: PS244042
Manufacturer #: WB30X342
This tilt lock hinge mounted surface element kit includes a 6 inch, three wire, 1350 watt surface element, and a terminal block with all three-wire units. These high rise elements do not come with an attached trim ring.
$49.45
In Stock


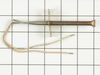
Oven Sensor
PartSelect #: PS235718
Manufacturer #: WB21X158
This sensor offers 16 ohms of resistance at room temperature, though the resistance increases as the temperature increases.
No Longer Available


Questions And Answers for RB735*03
We're sorry, but our Q&A experts are temporarily unavailable.
Please check back later if you still haven't found the answer you need.
Common Symptoms of the RB735*03
[Viewing 2 of 2]Element will not heat
Fixed by
these parts
these parts

Show All
Little to no heat when baking
Fixed by
these parts
these parts
Show All
Keep searches simple. Use keywords, e.g. "leaking", "pump", "broken" or "fit".
The oven's bottom bake element burned up
First I turned the circuit breaker switch off for the stove unit. I then removed the two screws that hold the element in place at the back of the oven. I then pulled the element out about 3 inches and disconnected the two wires. I attached the new element, bolting the wires into place and then screwed the element back into place on the
... Read more
back wall of the oven. I flipped the breaker switch back on, and turned on the oven. I was done in roughly 15 minutes. The most difficult part was having to shine a flash light into the oven to replace the part, and negotiating the hard cold kitchen floor.
Read less
Parts Used:

-
Dennis from Los Alamos, NM
-
Difficulty Level:Really Easy
-
Total Repair Time:Less than 15 mins
-
Tools:Socket set
19 of 23 people
found this instruction helpful.
Was this instruction helpful to you?
Thank you for voting!
oven temperature too low
After ordering the proper part with the help of the phone customer service tech, I moved the stove from the wall, unclipped the connector, removed the two screws holding the sensor in place, and removed it. Reversed the above to put it back, and the oven holds perfect temperature.
Parts Used:
-
Ryan from Henderson, NV
-
Difficulty Level:Easy
-
Total Repair Time:Less than 15 mins
-
Tools:Nutdriver
16 of 17 people
found this instruction helpful.
Was this instruction helpful to you?
Thank you for voting!
oven would not come up to temperature
Removed sensor from back wall of oven by removing 2 screws from flange. I could not pull the wire-nut connections out through the small hole and thought I would have to pull the whole oven out of the wall to acess the connections from the back so instead I clipped the wires close to the old sensor and connected the new sensor with the sma
... Read more
ll wire nuts provided, then enlarged the hole in the oven wall, being careful not to pinch the wires then pushed the wire nuts and extra wire back through the hole and put the screws back in the flange.
Read less
Parts Used:
-
Clarence from Norwich, NY
-
Difficulty Level:Difficult
-
Total Repair Time:30 - 60 mins
-
Tools:Nutdriver, Pliers, Screw drivers
14 of 17 people
found this instruction helpful.
Was this instruction helpful to you?
Thank you for voting!