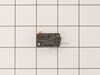
This door switch, also known as a safety switch, is a genuine OEM replacement part for microwaves. It is a safety mechanism that sends signals to the microwaves control system, telling it when the doo...
$37.15
In Stock
Order within the next 1 hr and 9 mins and your part ships today!
This is a range temperature sensor, used to detect the interior temperature of your oven when it is baking or cooking. If you notice your oven is baking unevenly or at inconsistent temperatures, will ...
$130.33
In Stock
Order within the next 1 hr and 9 mins and your part ships today!
This is a high limit thermostat designed for microwaves, ranges and ovens. Made of plastic and metal, this thermostat is designed to open the electrical circuit for your appliance when it reaches a sp...
$29.04
In Stock
Order within the next 1 hr and 9 mins and your part ships today!
This rubber cushion is supplied by the original manufacturer and has a shaft approximately 1 inch long. The cushion acts as a layer of protection between the oven door and oven frame/cavity. It preven...
$6.60
In Stock
Order within the next 1 hr and 9 mins and your part ships today!
This surface element triple burner infinite switch, or regulator control, is located in the control panel of your range oven. It is responsible for turning the surface element on or off and adjusting ...
$184.95
In Stock
Order within the next 1 hr and 9 mins and your part ships today!
This energy regulator, more commonly known as a surface element control switch or burner switch is compatible with various models of Samsung ranges. It consists of the switch housing and a metal shaft...
$182.88
In Stock
Order within the next 1 hr and 9 mins and your part ships today!
This stainless steel wire rack is a sturdy platform for baking or roasting food, making sure heat circulates evenly. It measures approximately 7/16 inches by 24 3/4 inches and is usually found inside ...
$266.45
In Stock
Order within the next 1 hr and 9 mins and your part ships today!
This genuine OEM left-threaded convection fan motor is responsible for spinning the fan blade, ensuring even circulation of hot air within your oven for consistent cooking. It is typically located beh...
$174.43
In Stock
Order within the next 1 hr and 9 mins and your part ships today!
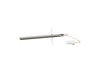
The temperature sensor, also referred to as a thermostat, probe, or thermistor sensor, is responsible for measuring the temperature inside your oven. It is a platinum-resistance sensor with a resistan...
$196.39
In Stock
Order within the next 1 hr and 9 mins and your part ships today!
This hexagon nut cap, also known as a nut cover cap, is a nylon-insulated cylindrical cap with left-hand threads and a 4mm thread size, for counterclockwise tightening. It is sourced from the original...
$10.58
In Stock
Order within the next 1 hr and 9 mins and your part ships today!
Order within the next 1 hr and 9 mins and your part ships today!
Questions And Answers for NE59J7850WS
Ask our experts a question about this model and we'll get back to you as soon as possible!
2 questions answered by our experts.
Sort by:
< Prev
1
Next >
Search filter:
Clear Filter
Your search term must have 3 or more characters.
Keep searches simple. Use keywords, e.g. "leaking", "pump", "broken" or "fit".
Sorry, we couldn't find any existing answers that matched.Try using some different or simpler keywords, or submit your new question by using the "Ask a Question" button above!
Cecil
November 5, 2021
Why is my hot surface light on when the stove hasn’t been used for days
For model number NE59J7850WS
Hello Cecil, thank you for your question. Each burner module has a thermostat rod that controls the Hot Cooktop Light. Each burner module has four female spade connectors with either one or two wires per spade connector. There are two large and two small spade connectors on each burner module. One burner module at a time, remove the two smaller female spade connectors and push aside. Next, use a volt meter set on ohms and check for continuity across the two MALE spade terminals at that same burner module. Do this for each burner module, one at a time. They should read open (no continuity) when the burner is cold. One of the burner module terminals will show closed (continuity). This is the burner that is causing the light to stay on. You have to replace that burner. We hope this helps. Good luck with your repair.
1 person found this helpful.
Was this helpful?
Thank you for voting!
Kelly
April 3, 2024
The top broiler oven does not get hot. Which part do I need to get heat back up and use the top oven?
For model number NE59J7850WS
Hello Kelly, thank you for getting in touch. Based on our understanding of the issue, we would suggest checking the temperature sensor, part number PS4240743, to solve the problem. Glad to be of assistance!
This oven has two fans that counter rotate. One spins clockwise, the other counterclockwise. Because of this, the motors and the fan blades are different. The schematic shows the counter clockwise rotating fan with a right hand threaded shaft/nut on the bottom and the clockwise motor and fan with the left hand nut on the top. My range
... Read more had the motors in the exact opposite orientation, but the fan blades on the motors as shown on the schematic. The incorrect assembly at the factory (I bought new in the box, so I know this is the first repair) meant that nether fan blade was turning the correct direction. So do yourself a favor, be sure you’re buying the right motor (clockwise or counterclockwise) and be sure you put the right fan blade on the right motor. The Samsung motor ending in F is the counterclockwise motor that has the right hand threaded shaft the clockwise motor with the left hand threaded shaft ends in E.
I took off the back cover after I looked at youtube similar problems. Then removed the little thermostat and un hooked the 2 wires. I looked up the part and after is was delivered couple days later I connected the 2 wies and after putting the back cover on the oven was back to normal. Was such an easy repair and the part was only $11.
I removed the control panel with a Phillips screwdriver and unplugged the burner switch and replaced the new switch and put the control panel back in place and turned on the burner and it worked as it should.i realized that I only would have only had to remove the 4 screws on the bottom of the control panel. All I would have had to do was
... Read more just take those 4 screws out and remove the switch control knob and the two screws that held the switch in. Am very happy with the results