This an authentic OEM 40-Watt replacement light bulb, used in a number of household appliances. It is specially designed to withstand extreme temperatures, which is why these replacement bulbs are mos...
The crisper drawer is clear plastic and is located inside the refrigerator. It is used to store fruits and vegetables at a certain temperature to ensure food will last longer. If your drawer is cracke...
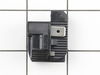
This capacitor (Refrigerator and Freezer Compressor Run Capacitor, Run Capacitor) provides the voltage or energy current required to start the compressor and keep it running. It allows the compressor ...
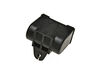
This evaporator fan motor is located in the back of the freezer, and circulates air over the refrigerator coils. These coils will convert the heat into cool air, which is then circulated.
This touch-up paint can be used on a wide variety of household appliances. It is most often used on washers, dryer, refrigerators, dishwashers, ranges, freezers, trash compactors, or microwaves. It is...
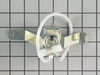
This hinge bracket, also known as a door stop, is attached to the bottom of the door and is used to limit how far the door swings out to protect the refrigerator itself, and any surrounding cabinets f...
This is a replacement crisper drawer for your refrigerator. The drawer is approximately 24 inches long, 11 inches wide, and 12 inches tall. It is made of clear plastic and is sold individually. The cr...
Ask our experts a question about this model and we'll get back to you as soon as possible!
1 question answered by our experts.
Sort by:
< Prev
1
Next >
Search filter:
Clear Filter
Your search term must have 3 or more characters.
Keep searches simple. Use keywords, e.g. "leaking", "pump", "broken" or "fit".
Sorry, we couldn't find any existing answers that matched.Try using some different or simpler keywords, or submit your new question by using the "Ask a Question" button above!
Jay
August 10, 2021
Some days the refrigerator works fine and some days it acts up (freezer defrosts and rest of fridge warm). This is an ongoing cycle now for weeks.
For model number MTB1954EEB02
Hello Jay, Thank you for the question. We suggest testing the Defrost Thermostat. The best way to do this is to remove the thermostat from the refrigerator so you can control the temperature of the sensor. You can let the sensor warm up to room temperature. With the sensor warmed up to room temperature the sensor should read approximately 6.2K Ohms at 68°F. With the thermistor submerged is a glass full of ice water, the sensor should be very close to 32°F which should read approximately 16.3K Ohms. If the values that you are getting are far off from these readings, then the sensor is bad and should be replaced. We hope this helps!
I knew the chances of all the freon leaking out was unlikely so I looked at the wiring to the compressor and there was a capacitor and a starter/overload so i figured I would start there. I went on line and found the parts at this site and they were less than the minimum service call charge for a service tech so I figured what the heck le
... Read moret's give her a shot so I did give it a shot. I ordered the parts and they were there in less time than a service tech could come out and i installed the parts and guess what for 90.00 in parts and 15 minutes in time I repaired my refrigerator. Thanks guys, It took less time to order the parts than it did to make the repair so thanks, your website rocks and is very well designed so my hat is off to you guys!
The reason I repaired it myself was because the repairman that diagnosed the problem.didn't come back in two weeks. The evaporator fan sits behind a vented wall in the freezer and directs cold air into freezer and refrigerator.I removed the ice make assembly first and then the freezer wall held in place by two sheet metal nuts. Then remov
... Read moreed wires from fan motor. Removed the fan blade from fan motor,which was press fitted on,then removed fan motor from bracket assembly(make sure and retain the two vibration rubber washers on back and front of motor. Reinstall new motor with vibration washers and press fan blade on new motor. Install in bracket assemble and reassemnble.
I used a flat-head screwdriver to pop out the old light rocker switch. Then, I unplugged the wires, plugged them into the new light rocker switch, and then popped the new switch into the hole. That's it! Lights began working again.