


Models
>
MDB9601AWQ
MDB9601AWQ Maytag Dishwasher - Overview
Sections of the MDB9601AWQ
[Viewing 3 of 3]
.gif "SUPPLEMENTAL INFORMATION Diagram and Parts List for Maytag Dishwasher")

Manuals & Care Guides for MDB9601AWQ
Click to downloadKeep searches simple, eg. "belt" or "pump".

Accumulator Filter
PartSelect #: PS11749941
Manufacturer #: WPW10192799
This part is essential in your dishes getting clean during the wash cycle. If there is any debris or a tear in the filter, it can cause extra buildup and, therefore, causing dirty dishes.
$136.41
In Stock

Docking Station with Flappers
PartSelect #: PS2340934
Manufacturer #: 6-917647
The docking station is located on the water supply tube at the far back. It provides water to the upper and middle spray arm and also includes the flappers.
No Longer Available

Wash Impeller
PartSelect #: PS11747701
Manufacturer #: WP99002659
This impeller rotates and is used to force water up through to the spray arm.
$64.17
In Stock

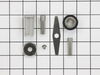
Seal and Chopper Kit
PartSelect #: PS11743074
Manufacturer #: WP6-919539
THE COURSE THREADED SLEEVE IS NLA SO THE KIT SHOULD NOW ONLY HAVE 1 SLEEVE 07/18KC UPGRADE TO NEW MOTOR WHICH CONTAINS SHAFT W10118627 1/14KC
No Longer Available


Drain Pump
PartSelect #: PS2340929
Manufacturer #: 6-917641
The pump ejects the water from the unit.
No Longer Available

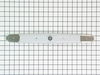
Lower Spray Arm - Shield Included
PartSelect #: PS11743058
Manufacturer #: WP6-917642
This spray arm is located on the lower half of your dishwasher. Water is forced through this spray arm by the unit's pump and motor assembly. The force of the water propels the spray arms, spraying wa...
$84.83
In Stock


Drain Pump Inlet Flapper / Baffle
PartSelect #: PS11743072
Manufacturer #: WP6-919119
This is part of the drain pump and aids with proper draining from the dishwasher.
$7.00
In Stock
Questions And Answers for MDB9601AWQ
We're sorry, but our Q&A experts are temporarily unavailable.
Please check back later if you still haven't found the answer you need.
Common Symptoms of the MDB9601AWQ
[Viewing 5 of 5]Not cleaning dishes properly
Fixed by
these parts
these parts


Show All
Not draining
Fixed by
these parts
these parts


Show All
Leaking
Fixed by
these parts
these parts

Show All
Noisy
Fixed by
these parts
these parts
Show All
Will Not Start
Fixed by
these parts
these parts
Show All


Keep searches simple. Use keywords, e.g. "leaking", "pump", "broken" or "fit".
Dishwasher not draining completely
You have to pull the dishwasher out from underneath the counter and set it on its side. Before removing, I used a shop vac to remove any standing water from inside the dishwasher. Once I pulled out the dishwasher, I then tilted the dishwasher forward to let remaining water fall on the floor, again, using the wet vac for clean up. After
... Read more
it is on its side, I used a socket wrench to remove the one bolt that holds the drain valve on. Then I used a socket wrench to loosen the clamp for the drain hose and removed the hose. You then need to turn the entire drain valve 1/4 of a turn counter-clockwise to remove the old drain valve. Once it is off, remove the bracket from the old drain and attach it to the new drain valve using a phillips screwdriver. Before I reassambled the drain valve, I used my wet vac to remove any debree from where the drain valve connects to the dishwasher. Reverse the prior steps to install new drain valve and install dishwasher back under the counter. I tested the unit before installing the dishwasher back under the counter to insure it fixed the problem. The hardest part about doing this, was actually taking the dishwasher out from under the counter, very easy process in general. One thing I couldn't figure out about my original problem of the water not completely draining out, is why would the drain valve start draining the water then after 20 seconds it would stop? I couldn't find the answer, so I assumed the drain valve is like a 2 stage system and took a chance on replacing the drain valve; it worked.
Read less
Parts Used:

-
Tim from Troy, OH
-
Difficulty Level:Easy
-
Total Repair Time:1- 2 hours
-
Tools:Screw drivers, Socket set
85 of 88 people
found this instruction helpful.
Was this instruction helpful to you?
Thank you for voting!
Maytag quiet series 300 stopped cleaning
Remove the racks top and bottom. The Station D seals are at the far back on the tube that supplies water to the top and middle spray heads. Unsnap the old one and snap in the new - it only goes one way! This will repair the seal aroound the tube that supplies the middle sprayer and restore pressure to all 3 heads. Repalcing the screen acc
... Read more
umulator is harder. you need a torx driver. remove the little thumb nut on the bottom sprayer and remove the sprayer. Then remove the tube where you just replaced the D station. (You of course could have done this earlier if you were doing both repairs) then 6 screws on the impeller housing. Now remove the 1 torx screw on the impeller and pull the impeller up and off. Remove the 3 screws on the cover and 2 screws on the accumulator. Clean all the old food scraps that are clogging up the works and reassemble in reverse order. Washer is working again!!
Read less
Parts Used:


-
mike from woodland hills, CA
-
Difficulty Level:Easy
-
Total Repair Time:15 - 30 mins
-
Tools:Screw drivers
72 of 80 people
found this instruction helpful.
Was this instruction helpful to you?
Thank you for voting!
Dishwasher would fill properly but when wash cycle would start you could not hear any water spraying.
First I removed the lower spray arm by removing the middle retainer nut. Next remove the 3 screws holding the outer shroud in place. Next remove 6 screws holding the water pump top housing in place. Under this housing you will find the impeller which is retained by a screw. Check the impeller closely for cracks especially near the center
... Read more
hex portion of the impeller. Replace if you have any doubt of it's integrity. Next remove the lower pump housing that has the screen material in the center. What I found was the nylon part that attaches to the shaft of the motor was stripped so the impeller would spin in it's normal direction ( counterclockwise) but under the load of water it would not. So I ordered a new impeller and seal kit with a metal sleeve and chooper blade. Follow the instructions provided in the new kit a reassemble accordingly.
Read less
Parts Used:


-
Timothy from Trevor, WI
-
Difficulty Level:Easy
-
Total Repair Time:15 - 30 mins
-
Tools:Pliers, Screw drivers
37 of 41 people
found this instruction helpful.
Was this instruction helpful to you?
Thank you for voting!