This an authentic OEM 40-Watt replacement light bulb, used in a number of household appliances. It is specially designed to withstand extreme temperatures, which is why these replacement bulbs are mos...
$11.73
In Stock
Order within the next 11 hrs and your part ships today!
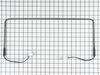
This is a center crisper rail for your refrigerator. This part acts as a support rail for the crisper drawer by holding the center of the crisper frame. You will need to replace this part is if your c...
$50.71
In Stock
Order within the next 11 hrs and your part ships today!
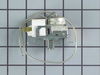
This light switch may also be known as a refrigerator door switch or a light switch kit, and is compatible with your refrigerator. The function of the refrigerator door switch is to turn on the light ...
$27.65
In Stock
Order within the next 11 hrs and your part ships today!
This is a multi-use and multi-appliance screw. It can be used on a microwave, refrigerator, range/oven, air conditioner, dehumidifier, washer, or dryer. The measurements of this screw are 8 x 1/2 inch...
$20.79
In Stock
Order within the next 11 hrs and your part ships today!
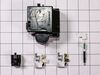
This includes both the run capacitor and the start relay. The capacitor helps the compressor kick on and off while maintaining a constant temperature to keep things frozen in your freezer.
The start ...
$75.94
In Stock
Order within the next 11 hrs and your part ships today!
This is a door handle for your refrigerator or freezer, which allows you to easily open and close the door. Take note that the screws are not included when you order this part; you will need to keep t...
$96.05
In Stock
Order within the next 11 hrs and your part ships today!
This touch-up paint can be used on a wide variety of household appliances. It is most often used on washers, dryer, refrigerators, dishwashers, ranges, freezers, trash compactors, or microwaves. It is...
$8.00
In Stock
Order within the next 11 hrs and your part ships today!
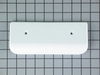
This is a deli drawer glide for the right side of your refrigerator. It allows the deli drawer to glide in and out smoothly. In order to access your glider, you will have to remove drawer and shelf, a...
$11.14
In Stock
Order within the next 11 hrs and your part ships today!
This is a replacement pan glide for your refrigerator. The pan glide can be found attached to the refrigerator shelf, and allows the pan to slide in and out efficiently. If your refrigerator pan will ...
$11.14
In Stock
Order within the next 11 hrs and your part ships today!
This ice cube tray is located inside your refrigerator and is eleven inches long, with 48 molds. It comes in white and is made entirely from plastic. If your tray is broken, cracked, or damaged, repla...
$26.45
In Stock
Order within the next 11 hrs and your part ships today!
Questions And Answers for MBB1952HEW14
Be the first to ask our experts a question about this model!
✖
Ask a Question
Ask our experts a question on this model and we'll respond as soon as we can.
Start by removing the freezer door and inner baskets so you have some space. Next, take out the ice maker by removing the 3 screws that attach it to the side and unplug it from the harness. Then the cover for the thermistor and the fan vent should be popped off carefully leaving the back cover only. The back cover is held on by 4 screw
... Read mores, one in each corner. Remove all 4 screws and carefully loosen the back cover by pulling the top forward and laying it level to pull it out. Behind the cover are the coils and other components. If the coils are covered with ice they should be defrosted by using a blow dryer. Once the ice is clear, the thermostat is located towards the top left clamped onto a copper pipe that circles up and around. Carefully pull it off the pipe and cut the wires making sure you leave enough to reattach the new ones with a butt connector. Strip about 1/4 inch of insulation off the wires and crimp both ends into the butt connector making sure they are tight. Heat shrink is highly recommended. Clamp the new thermostat to the copper pipe where the old one used to be and your almost done. Replace the back cover the opposite of the way it was pulled out by putting it in flat with the bottom part in front. Once it is all the way to where it needs to be, push the top upwards while sliding the bottom downwards, then push it in flat against the back. It can be bent slightly if needed. Put the screws back in that hold it on and replace the plastic covers. Then reinstall the ice maker being sure the hose for the water is correctly positioned so that the water goes into the ice maker. Turn it back on and put the baskets and door back on and you're done.
I used a flat-head screwdriver to pop out the old light rocker switch. Then, I unplugged the wires, plugged them into the new light rocker switch, and then popped the new switch into the hole. That's it! Lights began working again.