


Models
>
MBB1952HEB
MBB1952HEB Maytag Refrigerator - Overview
Models starting with MBB1952HEB
Click on the best match to narrow your results.
Keep searches simple, eg. "belt" or "pump".

Light Bulb - 40W
PartSelect #: PS884734
Manufacturer #: 8009
This an authentic OEM 40-Watt replacement light bulb, used in a number of household appliances. It is specially designed to withstand extreme temperatures, which is why these replacement bulbs are mos...
$11.73
In Stock

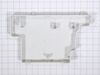
Refrigerator Center Crisper Drawer Slide Rail - White
PartSelect #: PS11757048
Manufacturer #: WPW10671238
This is a center crisper rail for your refrigerator. This part acts as a support rail for the crisper drawer by holding the center of the crisper frame. You will need to replace this part is if your c...
$50.71
In Stock

Refrigerator Door Switch
PartSelect #: PS12728638
Manufacturer #: W11384469
Door switch turns the light off when you close the door.
$38.48
In Stock

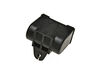
Capacitor
PartSelect #: PS11757023
Manufacturer #: WPW10662129
This capacitor (Refrigerator and Freezer Compressor Run Capacitor, Run Capacitor) provides the voltage or energy current required to start the compressor and keep it running. It allows the compressor ...
$79.16
In Stock

Door Switch
PartSelect #: PS12731166
Manufacturer #: W11396033
This light switch may also be known as a refrigerator door switch or a light switch kit, and is compatible with your refrigerator. The function of the refrigerator door switch is to turn on the light ...
$27.65
In Stock

Screw
PartSelect #: PS12349731
Manufacturer #: W11233072
This is a multi-use and multi-appliance screw. It can be used on a microwave, refrigerator, range/oven, air conditioner, dehumidifier, washer, or dryer. The measurements of this screw are 8 x 1/2 inch...
$20.79
In Stock

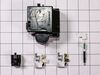
Compressor Start Device and Capacitor
PartSelect #: PS8746522
Manufacturer #: W10613606
This includes both the run capacitor and the start relay. The capacitor helps the compressor kick on and off while maintaining a constant temperature to keep things frozen in your freezer.
The start ...
$75.94
In Stock

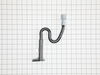
P-Trap Drain Tube Kit
PartSelect #: PS8691807
Manufacturer #: W10619951
The p-trap drain tube kit may also be known as the duck bill, or the drain pipe, and it is compatible with your refrigerator. The function of the p-trap drain kit is to carry the water that has formed...
$39.43
In Stock

Touch-Up Paint - White
PartSelect #: PS385132
Manufacturer #: 72017
This touch-up paint can be used on a wide variety of household appliances. It is most often used on washers, dryer, refrigerators, dishwashers, ranges, freezers, trash compactors, or microwaves. It is...
$8.00
In Stock

Deli Drawer Glide - Right Side
PartSelect #: PS11743441
Manufacturer #: WP67001053
This is a deli drawer glide for the right side of your refrigerator. It allows the deli drawer to glide in and out smoothly. In order to access your glider, you will have to remove drawer and shelf, a...
$11.14
In Stock

Glide - Left Side
PartSelect #: PS11743442
Manufacturer #: WP67001054
This is a replacement pan glide for your refrigerator. The pan glide can be found attached to the refrigerator shelf, and allows the pan to slide in and out efficiently. If your refrigerator pan will ...
$11.14
In Stock

Common Symptoms of models starting with MBB1952HEB
[Viewing 19 of 19]Light not working
Fixed by
these parts
these parts


Show All
Leaking
Fixed by
these parts
these parts

Show All
Fridge too warm
Fixed by
these parts
these parts


Show All
Will Not Start
Fixed by
these parts
these parts
Show All
Freezer section too warm
Fixed by
these parts
these parts

Show All
Fridge and Freezer are too warm
Fixed by
these parts
these parts
Show All
Noisy
Fixed by
these parts
these parts

Show All
Freezer not defrosting
Fixed by
these parts
these parts

Show All
Door won’t open or close
Fixed by
these parts
these parts

Show All
Clicking sound
Fixed by
these parts
these parts
Show All
Frost buildup
Fixed by
these parts
these parts
Show All
Too warm
Fixed by
these parts
these parts
Show All
Ice maker not making ice
Fixed by
these parts
these parts

Show All
Freezer too cold
Fixed by
these parts
these parts
Show All
Fridge runs too long
Fixed by
these parts
these parts
Show All
Not dispensing water
Fixed by
these parts
these parts
Show All
Fridge too cold
Fixed by
these parts
these parts
Show All
Ice maker won’t dispense ice
Fixed by
these parts
these parts
Show All
Won’t start
Fixed by
these parts
these parts
Show All


Keep searches simple. Use keywords, e.g. "leaking", "pump", "broken" or "fit".
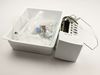
My refrigerator stopped cooling and the freezer section stopped freezing
I knew the chances of all the freon leaking out was unlikely so I looked at the wiring to the compressor and there was a capacitor and a starter/overload so i figured I would start there. I went on line and found the parts at this site and they were less than the minimum service call charge for a service tech so I figured what the heck le
... Read more
t's give her a shot so I did give it a shot. I ordered the parts and they were there in less time than a service tech could come out and i installed the parts and guess what for 90.00 in parts and 15 minutes in time I repaired my refrigerator. Thanks guys, It took less time to order the parts than it did to make the repair so thanks, your website rocks and is very well designed so my hat is off to you guys!
Read less
Parts Used:

-
garth from forest lake, MN
-
Difficulty Level:Really Easy
-
Total Repair Time:15 - 30 mins
-
Tools:Nutdriver, Screw drivers
396 of 476 people
found this instruction helpful.
Was this instruction helpful to you?
Thank you for voting!
Cracked & Snapped Center Crisper Rail
A very easy fix took all of five minutes
Parts Used:

-
Ruth from Roxbury, MA
-
Difficulty Level:Really Easy
-
Total Repair Time:Less than 15 mins
226 of 245 people
found this instruction helpful.
Was this instruction helpful to you?
Thank you for voting!
The refrigerator was not getting cold and the coils were not defrosting.
Start by removing the freezer door and inner baskets so you have some space. Next, take out the ice maker by removing the 3 screws that attach it to the side and unplug it from the harness. Then the cover for the thermistor and the fan vent should be popped off carefully leaving the back cover only. The back cover is held on by 4 screw
... Read more
s, one in each corner. Remove all 4 screws and carefully loosen the back cover by pulling the top forward and laying it level to pull it out. Behind the cover are the coils and other components. If the coils are covered with ice they should be defrosted by using a blow dryer. Once the ice is clear, the thermostat is located towards the top left clamped onto a copper pipe that circles up and around. Carefully pull it off the pipe and cut the wires making sure you leave enough to reattach the new ones with a butt connector. Strip about 1/4 inch of insulation off the wires and crimp both ends into the butt connector making sure they are tight. Heat shrink is highly recommended. Clamp the new thermostat to the copper pipe where the old one used to be and your almost done. Replace the back cover the opposite of the way it was pulled out by putting it in flat with the bottom part in front. Once it is all the way to where it needs to be, push the top upwards while sliding the bottom downwards, then push it in flat against the back. It can be bent slightly if needed. Put the screws back in that hold it on and replace the plastic covers. Then reinstall the ice maker being sure the hose for the water is correctly positioned so that the water goes into the ice maker. Turn it back on and put the baskets and door back on and you're done.
Read less
Parts Used:

-
Cheryl K from Pinellas Park, FL
-
Difficulty Level:A Bit Difficult
-
Total Repair Time:30 - 60 mins
-
Tools:Screw drivers
149 of 167 people
found this instruction helpful.
Was this instruction helpful to you?
Thank you for voting!