This genuine OEM washer has a 3/4 inch outside diameter. This thrust washer can be used on most makes and models of dryers. A complete list of compatible dryers is available below. The washer is found...
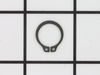
The metal retaining ring, which is under an inch long, holds the rear wheels on the axels of the dryer. The main reason why it would need to replaced is if the retaining ring has sprung out of place o...
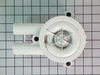
This pump is attached to the motor and helps expel water from the washing machine. It is activated after the spin speed is maintained for a specific period of time.
This hose clamp is used in a wide variety of household appliances. Most often it is found in washers, dishwashers, refrigerators, freezers, dehumidifiers, garbage disposals, or air conditioners. This ...
This is a multi-use and multi-appliance screw. It can be used on a microwave, refrigerator, range/oven, air conditioner, dehumidifier, washer, or dryer. The measurements of this screw are 8 x 1/2 inch...
The hose clamp is used to hold the water hose in place which will prevent the hose from leaking water. Sometimes the clamp may lose its ability to latch on, causing a leaking washer. For the installat...
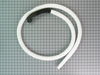
This inlet hose washer, also known as a high pressure inlet hose washer, is used in washing machines, refrigerators, freezers, and dishwashers. The function of this part is to create a watertight seal...
$8.00
In Stock
Questions And Answers for LW8263W2
Be the first to ask our experts a question about this model!
✖
Ask a Question
Ask our experts a question on this model and we'll respond as soon as we can.
VERY EASY!!! SAFETY FIRST-Always unplug the appliance. Use 8mm socket to remove front panel screws. Loosened up two hose clamps connected to the pump and removed both lines (Hoses contain water, use a towel) which is located underneath the motor. Disconnect motor electrical connector on the left side of the motor. With socket, r
... Read moreemove 4 mounting bracket screws that secure the motor and pump assembly. Pull back the tension/idler pulley to loosen belt off the main pulley to the washer drum. Tilt and pull out motor/pump assembly. Underneath the pump, use star-bit to remove the pump from motor assembly to remove the belt. Install new belt on motor pulley (Good time to check for debris or anything restricing free movement of pump) and re-install pump. Install the motor/pump assembly and loosely secure the motor/pump assembly. Place the belt onto the motor pulley and pull back the tensioner/idler pulley to allow slack of belt to be placed on washer drum pulley. Put the belt on the lip of the drum pulley and rotate while pulling back the tensioner/idler pulley until the belt is seated on the groove of the drum pulley. Tighten the motor/pump assembley. Re-attach the 2 hoses and tighten down the clamps. Re-connect the electrical connector to the motor...Don't forget to plug in the washer and secure the front panel...Piece 'O cake, you're done! About 15 minutes to do the job. Much like changing a belt on most vehicles.
Water was leaking on the floor during the wash cycle and especially during draining of the washer. I removed the front panel at ground level and watched while draining after a rinse.
I t was obvious that water was spraying from a hole in the rubber end of the hose (the hose is a fused assembly of a plastic section and a rubber
... Read more section).
So, I finished draining, removed the hose (required pliers to squeeze off a hose clamp).
Upon inspecting the hose, it was also apparent that the hole was caused by rubbing against a support bracket for the motor. This should not happen, but it did because the plastic standoff supposed to keep the hose away from the bracket was installed 180 degrees backwards.
So, I simply replaced the hose and turned the bracket around to the correct orientation.
Everything worked as planned and my repair cost was much less than if I had called someone out.
This is not a bad repair, but give yourself some time. I did not have to take the tranny and motor out, but the inner and outer tub and all related parts had to come out, along with the outer tub base. If you are replacing the tub bearing, you HAVE to order the seal kit. Don't try to skimp like I did, since you will need the seal kit as t
... Read morehis is what causes that bearing to fail in the first place. We forgot how quiet the washer was after I fixed it, and it saved us from buying a new washer since we were ready to say the heck with it and buy a new pair. You might need an 1.5 inch socket to get the big nut off the spindle, but I was able to get with a visegrip and hammer. The nice thing about this repair is even if you screw it up, you won't have water all over the place because of the seal design. I just checked under the washer a few times for the first few weeks and all seems fine.


 – Part Number: WP28808")


 – Part Number: WP28808")

