This is a multi-use and multi-appliance screw. It can be used on a microwave, refrigerator, range/oven, air conditioner, dehumidifier, washer, or dryer. The measurements of this screw are 8 x 1/2 inch...
This is an evaporator fan motor for a refrigerator. The fan motor circulates air through the refrigerator to the fresh food compartment for efficient cooling. It is just over three inches long. It is ...
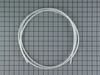
This part supplies water to refrigerator components that require water, such as the ice maker and water dispenser. If you notice a leak coming from your refrigerator, the plastic tubing that feeds you...
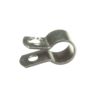
This water hose clamp is used in your refrigerator to support the water tube. If the tubing or hose is working, but is loose inside the unit, the clamp, which is supposed to support it in place, could...
The factory installed fill tube was formed and molded, hard plastic. Nothing like the replacement part or the one depicted in the install instructions.To remove it, I had to grip the exterior water tube module with a pair of Visegrip pliers, twist and pull as hard as possible, to expose a section of fill tube. I then had to cut through th
... Read moree tube with a hacksaw to remove the module and flange that secure it to the access hole. From the inside, I removed the ice maker and fan shield to expose the remaining section of fill tube. Using a section of copper pipe and a hammer, I was able to drive the tube through the back wall of the appliance. Fitting the new tube was easy. However, it is too short to reach the fill cup. I fashioned a section of the old tube to create an extension which I inserted in the new part. And, much to my surprise, it actually works!
First I unplugged the refrigerator. Next item was the ice-maker; remove (3) screws and unplug it from the back wall. Third task is remove the (4) screws that attach the back wall of the freezer compartment. Lift the wall up enough to dislodge the center cooling shaft that the fan rides in and remove the rear wall. The last item is the fa
... Read moren motor which is attached to the freezer wall by (2) screws and (3) wires which are easily removed. Change out the motor and reassemble freezer compartment .
Remove broken cap - easily accomplished without tools. Slide new cap on - again easily accomplished. Refrigerator was and is working well and once again with all shelves in good order for minimal cost and no effort.