This is replacement vent grille or vent grill for your microwave. You will find the grill vent either above or below the microwave door, depending on your model. If your vent grill is discolored or cr...
$54.65
In Stock
Order within the next 12 hrs and your part ships today!
This is a light bulb and it is a part for your microwave. This bulb uses 30 watts, operates on 125 volts, and is an incandescent lamp. The function of this bulb is to illuminate the surface underneath...
$13.94
In Stock
Order within the next 12 hrs and your part ships today!
This is an authentic LG charcoal filter for your microwave, sourced directly from the manufacturer. It is designed to remove odors from the air that circulate through your microwave vent. It measures ...
$41.90
In Stock
Order within the next 12 hrs and your part ships today!
This bracket holds the metal or plastic flapper that closes off the exhaust duct when the fan is not running and opens when the fan turns on. If the exhaust fan on your microwave does not appear to be...
$21.24
In Stock
Order within the next 12 hrs and your part ships today!
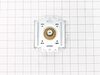
This mounting plate is a manufacturer-approved replacement part for your microwave. The mounting plate, or bracket, secures your above-range microwave in place against the wall. To conduct this repair...
$15.86
In Stock
Order within the next 12 hrs and your part ships today!
This magnetron in your microwave creates the radiation needed for cooking or warming your food. It is located inside the main cavity, typically near the transformer or waveguide. When the magnetron be...
$180.80
In Stock
Order within the next 12 hrs and your part ships today!
Usually found kitchen appliances, this OEM-certified diode cable assembly helps to convert power from the transformer to the magnetron, to heat up your food. A damaged cable assembly will cause your a...
$23.74
In Stock
Order within the next 12 hrs and your part ships today!
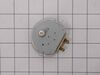
If the turntable on your microwave does not rotate, or you can hear a grinding noise, the problem may be with the motor. The motor is typically located below the floor of the oven, and is accessed thr...
$24.85
In Stock
Order within the next 12 hrs and your part ships today!
We're sorry, but our Q&A experts are temporarily unavailable.
Please check back later if you still haven't found the answer you need.
4 questions answered by our experts.
Sort by:
< Prev
1
Next >
Search filter:
Clear Filter
Your search term must have 3 or more characters.
Keep searches simple. Use keywords, e.g. "leaking", "pump", "broken" or "fit".
Sorry, we couldn't find any existing answers that matched.Try using some different or simpler keywords, or submit your new question by using the "Ask a Question" button above!
Kandi
9 days ago
This is only show the charcoal filter on this website. We need the filters underneath as well. Can you tell me which ones those are please?
For model number LMHM2237BD
Hi Kandi, thank you for reaching out. The filters you are looking for are the grease filters, part number PS12713651. If you need help placing an order, customer service is open 7 days a week!
Backside of door screw holes, the plastic has broken away. added washers to hold screws in place. Does LG sell replacement door?
For model number LMHM2237BD
Hello Tess, thank you for your inquiry. The full door assembly for your model is part number PS12114824. If you need help placing an order, customer service is open 7 days a week!
Hello Andrea, thank you for your inquiry. According to our research, the issue is most probably with the control panel. The control panel for your model comes along with the door assembly, part number PS11708936. We would recommend replacing it. Glad to be of help!
Unit was making rubbing, grinding noise. I shut off turntable but it still made the noise. Unit worked but didn't heat tea water as hot as usual. Finally the Unit shut down. No power at all. I checked the breaker not tripped. It's unplugged now.
For model number LMHM2237BD
Hello Michael, thank you for getting in touch. Based on our understanding of the issue, we would suggest checking the line fuse, part number PS3522743, to solve the power outage issue. You may also need to check the stirrer motor, part number PS3529203, to solve the noise and the heat issue. We hope this helps.
Repair was easy but you have to remove the screw at the top of the microwave (top left) in order to secure the far left tab with the hole in the tab. Place the grille in place, push to the left and then secure the screw you removed. Just remember that the mounted screw will need to be removed the next time you need access in order to repl
... Read moreace the charcoal filter.
Over the stove microwave installed in top cabinet row. 1. Unplug device. 2. Two people to remove from wall/cabinet (remove two, large, top mounting screws and rotate entire microwave down and off the wall mount). Should be some wood spacers between top of device and bottom of cabinet. 3. Remove screws from sheet metal cover
... Read more. 4. Remove one screw holding blowers in place and rotate out of the way, in order to gain access to 2 of 5 screws that hold the magnetron in place. 5. Unplug magnetron and remove the 5 screws. 6. Drop in new magnetron and re-assemble microwave in reverse order (steps 5-3). 7. Two people restore micro to wall/cabinet. Replace wood spacers, re-install two, large mounting screws (finger-tight). Test device. Secure the two large screws.
Unplug the microwave. Remove the Philips head and safety Torx head screws along the bottom of the sides and rear of the microwave which hold the black cover on. Lift the cover up at the rear and slide it backwards to disengage the tabs on the front top. Remove the cover. Discharge the capacitor by shorting the terminals to each other
... Read moreand then ground. Do this with a well insulated object and be aware there may be a pop when you do this. Keep hands, etc. on the insulated part of the object (screwdriver handle, etc). There's a lot of stored energy in that capacitor. I'd advise first checking the diode to make sure its not bad. Replace it if it is. The Magnatron is held in with a couple of screws on the top and sides. Unplug the connector and remove the screws. Remove the Magnatron. Installation is the reverse of removal.


 – Part Number: 6851W1A002E")