Enter the code DIYDAD10 at checkout to apply your discount. Discount will be applied at checkout when the code is entered & applies to all parts. Cannot be combined with any other coupon or special offer & cannot be applied to a previously placed order. Not valid toward tax or shipping & handling. Discount has no cash value. Discount expires on June 17 at 11:59pm EST.
You've Got 10% Off Your First Order!Save 10% with code at checkout *click to copy coupon code
This part connects the wire harness to the surface element and is used for ranges. The kit includes interchangeable mounting brackets, ceramic wire nuts, heat shrink protective tubing, and wires. If y...
$16.24
In Stock
Order within the next 12 hrs and your part ships today!
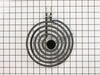
The range surface element provides heat to the cooking surface on top of the range. The element has a universal plug, is 8 inches in diameter, spans 5 coils in width and reaches 2600 watts. Before you...
$20.43
In Stock
Order within the next 12 hrs and your part ships today!
This part is sold individually. This is a part for your stove top. The surface element is what your cookware sits on. The element supplies heat at varying temperatures. This may need to be replaced if...
$35.48
In Stock
Order within the next 12 hrs and your part ships today!
This is a burner switch kit, also known as the surface element control switch repair kit, for ranges. This burner switch kit sends voltage to the surface element coil and it controls the stove top sur...
$40.22
In Stock
Order within the next 12 hrs and your part ships today!
I followed the directions by clipping wires to old burner socket, splicing the wires to new terminal block, screwing down new "block bracket," and plugging in new burner.
Most of the job is simple fastener mechanics. Use a nut driver or Phillips screwdriver. Remove rear panel.
Pull out control knob. If it is stuck, wrap a small rag around the back of it and pull the rag steadily.
Carefully match marked terminals on the replacement switch with those on original. Switch terminals
... Read moremay not be in the same location. Replace wires one for one, one at a time.
Carefully select the correct knob filler for the switch post. Several are supplied. Proceed with logic and measure the shaft length and the filler length and type to match.
was more of a job of splicing wires together than anything else. Loved the heat shrink electrical tubing to put over the wires for insulation. used a hair dryer. must buy more of that amazing stuff