


Models
>
KECC508MBL00
KECC508MBL00 KitchenAid Cooktop - Overview
Sections of the KECC508MBL00
[Viewing 1 of 1]
Manuals & Care Guides for KECC508MBL00
Click to downloadInstall
Installation Instructions
(0.34MB)
Install
Installation Instructions
(1.91MB)
Manual
Owner's Manuals
(0.7MB)
Manual
Owner's Manuals
(2.48MB)
Specs
Product Specifications Sheet
(0.05MB)
Keep searches simple, eg. "belt" or "pump".


Cooktop Cleaner
PartSelect #: PS3492527
Manufacturer #: W10355051
This bottle of non-abrasive cooktop cleaner breaks down and gets rid of the hardest baked-on stains and residue without causing any harm to your appliance. The bottle is 10 oz and does not require a l...
$17.76
In Stock

Screw
PartSelect #: PS11740977
Manufacturer #: WP3196163
This screw is sold individually.
$8.04
In Stock


Hex Nut
PartSelect #: PS11738304
Manufacturer #: WP112432
This 10-32-inch hex nut works with multiple appliances in your home as a fastener. This specific model is sold individually. Hex nuts usually have 6 even sides and together they are used with bolts an...
$8.04
In Stock

Main Power Terminal Block
PartSelect #: PS11745232
Manufacturer #: WP8203546
Sold individually.
$24.59
In Stock


Surface Element - 1200W RF - Liner OR lower
PartSelect #: PS11745655
Manufacturer #: WP8285230
$161.77
Special Order
Questions And Answers for KECC508MBL00
We're sorry, but our Q&A experts are temporarily unavailable.
Please check back later if you still haven't found the answer you need.
Common Symptoms of the KECC508MBL00
[Viewing 2 of 2]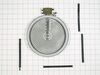


Keep searches simple. Use keywords, e.g. "leaking", "pump", "broken" or "fit".
Range element shorted out
I priced a new two-burner unit and it was going to cost $300. I took the broken unit apart, saw that it was an element that had suffered catastophic failure and found partselect on the internet. $60 and three days later I had the part in hand. The repair was "a piece of cake." Thanks for saving me a lot of money.
Parts Used:
-
Dennis from Seattle, WA
-
Difficulty Level:Really Easy
-
Total Repair Time:Less than 15 mins
-
Tools:Nutdriver
13 of 28 people
found this instruction helpful.
Was this instruction helpful to you?
Thank you for voting!
large element failed
Easy removal (lift and pull) of the the two element unit from the Jenn-air stove top. Placed unit right side up on a work surface. used a nut driver to remove 12 screws from the unit. removed the glass cook-top, revealing the two elements. Un-hooked two wires off the old damaged element, placed wires (plug and play) onto the new unit, th
... Read more
en replaced the glass cook-top, used the nut driver to replace the 12 screws. Pluged the unit back into the Jenn-air stove top.
Read less
Parts Used:
-
Charles from Mamaroneck, NY
-
Difficulty Level:Really Easy
-
Total Repair Time:Less than 15 mins
-
Tools:Nutdriver
13 of 28 people
found this instruction helpful.
Was this instruction helpful to you?
Thank you for voting!
Electric coil burned
The repair was easy but the replacement coil had 4 connections while the old one had only two. After calling the distributor with no explanation of how to solve the problem I was given a telephone number of Jenn Air. They explained that my unit was too old and they no longer provided the part I needed.
I then decided to do the follow ... Read more ing. Of the 4 connections on the replacement coil, two are larger and two are smaller. I then decided to connect the wires to the two larger connections leaving the small ones free. I replaced the cooktop and WOW it worked. Not sure what the smaller connectors are used for but with old cooktops it seems they are not needed.
I can submit a photo but have no means to do it here
Read less
Parts Used:
-
George from LEXINGTON, MA
-
Difficulty Level:Really Easy
-
Total Repair Time:30 - 60 mins
-
Tools:Nutdriver, Pliers
4 of 4 people
found this instruction helpful.
Was this instruction helpful to you?
Thank you for voting!