Models > KECC507RSS06

KECC507RSS06 KitchenAid Cooktop - Overview

Sections of the KECC507RSS06

[Viewing 2 of 2]

Manuals & Care Guides for KECC507RSS06

Click to download
Keep searches simple, eg. "belt" or "pump".
Element with Limiter 6 Inch - 1200W – Part Number: W10823711
Element with Limiter 6 Inch - 1200W
★★★★★
★★★★★
(14)
PartSelect #: PS11764915
Manufacturer #: W10823711
This is a radiant surface element with limiter, and it works in conjunction with your range. The function of this part is to give heat to the surface directly above it, on cooking area stove top.This ...
$220.32
  In Stock
Terminal Block – Part Number: WPW10245259
Terminal Block
★★★★★
★★★★★
(17)
PartSelect #: PS11750972
Manufacturer #: WPW10245259
This part is for oven ranges, it connects individual wires and protects the device from electrical surges, voltages, and current. With this part, the house power is connected to the range wire harness...
$34.09
  In Stock
Screw – Part Number: W10491985
Screw
★★★★★
★★★★★
(4)
PartSelect #: PS3651485
Manufacturer #: W10491985
Sold individually.
$8.04
  In Stock
Radiant Surface Burner Element 1500W – Part Number: W10823699
Radiant Surface Burner Element 1500W
★★★★★
★★★★★
(3)
PartSelect #: PS11764909
Manufacturer #: W10823699
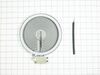
This surface element is made for under glass set-ups and supplies the heat to a cooking area on top of the range. It has an outside diameter of approximately 7 inches (1500 watts), and is a genuine OE...
$106.72
  In Stock
Screw – Part Number: WP3196557
Screw
PartSelect #: PS11740992
Manufacturer #: WP3196557
Sold individually.
$7.76
  In Stock
Nut – Part Number: WP7103P027-60
Nut
PartSelect #: PS11743919
Manufacturer #: WP7103P027-60
$5.36
  In Stock
Control Knob - Black – Part Number: WP8286096BL
Control Knob - Black
PartSelect #: PS11745703
Manufacturer #: WP8286096BL
This knob is sold individually.
$29.24
  In Stock
Infinite Switch - Triple Element – Part Number: WP9763765
Infinite Switch - Triple Element
PartSelect #: PS11747410
Manufacturer #: WP9763765
$208.52
  Special Order
Cooktop Mounting Bracket & Screw – Part Number: 8186533
Cooktop Mounting Bracket & Screw
PartSelect #: PS1486367
Manufacturer #: 8186533
$52.36
  Special Order
Screw – Part Number: WP7101P309-60
Screw
PartSelect #: PS11743911
Manufacturer #: WP7101P309-60
Sold individually.
$5.36
  Special Order
Screw – Part Number: WP486754
Screw
PartSelect #: PS11742701
Manufacturer #: WP486754
Sold individually.
$8.04
  In Stock
SEAL-SWTCH – Part Number: 3183956
SEAL-SWTCH
PartSelect #: PS338210
Manufacturer #: 3183956
$35.56
  Special Order

Questions And Answers for KECC507RSS06

Be the first to ask our experts a question about this model!

Common Symptoms of the KECC507RSS06

[Viewing 4 of 4]
Element will not heat
Fixed by
these parts
Fixing Fixing Fixing
Show All
Will Not Start
Fixed by
these parts
Fixing Fixing
Show All
Little to no heat when baking
Fixed by
these parts
Fixing
Show All
Touchpad does not respond
Fixed by
these parts
Fixing
Show All
Keep searches simple. Use keywords, e.g. "leaking", "pump", "broken" or "fit".
Right rear burner went bad
Turned the breaker off, I removed 2 screws securing the range top to the range, opened the top and secured it in the up position, Removed the 2 screws securing the element ,one at a time I swapped the quick connectors from the old element to the new and repeated the process in reverse. I save over $100.00 in labor, plus most companies get you for a trip charge. It was easy!!
Parts Used:
Element with Limiter 6 Inch - 1200W
  • Mark from Loxahatchee, FL
  • Difficulty Level:
    Really Easy
  • Total Repair Time:
    15 - 30 mins
  • Tools:
    Nutdriver, Screw drivers
144 of 163 people found this instruction helpful.
Was this instruction helpful to you?
Thank you for voting!
Hot Burner Light always on
Thermal switch is integral to element and can not be changed, must replace entire element.

Turn off power. Removed front two screws above oven door jamb and lifted the top. Removed the bracket that holds the element against the glass top and removed the element. Moved brackets from old element to new one, aligning to same numerical position and then moved wiring to new element. Slide new element under bracket and reinstalled single screw. Replaced top and screwed down. Turn on power and test .
Parts Used:
Element with Limiter 6 Inch - 1200W
  • Gregory from Cary, NC
  • Difficulty Level:
    Really Easy
  • Total Repair Time:
    15 - 30 mins
  • Tools:
    Screw drivers
106 of 148 people found this instruction helpful.
Was this instruction helpful to you?
Thank you for voting!
Burned terminal block and filter board
Removed and replaced above named parts, rewired.Be sure to tighten all nuts that secure wires. I believe this is what caused the problem.
Parts Used:
Terminal Block
  • Joseph from Decatur, GA
  • Difficulty Level:
    Easy
  • Total Repair Time:
    30 - 60 mins
  • Tools:
    Nutdriver, Screw drivers, Socket set, Wrench set
90 of 192 people found this instruction helpful.
Was this instruction helpful to you?
Thank you for voting!