


Models
>
JVM1640CJ03
JVM1640CJ03 General Electric Microwave - Overview
Sections of the JVM1640CJ03
[Viewing 7 of 7]


Manuals & Care Guides for JVM1640CJ03
Click to downloadKeep searches simple, eg. "belt" or "pump".

FUSE
PartSelect #: PS1481237
Manufacturer #: WB27X10928
This ceramic microwave fuse is just over an inch in length. It is white in the center, and metal on both ends. This is a 20-amp fuse, and is used to power your microwave. If the touch pad on the micro...
$10.58
In Stock

Grease Filter
PartSelect #: PS228066
Manufacturer #: WB06X10359
Sold individually. Most microwaves require 2.
$54.19
In Stock

Glass Turntable Tray
PartSelect #: PS1016243
Manufacturer #: WB49X10176
This tray rotates in your microwave ensuring more even temperatures.
$88.85
In Stock

Light Bulb
PartSelect #: PS1481517
Manufacturer #: WB36X10328
Sold individually. Appliance may take 2.
$26.65
In Stock

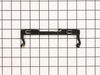
EXHAUST ADAPTER
PartSelect #: PS12709817
Manufacturer #: WB02X32715
This is the replacement damper bracket for your microwave. It is made of plastic and is approximately 11 inches wide and 3 inches long. The damper bracket attaches to the outer cabinet and directs air...
$8.54
In Stock

Door Latch
PartSelect #: PS952070
Manufacturer #: WB02X11096
Used to keep the microwave door closed during operation.
$10.42
In Stock

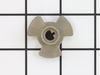
Rotating Ring
PartSelect #: PS1019285
Manufacturer #: WB06X10689
This part sits underneath the glass turntable tray.
No Longer Available

Plastic Rivet
PartSelect #: PS222397
Manufacturer #: WB01X10055
This part is the replacement plastic rivet, or stirrer fan cover clip for your microwave. It is made of white plastic and is approximately ¼ inch in diameter, and ½ inch long. The plastic rivet holds ...
$9.49
In Stock

Charcoal Filter
PartSelect #: PS783520
Manufacturer #: WB02X10943
It is recommended to replace this filter yearly.
No Longer Available

Damper
PartSelect #: PS952387
Manufacturer #: WB06X10565
This vent damper is a manufacturer-approved replacement part for your above-range microwave. This part helps vent air from the microwave to the exterior of your home, and helps keep exterior wind out ...
$15.99
In Stock

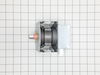
Microwave Magnetron
PartSelect #: PS12722595
Manufacturer #: WB26X32629
Genuine OEM magnetron for your microwave. Always use proper safety equipment and follow the manufacturers instructions while installing.
$199.77
In Stock

Questions And Answers for JVM1640CJ03
We're sorry, but our Q&A experts are temporarily unavailable.
Please check back later if you still haven't found the answer you need.
Sort by:
- < Prev
- 1
- Next >
Search filter:
Clear Filter
Your search term must have 3 or more characters.
Keep searches simple. Use keywords, e.g. "leaking", "pump", "broken" or "fit".
Sorry, we couldn't find any existing answers that matched.Try using some different or simpler keywords, or submit your new question by using the "Ask a Question" button above!
James
February 8, 2020
What cubic foot is this micro-wave?
For model number JVM1640CJ03
Hello James,
Thank you for your question. Your model JVM1640CJ03 has 1.6 cu ft for its total capacity. We hope this helps.
3 people found this helpful.
Was this helpful?
Thank you for voting!
Bernsrd
October 30, 2023
What are the exterior dimensions?
For model number JVM1640CJ03
Hello Bernsrd, thank you for your inquiry. The exterior dimensions of your model are: 16 3/16 H x 29 7/8 W x 15 5/32 D. We hope this information helps!
1 person found this helpful.
Was this helpful?
Thank you for voting!
- < Prev
- 1
- Next >
Common Symptoms of the JVM1640CJ03
[Viewing 5 of 5]No heat
Fixed by
these parts
these parts


Show All
Won’t turn on
Fixed by
these parts
these parts


Show All
Touchpad does not respond
Fixed by
these parts
these parts
Show All
Door not closing properly
Fixed by
these parts
these parts
Show All
Tray won’t turn
Fixed by
these parts
these parts


Show All

Keep searches simple. Use keywords, e.g. "leaking", "pump", "broken" or "fit".
Microwave completely stopped working
Turned out the issue was easily solved by replacing a single, inexpensive fuse.
First off, UNPLUG THE MICROWAVE.
The fuse is located under the plastic grill at the top of the microwave. It's held on by two screws. Once you've removed the screws and taken off the plastic grill, you go to the right side of the mic ... Read more rowave and remove another screw that holds a small metal grill in place. Removing the small metal grill is probably the toughest part of this repair. You kind of have to rock it back and forth a bit to get it to release. Once that's off, you can get to the fuse. I removed the burnt out one with a pair of needle nose pliers. I also put a small piece of cardboard under the fuse when I did this so I didn't accidentally drop it into the innards of the microwave. I did the same thing when I replaced the new fuse. I then plugged the appliance back in and made sure it worked. Once that was confirmed, I replaced both grills.
Read less
Parts Used:
-
Kim from Cliffside Park, NJ
-
Difficulty Level:Really Easy
-
Total Repair Time:15 - 30 mins
-
Tools:Screw drivers
953 of 1228 people
found this instruction helpful.
Was this instruction helpful to you?
Thank you for voting!
No power to microwave, no heating.
Unpluged power cord!! Removed front control panel to expose electronics (need to remove top horizontal vent cover to expose mounting hardware). Unplugged leads to control panel board. Removed magnetron with Tstat (3- phillip heads, need stubby). Installed new parts and control panel, plugged it in tested. Done.
Parts Used:
-
Michael from Coulterville, CA
-
Difficulty Level:A Bit Difficult
-
Total Repair Time:30 - 60 mins
-
Tools:Screw drivers
47 of 79 people
found this instruction helpful.
Was this instruction helpful to you?
Thank you for voting!
I diagnosed the problem incorrectly: based on a previous repair.
-
Ralph from Brandon, FL
-
Difficulty Level:Easy
-
Total Repair Time:Less than 15 mins
-
Tools:Pliers, Screw drivers
64 of 136 people
found this instruction helpful.
Was this instruction helpful to you?
Thank you for voting!