


Models
>
JP5030SJ1SS
JP5030SJ1SS General Electric Cooktop - Overview
Sections of the JP5030SJ1SS
[Viewing 1 of 1]
Keep searches simple, eg. "belt" or "pump".

ELEMENT RADIANT 9 Inch DUAL
PartSelect #: PS11729126
Manufacturer #: WB30X24111
This is a dual ceramic surface burner for ranges. This burner, also known as a heating element, is used within electric ranges to act as a stovetop burner. This burner measures approximately 10 inches...
$131.74
In Stock


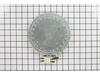
Foam Rubber Tape
PartSelect #: PS11726663
Manufacturer #: WB02X26088
This is foam tape and it is usually used in conjunction with your range, specifically on the cooktop. Its purpose is to help seal the edges of the cook top to the counter top. Another of its functions...
$39.82
In Stock


SPRING RADIANT ELEMENT
PartSelect #: PS16542086
Manufacturer #: WB09X40389
This part is the replacement spring for the radiant element in your range. It is black in color, curved in shape, and is approximately 1 inch by 1/2 an inch. The radiant element spring is found beneat...
$8.06
In Stock


Cerama Bright Cooktop Cleaner
PartSelect #: PS783497
Manufacturer #: PM10X310
This is a 28 oz bottle of Cooktop Cleaner.
$18.28
In Stock


Trim Assembly
PartSelect #: PS11758938
Manufacturer #: WB07X25210
Stainless Steel genuine OEM part
$64.17
In Stock


Questions And Answers for JP5030SJ1SS
We're sorry, but our Q&A experts are temporarily unavailable.
Please check back later if you still haven't found the answer you need.
Common Symptoms of the JP5030SJ1SS
[Viewing 1 of 1]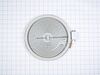


Keep searches simple. Use keywords, e.g. "leaking", "pump", "broken" or "fit".
Element out LF
Unplug stove.2 screws out ,lift top ,disconnect bad element, connect new element, put top down .2 screws in .plug stove back in...EASY PEASY
Parts Used:
-
Brian from HAGERSTOWN, MD
-
Difficulty Level:Very Easy
-
Total Repair Time:Less than 15 mins
-
Tools:Pliers, Screw drivers
8 of 12 people
found this instruction helpful.
Was this instruction helpful to you?
Thank you for voting!
Replaced radiant burner element glass top range
First; turn off breaker to stove.
Second; remove two Phillips head screws that hold the top on, located in front, underneath, will have to open the oven door to see.
Third; prop the top up.
Four; disconnect wire clips of old element.
Five; plug in new wire clips of new element.
Six; unprop the top and realign ... Read more the top.
Seven; replace the two Phillips head screws to secure the top, then close oven door.
Eight; turn breaker back on.
Done and Back in Action! You Can Do This!
Read less
Parts Used:
-
Denise from SENECAVILLE, OH
-
Difficulty Level:Really Easy
-
Total Repair Time:15 - 30 mins
-
Tools:Nutdriver, Screw drivers
4 of 5 people
found this instruction helpful.
Was this instruction helpful to you?
Thank you for voting!
Burner burned out
YouTube to review, had 1 person hold stove top for ease. Simple repair
Parts Used:
-
John from TABERNACLE, NJ
-
Difficulty Level:Very Easy
-
Total Repair Time:Less than 15 mins
-
Tools:Screw drivers
3 of 3 people
found this instruction helpful.
Was this instruction helpful to you?
Thank you for voting!