The broil element is located at the top of the oven and gives off heat in order to bake evenly. If you notice that the element is not heating up or is not cooking evenly it could be because it is brok...
This light bulb lens covers the interior light bulb in an oven, range, or stove. No tools are necessary to replace this part. Simply slide off the wire bracket to remove the existing light bulb lens. ...
This large broiler pan is found in the bottom of your oven and is used to catch drippings from broiling foods. This part includes the grate and bottom pan and is made of porcelain. The grate measures ...
These are replacement screws designed to fit your range. They are made of metal and are approximately ¼ inch long. They come in a package of 12. These are OEM parts sourced directly from the manufacturer.
Successful repair to Our GE range, manufactured prior to 1965 (when installed in house). Pulled range from wall, unplugged, removed burned-out broiler element. Previous check with GE to make cross reference of range part number to Part-select part number for this nearly 50-year-old range. Obtained new part and installed. Works. Range has
... Read moreself-cleaning oven, accidentally destroyed thermal switch attached to element mounting bracket, difficulty with frozen mounting nut. Self-cleaning still works; thermal switch locks out a solenoid which defeats door latch; prevents premature opening of oven door when oven too hot to open safely. Internet search did not find GE part but there are generic devices of the same type available; will consider installation later.
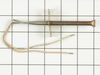
After ordering the proper part with the help of the phone customer service tech, I moved the stove from the wall, unclipped the connector, removed the two screws holding the sensor in place, and removed it. Reversed the above to put it back, and the oven holds perfect temperature.
We took out the philips screws on the right and left side of inside of the oven and two hex head screws on the clip on the top of the oven in the front. Then using a slot screw driver pryed the oven liner out enough to remove old gasket and replace the new gasket. We did see in some online directions that we were suppose to remove enti
... Read morere oven from cabinet and loosen bolts in the back. But, we were able to get enough space to get the old gasket out and new one installed. We did use a 1/4" thick piece of wood on face of oven to prevent any denting of oven when prying out the liner of the oven.