Models > JEM31GYC002

JEM31GYC002 General Electric Microwave - Overview

Sections of the JEM31GYC002

[Viewing 1 of 1]
Keep searches simple, eg. "belt" or "pump".
Primary Door Interlock Switch – Part Number: WB24X10047
Primary Door Interlock Switch
★★★★★
★★★★★
(18)
PartSelect #: PS237015
Manufacturer #: WB24X10047
This interlock switch is located in the door latch.
$33.44
  In Stock
Rectangle Glass Tray – Part Number: WB48X194
Rectangle Glass Tray
★★★★★
★★★★★
(1)
PartSelect #: PS249692
Manufacturer #: WB48X194
  No Longer Available
Lock Button – Part Number: WB06X10126
Lock Button
★★★★★
★★★★★
(4)
PartSelect #: PS227841
Manufacturer #: WB06X10126
  No Longer Available
Ceramic Fuse - 15 Amp – Part Number: WB27X7
Ceramic Fuse - 15 Amp
PartSelect #: PS240270
Manufacturer #: WB27X7
$11.36
  In Stock
Magnetron – Part Number: WB27X10017
Magnetron
PartSelect #: PS239126
Manufacturer #: WB27X10017
This magnetron uses electrical and magnetic currents in order to create an intense heat output.
$259.96
  In Stock
Capacitor – Part Number: WB27X10011
Capacitor
PartSelect #: PS239120
Manufacturer #: WB27X10011
The capacitor is an electric circuit element that is used to store charge temporarily.
$112.83
  In Stock
PIN FOOT – Part Number: WB6X139
PIN FOOT
PartSelect #: PS254954
Manufacturer #: WB6X139
$4.49
  Special Order
DISCONTINUED – Part Number: WB6X138
DISCONTINUED
PartSelect #: PS254953
Manufacturer #: WB6X138
  No Longer Available
SMARTBOARD – Part Number: WB27X10076
SMARTBOARD
PartSelect #: PS239190
Manufacturer #: WB27X10076
  No Longer Available
Assembly WIRE HARNESS-S – Part Number: WB18X10030
Assembly WIRE HARNESS-S
PartSelect #: PS233499
Manufacturer #: WB18X10030
$28.69
  Special Order
SUPT HINGE – Part Number: WB1X1497
SUPT HINGE
PartSelect #: PS234644
Manufacturer #: WB1X1497
$6.05
  Special Order
SCRN Door FILM – Part Number: WB55X931
SCRN Door FILM
PartSelect #: PS251829
Manufacturer #: WB55X931
$26.48
  Special Order

Questions And Answers for JEM31GYC002

Be the first to ask our experts a question about this model!

Common Symptoms of the JEM31GYC002

[Viewing 4 of 4]
Won’t turn on
Fixed by
these parts
Fixing Fixing
Show All
No heat
Fixed by
these parts
Fixing Fixing
Show All
Doesn’t shut off
Fixed by
these parts
Fixing
Show All
Tray won’t turn
Fixed by
these parts
Fixing
Show All
Keep searches simple. Use keywords, e.g. "leaking", "pump", "broken" or "fit".
Unit worked fine except it would not heat
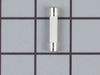
Had to take unit off wall and disassemble the main casing.then disconnected the wires from the magnetron.took the mounting nuts off but wasn't able to remove the magnetron until I loosened the transformer out of the way .Then it came out easy.Installed the magnetron ,tightened the nuts,installed the transformer back in, connected the the wires back on and installed the casing on ,screwed the screws and got help to install the unit to the wall again.....Tested the unit before putting back on the wall to make sure it heated....The parts were exac same type and wasn't too hard to do...
Parts Used:
Magnetron
  • Roy from Colorado Springs, CO
  • Difficulty Level:
    A Bit Difficult
  • Total Repair Time:
    30 - 60 mins
  • Tools:
    Screw drivers, Socket set
86 of 92 people found this instruction helpful.
Was this instruction helpful to you?
Thank you for voting!
Oven wouldn't heat
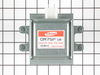
Over the range microwave. Replaced magnetron. Completely disassemble the case top and bottom.
Remove screws from bottom of HV transformer. Magnetron will not clear without this removal.

Remove nuts with socket from top of Magnetron. Remove thermo unit from old magnetron and attach it to new. Replace and bolt down Mag. Replace and screw in HV transformer. Make sure all wires are reconnected.

Put it back up on the wall. Took about three hours from taking it down from wall and putting it back up.
Parts Used:
Magnetron
  • CARTER from OXNARD, CA
  • Difficulty Level:
    Difficult
  • Total Repair Time:
    More than 2 hours
  • Tools:
    Nutdriver, Screw drivers, Socket set
36 of 37 people found this instruction helpful.
Was this instruction helpful to you?
Thank you for voting!
oven wouldn't heat
1. remove microwave from wall
2. remove cover (many screws)
3. remove nuts holding magnetron in place (4)
4. remove magnetron (this is a pain due to the plastic molding used to direct cooling air through the magnetron
5. get new magnetron in place (this was even more fun to find the right angles to tilt to get the magnetron to fit
6. re-tighten the 4 nuts on the magentron
7. put the cover back on
8. put the unit back on the wall.

bonus repair: the display flickered while the magnetron was on (cooking ) prior to the magnetron dying. found a ribbon cable on the control board to the display with an aluminum foil shield that had peeled off (adhesive failure). re-installing the aluminum shield with packaging tape, and the display no longer flickers
Parts Used:
Magnetron
  • david from elmira, NY
  • Difficulty Level:
    A Bit Difficult
  • Total Repair Time:
    1- 2 hours
  • Tools:
    Screw drivers, Wrench set
43 of 58 people found this instruction helpful.
Was this instruction helpful to you?
Thank you for voting!