


Models
>
JEA7000ADS
JEA7000ADS Jenn-Air - Overview
Models starting with JEA7000ADS
Click on the best match to narrow your results.
Exact Part matches for your search term
[Viewing 1 of 1]
Cartridge 4 Spades - Stainless Steel
This part number matches the current model number JEA7000ADS
PartSelect #: PS8769936
Manufacturer #: JEA7000ADSA
This part has an end plug in.
$312.10
In Stock
Keep searches simple, eg. "belt" or "pump".

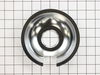
Drip Bowl - Chrome - 8 Inch
PartSelect #: PS2079053
Manufacturer #: 715878
This is a drip bowl, and it is used in conjunction with your range. The function of this part is to sit underneath your stove top burner element. This will allow the bowl to catch any spills that fall...
$13.66
In Stock

Drip Bowl - 6 Inch
PartSelect #: PS1854703
Manufacturer #: 715877
The drip bowl is found under the 6-inch burner on your range. This square chrome stove top drip pan is intended for use with electric ranges. It has a 2-inch inner hole diameter and 7-inch outer diame...
$8.39
In Stock

Surface Burner Receptacle Kit
PartSelect #: PS1570190
Manufacturer #: 12001676
The tools you will need to replace the surface burner receptacle kit on your range include a Phillips screw driver, and a pair of wire strippers. Before doing this repair, make sure to disconnect your...
$13.91
In Stock

Standard Y-Frame Range Surface Burner
PartSelect #: PS11743366
Manufacturer #: WP660532
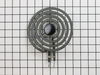
The standard y-frame surface burner provides heat to your range. If you notice that your element will not heat, you may need to replace your surface burner. This product is 6 inches in diameter, and 1...
$30.15
In Stock

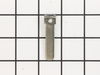
Cartridge Male Contact Spade
PartSelect #: PS1988157
Manufacturer #: Y708572
This cartridge assembly male contact spade is made of metal. These are sold individually, though each range uses four contact spades.
$13.95
In Stock

Surface Burner Element - 8 Inch
PartSelect #: PS11740903
Manufacturer #: WP3191454
This surface burner element is a genuine OEM replacement part for your kitchen appliances. It measures 8inches in diameter with a wattage of 2100W. You will need to replace the element if you notice t...
$110.85
In Stock

Burner Cartridge Terminal Block
PartSelect #: PS11757594
Manufacturer #: WPY708730
No spades or wiring come with this part. To order the spades or wiring, please research by model# of appliance.
$61.33
In Stock

Element Receptacle Assembly
PartSelect #: PS11744184
Manufacturer #: WP74007474
This part connects the surface burner to the wiring harness.
$71.30
In Stock

Screw - 6-32 x 5/16
PartSelect #: PS11744050
Manufacturer #: WP74004005
This screw is well under an inch long, and is made of metal.
$5.36
Special Order

Screw
PartSelect #: PS11742713
Manufacturer #: WP488234
This screw is sold individually.
Size: 8-32 x 1/4 inch.
$9.13
Special Order

Terminal Block Insulator
PartSelect #: PS1641107
Manufacturer #: 708834
This part fits inside your range's terminal block to act as an insulator for the contact spade.
$16.22
Special Order

Common Symptoms of models starting with JEA7000ADS
[Viewing 3 of 3]Element will not heat
Fixed by
these parts
these parts

Show All
Will Not Start
Fixed by
these parts
these parts
Show All
Touchpad does not respond
Fixed by
these parts
these parts
Show All


Keep searches simple. Use keywords, e.g. "leaking", "pump", "broken" or "fit".
Stove top element not working due to bad receptacle.
Turned off the power at the breaker box, cut the wires approximately 5 inches from the bad receptacle and removed it after removing one screw. Stripped back the wires about 1/2 inch and attached the new wires with the ceramic wire nuts provided and secured the receptacle back in place with the new screw provided in the kit.
My sister ... Read more 's husband wanted to scrap the whole range but I repaired it with $14.00 worth of parts.
The element is working great now.
Whenever I need appliance parts again I'll use partselect.com.
My sister ... Read more 's husband wanted to scrap the whole range but I repaired it with $14.00 worth of parts.
The element is working great now.
Whenever I need appliance parts again I'll use partselect.com.
Read less
Parts Used:

-
Richard from Carthage, NC
-
Difficulty Level:Really Easy
-
Total Repair Time:Less than 15 mins
-
Tools:Pliers, Screw drivers
191 of 208 people
found this instruction helpful.
Was this instruction helpful to you?
Thank you for voting!
The top would not heat,large or small eye.
Removed the bottom cover and replaced the burned contact spade. Cleaned the wires and adjust the contact holder.
Parts Used:


-
Calvin from Merced, CA
-
Difficulty Level:Really Easy
-
Total Repair Time:15 - 30 mins
-
Tools:Nutdriver, Pliers
27 of 47 people
found this instruction helpful.
Was this instruction helpful to you?
Thank you for voting!
Range element receptacle had shorted out
(1) Disassembled range element cartridge unit by removing six machine screws on sides
(2) Removed old element receptacle assembly (note screww attaching the clip to ring was corroded and had to be drilled out and replaced - screw not included), retaining existing element (determined it was good)
(3) Fited up new element receptac ... Read more le assembly and determined how far the new wires would go, cut the old wires at appropriate point (allowing for wire splice).
(4) Attached new element receptacle assembly using a machine screw I found in my collection
(5) Routed new wires though retaining clips, and spliced into old wires near the cartridge plug (note: be sure to use high temp splice nuts - not supplied in kit)
(6) Installed old element into new receptacle and tested by measuring resistance - element resistance should be about 12 ohms, with all connections to ground reading infinity)
(7) Reassembled cartrige assembly using six machine screws previously removed (note, make sure the part align properly - top inside the bottom)
(8) Put the assembly back on range - worked great!
Read less
Parts Used:

-
Daniel from Great Falls, VA
-
Difficulty Level:A Bit Difficult
-
Total Repair Time:30 - 60 mins
-
Tools:Nutdriver, Screw drivers
19 of 24 people
found this instruction helpful.
Was this instruction helpful to you?
Thank you for voting!