


Models
>
JDRP536WP02
JDRP536WP02 Jenn-Air Range - Overview
Sections of the JDRP536WP02
[Viewing 9 of 9]


Keep searches simple, eg. "belt" or "pump".

Screw, 8/18 x 3/8
PartSelect #: PS11746840
Manufacturer #: WP90767
This screw is sold individually.
$5.42
In Stock

Screw
PartSelect #: PS12349731
Manufacturer #: W11233072
This is a multi-use and multi-appliance screw. It can be used on a microwave, refrigerator, range/oven, air conditioner, dehumidifier, washer, or dryer. The measurements of this screw are 8 x 1/2 inch...
$20.79
In Stock

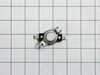
Temperature Sensor
PartSelect #: PS11748765
Manufacturer #: WPW10131825
The temperature sensor measures the temperature inside the oven. If your oven is too hot, not heating evenly, is not heating enough when baking, or simply will not start, you could have a faulty tempe...
$89.97
In Stock

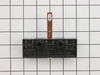
Terminal Block
PartSelect #: PS11747341
Manufacturer #: WP9761958
This is the terminal block for the power cord on an electric range.
$19.60
In Stock

Grate Feet - Kit of 4
PartSelect #: PS2330208
Manufacturer #: W10185266
This kit contains 4 grate feet for a range. These are the feet to fit your burner grates so the burner will not scratch your cooktop. The are black in color and made of rubber. These feet are fitted w...
$7.88
In Stock

Temperature Probe
PartSelect #: PS11747165
Manufacturer #: WP9755542
Also known as a meat probe.
$92.83
In Stock

Light Bulb
PartSelect #: PS11749457
Manufacturer #: WPW10169757
This is a replacement light bulb to illuminate the inside of your oven. It is 25 watts and 120 volts. Please wear gloves during replacement if your existing bulb is shattered. Consider ordering a spar...
$39.77
In Stock


Broiler Pan with Roasting Rack
PartSelect #: PS1519212
Manufacturer #: W10123240
This is a 3 piece set.
$71.39
In Stock

Stainless Steel Cleaner
PartSelect #: PS2360188
Manufacturer #: 31462A
Use this bottle of stainless steel cleaner and polish for any of your stainless steel appliances.
No Longer Available

Screw
PartSelect #: PS11744049
Manufacturer #: WP74003976
This screw is sold individually.
$5.36
In Stock

Questions And Answers for JDRP536WP02
We're sorry, but our Q&A experts are temporarily unavailable.
Please check back later if you still haven't found the answer you need.
Sort by:
- < Prev
- 1
- Next >
Search filter:
Clear Filter
Your search term must have 3 or more characters.
Keep searches simple. Use keywords, e.g. "leaking", "pump", "broken" or "fit".
Sorry, we couldn't find any existing answers that matched.Try using some different or simpler keywords, or submit your new question by using the "Ask a Question" button above!
Glenn
March 7, 2023
Confection oven fan runs continuously. Even after cool down. What is fix ?
For model number JDRP536WP02
Hi Glenn, thank you for reaching out. According to our research, the issue is probably with the high-limit thermostat, part number PS11742549, or the fan motor, part number PS11731569. If the issue persists, we would recommend checking the control board, part number PS11755154, to fix the issue. We hope this solves your problem!
Was this helpful?
Thank you for voting!
Related Parts:


- < Prev
- 1
- Next >
Common Symptoms of the JDRP536WP02
[Viewing 7 of 7]Oven is too hot
Fixed by
these parts
these parts

Show All
Will Not Start
Fixed by
these parts
these parts

Show All
Little to no heat when baking
Fixed by
these parts
these parts
Show All
Oven not heating evenly
Fixed by
these parts
these parts
Show All
Element will not heat
Fixed by
these parts
these parts
Show All
Will not program
Fixed by
these parts
these parts
Show All
Door won’t open after self cleaning cycle
Fixed by
these parts
these parts
Show All


Keep searches simple. Use keywords, e.g. "leaking", "pump", "broken" or "fit".
Burners kept clicking after ignited
This problem was driving me crazy for months. Of course, after I bought and installed the part and it still was not fixed I finally found a website that told me how to fix the clicking. The problem is that the removable head burners (#8 on the top assembly diagram) are not making good electrical contact with the base burners (#22). What I
... Read more
did was grab the head burners and grind them back and forth into the base burners with the weight on the heal of my hand. Steel wool or sandpaper would work too--you just want to clean the surfaces to restore electrical contact.
If you still want to know how to replace the spark module start by removing #24. This will allow the removal of #9 (after you take the knobs off). You may have to do some fiddling cause the rubber gasket is sticky. Next there are 2 obvious regular screws for #14 and 2 not so obvious star screws in the space where the burner valves are. After #14 is off there are 2 screws on the spark module to be removed and one that you can't loosen that is in a slot. You wriggle the module out of that one.
If you still want to know how to replace the spark module start by removing #24. This will allow the removal of #9 (after you take the knobs off). You may have to do some fiddling cause the rubber gasket is sticky. Next there are 2 obvious regular screws for #14 and 2 not so obvious star screws in the space where the burner valves are. After #14 is off there are 2 screws on the spark module to be removed and one that you can't loosen that is in a slot. You wriggle the module out of that one.
Read less
Parts Used:

-
Robert from Ranchos de Taos, NM
-
Difficulty Level:Really Easy
-
Total Repair Time:15 - 30 mins
-
Tools:Screw drivers
27 of 29 people
found this instruction helpful.
Was this instruction helpful to you?
Thank you for voting!
faulty meat probe
Not a repair. Just needed to replace the meat probe sensor for the programmable oven. Quick and easy purchase and very fast delivery took care of the problem. I was back in business.
Parts Used:

-
Kent from Seattle, WA
-
Difficulty Level:Really Easy
-
Total Repair Time:Less than 15 mins
38 of 65 people
found this instruction helpful.
Was this instruction helpful to you?
Thank you for voting!
bought floor model with loose cord that melted block terminal
Safety first always shut breaker off at box.
I unplugged stove, disconnected wires keeping in mind the color placement. Unscrewed one ground screw and removed terminal block. Attached new block with ground screw, replaced wires in correct order, re-attached plug. Then reattached safety cover. Pretty simple for d.i.y.
I unplugged stove, disconnected wires keeping in mind the color placement. Unscrewed one ground screw and removed terminal block. Attached new block with ground screw, replaced wires in correct order, re-attached plug. Then reattached safety cover. Pretty simple for d.i.y.
Parts Used:

-
larry from alexandria, IN
-
Difficulty Level:Easy
-
Total Repair Time:15 - 30 mins
-
Tools:Nutdriver, Screw drivers, Socket set
18 of 20 people
found this instruction helpful.
Was this instruction helpful to you?
Thank you for voting!