Enter the code DIYDAD10 at checkout to apply your discount. Discount will be applied at checkout when the code is entered & applies to all parts. Cannot be combined with any other coupon or special offer & cannot be applied to a previously placed order. Not valid toward tax or shipping & handling. Discount has no cash value. Discount expires on June 17 at 11:59pm EST.
You've Got 10% Off Your First Order!Save 10% with code at checkout *click to copy coupon code
This 40-Watt light bulb is sold individually and is a genuine OEM replacement option for your home appliances. It is specially designed to withstand extreme temperatures, so this bulb is compatible wi...
The oven rack is sold individually. It is chrome in color and measures approximately 24 inches wide by 17-1/2 inches deep. The rack is used to hold cookware in the oven and slides back and forth for e...
The function of the oven sensor is to detect the temperature within the oven cavity. If you notice that the oven is too hot or too cold, or it is not heating evenly, you may need to replace the oven s...
This radiant stovetop element, or burner, is a genuine replacement part, and is 8 inches in diameter. The radiant element heats your cookware as you prepare food on the stovetop. To complete this repa...
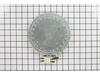
This part is the replacement oven bulb lens cover. It is made of glass and is approximately 3 inches in diameter. The lens cover is rigid and protects the oven light bulb from being damaged. The main ...
The light housing is also known as a lamp holder and is a part for the oven in your range. The function of this piece is to hold the bulb that will light up the inside of your oven. As per the manufac...
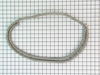
This window pack assembly, also known as inner door glass, is supplied directly by the manufacturer for use in range ovens. It has measurements of approximately 22 inches by 14 inches. The inner door ...
First, disconnect the power from the electrical box, not just turn off that oven. specially if you have a double oven. Just turn one off is not enough.
I removed the two screws that hold the element in place. I then pulled the element out slowly about 2 inches to expose the connectors, and then disconnected the two wires by hol
... Read moreding the wire (female) connector by one plier and pull the element (male) connector out with another plier. Then, insert the new element connectors, and push the wire back into wall then fasten the element with 2 screws.
I had to remove the oven from the wall because the sensor plug connction is behind the unit. Two screws hold the sensor inside the oven and then I disconnected the lead and pulled the sensor out from the front. I installed the new sensor, tightened the two screws holding it in and connected the lead. Then reinstalled the oven into the wal
... Read morel. Overall, a very easy repair once you get the oven out.
removed two phillips screws. Unplugged electrical connections replaced unit from PartSelect. They sent holder cover and new bulb (surprise). Great store with great directions.