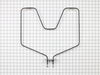
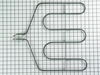
The metallic clip, or also known as a broil element support, is for a oven element on a range. This part holds the broil element in place on top of the oven. If your support clip is broken then this r...
This large broiler pan is found in the bottom of your oven and is used to catch drippings from broiling foods. This part includes the grate and bottom pan and is made of porcelain. The grate measures ...
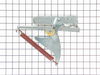
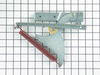
This hinge kit is used on the right hand side of the oven door.
No Longer Available
Questions And Answers for JCTP16GV3BB
Ask our experts a question about this model and we'll get back to you as soon as possible!
1 question answered by our experts.
Sort by:
< Prev
1
Next >
Search filter:
Clear Filter
Your search term must have 3 or more characters.
Keep searches simple. Use keywords, e.g. "leaking", "pump", "broken" or "fit".
Sorry, we couldn't find any existing answers that matched.Try using some different or simpler keywords, or submit your new question by using the "Ask a Question" button above!
Sue
November 18, 2021
Oven door will not open after self clean. Needs a new safety element for over heating. Is such a part still available anywhere? Thanks. Sue
For model number JCTP16GV3BB
Hello Sue, thank you for your question. If you're unable to open the oven door when the self-cleaning is over, your door lock/motor assembly may be malfunctioning. First, try to “reboot” the oven by unplugging it, waiting 5 minutes, and plugging it back in: sometimes this resets the lock and your oven door will be back to normal. If this does not work, replace the door lock, part number PS2577623. The part number for the limit switch is PS236676. We hope this helps.
Fan motor has to be removed from the rear. Since this is a (double) wall oven, the hardest part was sliding the oven out of the wall.
First, doors are removed, eight screws that hold the oven in place (along the side of the doorways) are removed. The rear panel inside the oven must be removed to expose the fan. Four screws hol
... Read mored that in place. Next, slide out the oven. The fan is covered by a tin shroud which is easily removed with a nut driver. The blade of the fan (inside the oven) is held on by a reverse threaded nut which must be removed. The fan motor is mounted with three screws and has two wires plugged into it. Piece of cake.
Reverse the procedure and you're done.
The best part was that I had originally called a service guy, who was going to 'defer me to GE for the repair' because the oven had to come out of the wall!! I think I'm going into the repair business!
After turning off the breaker to cut power to the oven, I opened the oven door and, using the PartSelect exploded diagram as a guide, I removed 3 screws from the underside of the control panel - I was then able to slide the panel up and out to remove it. Leaving all of the control wires (especially the ribbon) connected to control panel,
... Read moreI saw the fan assembly mounted to the rear of the control box.
I noted the position of the two attached wires - black on top (or left), white on bottom (or right). Using a nutdriver with an extension bar, I unscrewed 4 screws holding the assembly in place. I removed the old fan and installed the new fan in its place. It was necessary to bend the new fan's legs out a bit to get them to line up with the holes. I reconnected the wires as mentioned above, then reinstalled the control panel.
I tested the oven by turning the breaker back on and letting the oven heat up to 450 degrees. The fan turned on as expected. After the oven cooled off, I reinstalled the 3 screws to secure the control panel.