


Models
>
JBP35BH3CT
JBP35BH3CT General Electric Range - Overview
Sections of the JBP35BH3CT
[Viewing 5 of 5]


Manuals & Care Guides for JBP35BH3CT
Click to downloadKeep searches simple, eg. "belt" or "pump".

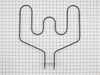
Bake Element - Push On Terminals - 240V
PartSelect #: PS249286
Manufacturer #: WB44T10011
The bake element in your oven provides the cooking heat. This part can be found at the bottom of your oven, and attaches to the power source on the back wall. It has two terminals that fit into the po...
$88.10
In Stock

Burner Bowl - 8 Inch
PartSelect #: PS244399
Manufacturer #: WB31T10015
This part is located beneath the element and catches any spills.
$17.92
In Stock

Burner Bowl - 6 Inch
PartSelect #: PS244398
Manufacturer #: WB31T10014
This burner bowl is also known as a burner drip bowl or burner drip pan, and is designed for use with your cooktop or range. It is black in color and is approximately 6 inches in diameter. It can be f...
$16.56
In Stock

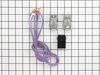
Surface Burner Terminal Block Kit
PartSelect #: PS783534
Manufacturer #: WB17T10006
This kit includes the female contact with wires, terminal block and mounting clip.
$26.12
In Stock

Surface Burner Switch - 8 Inch - 2500W
PartSelect #: PS236750
Manufacturer #: WB24T10025
The 8-inch surface element switch is also known as an infinite heat switch, and is a part for your range. It controls the large surface element. It will turn the element on and off, and allow you to c...
$43.33
In Stock

Temperature Sensor
PartSelect #: PS10059162
Manufacturer #: WB21X22134
The temperature sensor, also known as the oven temperature sensor assembly is usually found in the back of the oven. The function of the oven temperature sensor assembly is to measure the temperature ...
$38.48
In Stock

Light Bulb - 40W
PartSelect #: PS217532
Manufacturer #: 40A15
This 40-Watt light bulb is sold individually and is a genuine OEM replacement option for your home appliances. It is specially designed to withstand extreme temperatures, so this bulb is compatible wi...
$11.02
In Stock

REAR SUPPORT
PartSelect #: PS12709839
Manufacturer #: WB02X33180
This rear drawer support comes with the installation screw. This part has been redesigned. The new support inserts towards the rear of the drawer as opposed to the side.
$13.05
In Stock

CONTROL OVEN TO9
PartSelect #: PS16873547
Manufacturer #: WB27X45466
This part is also known as the "brains" of the appliance. ***NOTE: The wiring could be different than the original control. This part may need to be installed by an appliance repair person.
$198.44
In Stock


Broil Element
PartSelect #: PS249284
Manufacturer #: WB44T10009
This broil element is found on the upper part of the oven cavity.
$97.66
In Stock

Range Surface Element Control Switch - 6 Inch - 1560 W
PartSelect #: PS236754
Manufacturer #: WB24T10029
This switch controls the small burner on a range/stove top.
$45.15
In Stock
Questions And Answers for JBP35BH3CT
We're sorry, but our Q&A experts are temporarily unavailable.
Please check back later if you still haven't found the answer you need.
Common Symptoms of the JBP35BH3CT
[Viewing 10 of 10]Element will not heat
Fixed by
these parts
these parts

Show All
Little to no heat when baking
Fixed by
these parts
these parts


Show All
Oven not heating evenly
Fixed by
these parts
these parts
Show All
Little to no heat when broiling
Fixed by
these parts
these parts

Show All
Will Not Start
Fixed by
these parts
these parts
Show All
Oven is too hot
Fixed by
these parts
these parts
Show All
Touchpad does not respond
Fixed by
these parts
these parts
Show All
Door won’t close
Fixed by
these parts
these parts


Show All
Will not program
Fixed by
these parts
these parts
Show All
Timer will not advance
Fixed by
these parts
these parts
Show All


Keep searches simple. Use keywords, e.g. "leaking", "pump", "broken" or "fit".
oven element burned itself up
Turned off circuit breaker to range.
Removed the 2 oven racks. Removed two screws in back of oven compartment. Pulled element forward and the terminal connections get exposed.
The right terminal clip disconnected by itself and the wire went back into the stove and could not be retrieved.
Removed range draw under the oven an ... Read more d pulled entire range out from wall about 4 feet.. Removed metal backing with a socket wrench and exposed the oven element wires and terminals.
Reinstalled new element and metal backing.
Since range was out from wall, cleaned and vacuumed before pushing stove back in place.
Since range draw was out re-leveled by setting adjustable feet.
Reinstalled drawer and racks.
Turned on circuit breaker.
Tested element by setting bake cycle on.
Read less
Parts Used:
-
Dennis from Bondville, VT
-
Difficulty Level:Really Easy
-
Total Repair Time:15 - 30 mins
-
Tools:Screw drivers, Socket set
262 of 285 people
found this instruction helpful.
Was this instruction helpful to you?
Thank you for voting!
The baking assembly in the oven burst into flames one day, then broke apart.
After the element cooled down, I pulled the racks out of the oven, turned off the oven at the breaker box, then, using a nut driver, loosened the screws that held the baking assembly in the back of the oven, and pulled the connecting wires off. I bent the wires to make sure they would stay out, because if they get back in the insulation,
... Read more
they are hard to find. I would recommend getting a pair of locking pliers and putting them on the ends of the wires just to keep them from getting back into the insulation. Then I attached the left connection wire and then the right one, pushed them back into the insulation, tightened the baking assembly to the back wall of the oven, turned it back on at the breaker box, then tested the oven to see if it heated up. It did. Total repair time 15 -20 minutes. Would have been less if I didn't have to chase one of the wires back in the insulation. Shamless plug for the company ...By paying extra for 2-day shipping to receive the part, I saved just over $20 from buying it at Sears, which would have had to order the part anyway.
Read less
Parts Used:
-
Theresa from Sherman, TX
-
Difficulty Level:Easy
-
Total Repair Time:15 - 30 mins
-
Tools:Nutdriver, Pliers
141 of 151 people
found this instruction helpful.
Was this instruction helpful to you?
Thank you for voting!
Oven would go in to a F2 Error
Removed six 1/4" hex nuts on rear of oven. Then through front/inside removed a single 1/4" hex nut to actually remove sensor. Unplug sensor connector, remove. Reversed steps, push oven back in place and plugged in. Tested oven function.
Parts Used:
-
Peter from stamford, CT
-
Difficulty Level:Really Easy
-
Total Repair Time:15 - 30 mins
-
Tools:Nutdriver
143 of 206 people
found this instruction helpful.
Was this instruction helpful to you?
Thank you for voting!