


Models
>
J764Y1
J764Y1 General Electric Range - Overview
Sections of the J764Y1
[Viewing 1 of 1]
Keep searches simple, eg. "belt" or "pump".

Tilt Lock Hinge Mounted Surface Burner Kit - 6"
PartSelect #: PS244042
Manufacturer #: WB30X342
This tilt lock hinge mounted surface element kit includes a 6 inch, three wire, 1350 watt surface element, and a terminal block with all three-wire units. These high rise elements do not come with an attached trim ring.
$49.45
In Stock

Broiler Pan - Large
PartSelect #: PS1517612
Manufacturer #: WB48X10056
This large broiler pan is found in the bottom of your oven and is used to catch drippings from broiling foods. This part includes the grate and bottom pan and is made of porcelain. The grate measures ...
$30.07
In Stock

Tilt Lock Hinge Mounted Surface Burner Kit - 8 Inch
PartSelect #: PS244040
Manufacturer #: WB30X341
This tilt lock hinge mounted surface element kit includes an 8 inch element, three wire, 2450 watt surface element, and a terminal block with all three-wire units. These high rise elements do not come...
$83.46
In Stock

Upper Bake Element
PartSelect #: PS249421
Manufacturer #: WB44X195
The depth of the terminals is 2.5 inches, and the screw-in terminals are 1.5 inches apart.
$96.31
In Stock


Silicone Door Gasket
PartSelect #: PS241938
Manufacturer #: WB2X1522
This gasket seals the range/oven door.
$106.66
In Stock

Broil Element
PartSelect #: PS249392
Manufacturer #: WB44X139
This oven broil element has push on terminals.
$106.19
Special Order

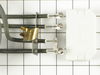
Thermostat
PartSelect #: PS235956
Manufacturer #: WB21X5209
The length of this thermostat's capillary is 62 inches.
No Longer Available

Questions And Answers for J764Y1
We're sorry, but our Q&A experts are temporarily unavailable.
Please check back later if you still haven't found the answer you need.
Common Symptoms of the J764Y1
[Viewing 2 of 2]Element will not heat
Fixed by
these parts
these parts


Show All
Little to no heat when baking
Fixed by
these parts
these parts
Show All
Keep searches simple. Use keywords, e.g. "leaking", "pump", "broken" or "fit".
replaced the rubber gasket on the oven door
Turned off the power. Removed the screws holding the built-in oven to the wall. Slid out the oven. removed the four screws that were holding the inner oven walls to the outer oven walls. Slid the inner oven wall out 1/4", removed old gasket material and replaced with new gasket. Slid the inner oven in tight and replaced the screws.
Parts Used:
-
Henry from Clinton, CT
-
Difficulty Level:Really Easy
-
Total Repair Time:15 - 30 mins
-
Tools:Screw drivers
27 of 57 people
found this instruction helpful.
Was this instruction helpful to you?
Thank you for voting!
The lower bake element in the upper oven burnt out.
In order to determine what was wrong with the oven I used a voltage meter to determine if power was coming to the element in the first place. Be careful to set your meter at least 500 ACV, as the oven is operating at 240V. Remove the two screws that hold the element in place and carefully pull it out of the side of the oven. Turn on t
... Read more
he bake element in the upper oven and place your test leads to either side of the connection leads. If you get a reading of 240Volts plus or minus you will know for sure the element is bad.
Turn off the oven, or even better turn off the circuit breaker to your stove.
There are two leads to the element that are held in place by self taping screws. If you have the same luck I have they will be corroded together. Carefully use long nose pliers to hold steady while gently applying pressure. If necessary use liquid wrench. When separated put together in the reverse order as how you took it apart.
Read less
Parts Used:
-
John D. from Thousand Oaks, CA
-
Difficulty Level:Easy
-
Total Repair Time:15 - 30 mins
-
Tools:Nutdriver, Pliers
11 of 13 people
found this instruction helpful.
Was this instruction helpful to you?
Thank you for voting!
The bake elment was over 25 years old when it cracked and burned out.
Turned off the electricity to the ovens. Unscrewed the two screws holding the old bake element. Removed the old one by disconnecting the two wires and replaced the new element in it's place.
Parts Used:
-
Rita from Buda, TX
-
Difficulty Level:Really Easy
-
Total Repair Time:Less than 15 mins
-
Tools:Screw drivers
5 of 7 people
found this instruction helpful.
Was this instruction helpful to you?
Thank you for voting!