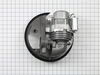
The rack track stop on your dishwasher is designed to stop the dish rack at the appropriate place when opening and closing the rack. If your dishwasher is not cleaning your dishes properly, the rack s...
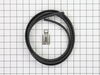
This manufacturer-certified heating element is used to create heat during the dry cycle and increase water temperature during portions of the wash cycle when certain options are selected. If your dish...
The mounting bracket is sold individually, without screws. This part secures the upper side of the dishwasher to the underside of the counter or cabinet to prevent the dishwasher from moving, shaking,...
This one-piece door gasket provides a water tight seal between the tub and the door, to keep water from leaking out of your dishwasher. If your dishwasher is leaking, tears, or there are gaps in your ...
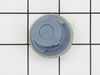
The rinse aid cap (sometimes referred to as the dispenser cap), covers the rinse aid dispenser on the dishwasher door. If your dishwasher will not dispense detergent, or it is leaking detergent, there...
The rubber washer is a part which is specific to dishwashers and should not be substituted by a similar part. It works with the heating element to seal the receptacle opening where the heating element...
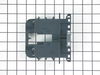
This part releases the detergent and rinse aid into the dishwasher.
$90.08
In Stock
Questions And Answers for GU2400XTPT6
Ask our experts a question about this model and we'll get back to you as soon as possible!
1 question answered by our experts.
Sort by:
< Prev
1
Next >
Search filter:
Clear Filter
Your search term must have 3 or more characters.
Keep searches simple. Use keywords, e.g. "leaking", "pump", "broken" or "fit".
Sorry, we couldn't find any existing answers that matched.Try using some different or simpler keywords, or submit your new question by using the "Ask a Question" button above!
John
February 22, 2020
Will not switched to wash cycle gets stuck on soak
For model number GU2400XTPT6
Hi John,
Thank you for your question. If the washing machine stops mid-cycle, there are some parts that you will need to check to see which one is causing the issue. You will need to check the heating element and the high limit thermostat to see which part is causing the issue. You will need to test the parts with a multi-meter. To test the heating element, unplug your dishwasher before attempting this test.
Your heating element will be found inside the dishwasher, attached to the bottom of the tub. It may be covered or uncovered. If it is covered, remove the cover. In order to disconnect the heating element, you will need to remove the lower access panel. Remove the wires attached to the heating element’s terminals by carefully grasping the metal connector, do not pull on the wire itself. To test the element, set your multimeter to Rx1 and touch each probe to a terminal. Your reading should be somewhere between zero and infinity, refer to your owner’s manual to determine what reading you should receive for your model. If it is exactly zero or infinity it is defective. If your test produces a reading different from the manufacturer’s recommendation, you will need a replacement heating element. To test the high limit thermostat, also ensure that you have unplugged your dishwasher before beginning this inspection. Locate and remove the thermostat in order to test it for continuity. In most models, it can be found at the bottom of the dishwasher tub, behind the lower access panel. Set your multi-meter to the Rx1 mode and touch the terminals with the probes. When your thermostat is at room temperature, you should receive a reading of infinity. If you place the thermostat next to a warm lamp, you should receive a reading of zero. If your thermostat produces different results, you will need a replacement high limit thermostat. We hope this helps. Thank you and have a great day.
Was this helpful?
Thank you for voting!
< Prev
1
Next >
✖
Ask a Question
Ask our experts a question on this model and we'll respond as soon as we can.
Rather than remove the pump assembly - as an earlier post had done - I pulled the entire dishwasher out and laid it down on the floor. This allowed easy, direct access to the motor (that was the hard, messy part). From this point it was easy. Unplug the wiring, remove the retaining bolt, rotate the motor off the mounting brackets and pull
... Read more it out. Then put the new one in. That was the easy part (about 15 minutes). The entire job took 2-and-a-half hours, most of which was taken in disconnecting, cleaning up and reconnecting the dishwasher. It's much quieter now.
1. Remove torx screws around outer edge of inside of door. 2. Separate outer door panel from inner door panel. 3. Locate dispenser, and remove 6 hex nuts and 2 wires for solenoid. 4. Insert new dispenser and re-insert hex nuts. 5. Reinsert torx screws.


 Diagram and Parts List for Whirlpool Dishwasher")