If you notice that your refrigerator or freezer is noisy or too warm, you may need to replace the evaporator fan grommet. This part is red in color, and is about 1 inch in diameter. The evaporator fan...
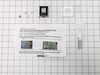
This electronic board (Main Control Board Assembly, Control Board, Motherboard) controls the temperature and defrost functions of the unit. This control board is located on the back of the refrigerato...
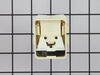
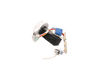
This is the light switch that goes in your refrigerator. If the light is not working or stays on, you may need to replace the switch. It is made of mainly white plastic, and is an OEM part, directly f...
Sold individually. This door bin is for refrigerators.
Door bin attaches to the inside of the refrigerator door and typically holds jars and bottles.
Follow the instructions in the owner's manu...
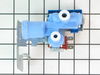
This OEM water filter works with side-by-side and bottom freezer refrigerators. You will find this filter mounted in a vertical position in the back upper right-hand corner of the refrigerator compart...
This part is a replacement recess grille tray for your refrigerator. This recess grille tray sits below the ice and water dispenser, and collects any spills. If your dispenser grille tray is broken or...
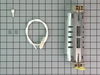
This kit includes damper, fan assembly, nozzle and gasket for nozzle. The damper and fan has been updated by the manufacturer to avoid freezing in the refrigerator. Also known as a damper assembly.
$213.06
In Stock
Questions And Answers for GSR23KSWASS
Be the first to ask our experts a question about this model!
✖
Ask a Question
Ask our experts a question on this model and we'll respond as soon as we can.
After checking the stories, the consensus of opinion was to change the mother board. I had a tremendous help from Tom Paone at quality@applianceeducator.com. He also told me to change the motherboard but to make sure that the coils were totally defrosted before starting up the refrigerator after changing the board.
Took off thr
... Read moreee nuts around the board at the back of the unit. Removed the input wires and you have to push in the plastic tabs holding the board in. Then just put the new board in place and push till the tabs click. Re-install the wires and put the cover back on.
Really simple task,
It is now a week since doing this and the unit is working perfectly. No soulds and good nights sleep. The ghost has moved on.
Disclaimer - if you aren't confident about doing this repair, call a repair specialist in. Also, take care not to damage the freezer coils as they have refrigerant in them that I'm told is harmful if it leaks. It may also be under pressure. The instructions that follow won't require you to touch the coils. There is no need to unplug the r
... Read moreefrigerator or disconnect the water supply to do this repair. The screw driver you will need is a phillips (the one withe the + head).
1st, take out your frozen food (which, if you need to do this repair may not be frozen) and put it in a cooler or the refrigerator. 2nd, remove the ice cube bucket and dump the ice cubes in the cooler to help keep the frozen food cool. Turn the ice cube maker off. 3rd, remove the freezer shelves. 4th, locate the panel covering the freezer coils. It's a panel at the back of the freezer. It hides the freezer coils and protects them from damage. It's held in place by two screws located at the top left and right corners of the panel. 5th, unscrew the screws holding the panel to the refrigerator. 6th, detach the clip at the top of the panel. 7th, remove the panel. You should see the coils now. The coils will be covered in frost if the defroster heater has failed. If the coils are not covered in frost, there may be another reason for the refrigerator failing to cool. 8th, even if the coils are covered in frost, you should also inspect the defroster heater at the bottom, underneath the coils. The business end of it is a long tube running horizontally between two wires. If it's black like a badly burned out light bulb, then it's failed. If the bulb appears fine, you may have a different reason for your refrigerator and freezer frosting up. We'll assume that the defroster heater has blown out, and proceed. 9th, place a towel at the bottom of the panel space, to soak up any water that melts and runs down. There is a drain under the coils. It collects water that melts during the defrost cycle, but I'd rather mop up the water instead of relying on the drain. 10th, use hot air blowing from the hair dryer to defrost the coils. Just play the air from the hair dryer over the coils, starting at the top, and working down. The frost will quickly melt and the water will be soaked up by the towels. If you want things to go faster, you can throw hot water on the coils to melt them faster, but that produces more water to mop up, and makes a big mess. It's also dangerous to have water lying around if you then decide to use the hair dryer to continue defrosting the coils. 11th. MOST IMPORTANT. Don't use your screwdriver or any other sharp object to pick away at the frost on the coils. If you damage the coils the refrigerant could leak out. I'm told that it's dangerous stuff. Furthermore, I expect that you'd have to buy a new refrigerator if you damaged the coils. 12th, once you've defrosted the coils, locate the defroster heater and bracket assembly again. It's held in place by two screws, and has two insulated wires running into it on either side. Unscrew the screws, disconnect the wires and remove the assembly. Throw it away - there are no useful parts in it. 13th, install the new defroster heater and bracket assembly by connecting the wires to it, mounting it back into its place, and rescrewing the screws. 14th, put the panel back in place, replace the clip, and screw the panel back in place. 15th, turn the ice cube maker back on and replace the ice cube bucket and shelves. Put your food back into the freezer. 16th, use the freezer and refrigerator as normal. If the defroster heater fails again (I'm on my third one in less than six years), you'll notice frost building up on the panel at the back of the freezer before your freezer and refrigerator stops cooling. The frost build up is your signal to defrost the freezer and buy another defroster heater and bracket assembly. I don't know why this part is so weak, and don't know any fix except to keep replacing it.
My repair experience was a little more complicated than previous posts, but nothing major. And most importantly replacing the Fresh Food Air Inlet Cover did fix my problem. Here are the steps I followed: 1. You will need to remove a minimum of the top two shelves to get access to the Air Inlet Cover. It runs along the back of the
... Read more fridge and connects to a hole to the freezer side. It has a little fan inside that sucks the cold air from the freezer and diverts to the top and bottom of the fridge. 2. As mentioned in other posts, there are four screws holding the Inlet Cover in place, 2 lower and 2 upper. To get access to the lower two screws,you simply pop off the lower duct assembly (squeeze the sides). Be careful when removing and installing these screws. If you drop one into the lower duct, you will add a few more steps to the installation to remove more shelves and take out the lower duct to get to where the screw fell. Obviously this happened to me. Not difficult to do, just adds more time. 3. To access the upper two screws I had to remove the top light cover (one screw) and then slide out the top duct/diffuser assy (my name, not GE's). 4. Finally to get clearance to pull out the Inlet Cover, I had to remove the water filter and cover. When you pull away the Inlet Cover, you will see the electrical connection that is simple to disconnect. 5. After I removed my Inlet Cover, it was obvious that it was broken because it rattled and I could peek inside to see that the plastic air diverter/flapper thingy was broken. 6. One final surprise was that the replacement Air Inlet Cover did not exactly match the one I removed. The replacement only had one upper air outlet, while my old one had three upper outlets, left, right and center. I noticed there was a plastic cover over one of the side outlets on the replacement, so I just popped that off and hoped for the best. 7. The replacement Air Inlet Cover Kit came with sticky back insulation that you attach to where the Inlet Cover meet the freezer access hole to make sure snug fit to limit extra cold air leaking into the fridge side. 8. Installation of the replacement Air Inlet Cover was fairly easy, just follow the above steps in reverse and make sure you don't drop any screws. It's been a couple of weeks since I performed this installation and my fridge has been maintaining temperature perfectly. No more frozen milk or lettuce. The wife is very happy.