This rear drum bearing kit is designed for use with dryers. It supports the rear of the drum in your appliance as it tumbles your clothes during the drying cycle. If your drum will not tumble, or if i...
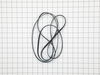
This drum belt, often referred to as a drive belt, is used in the assembly of dryers. It goes around the drum, the idler pulley, and the motor pulley. As the armature on the motor spins, this belt is ...
This selector knob, also be known as the laundry appliance control knob, is meant for your washer or dryer. This model is sold individually and takes a D-shaped shaft. The purpose of this part is to a...
If your dryer does not tumble, will not start, is noisy, or is leaving marks on your clothing, you may need to replace the drum support bearing. The drum is supported at the rear by a bearing, which a...
This white drum glide is used in a clothes dryer to ensure the front of the dryer drum is supported as it does rotations. *Please note: these are sold individually, however there are two of these in y...
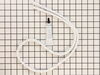
The door catch on your dryer is an important part as it keeps your dryer door closed, in order to ensure no air or clothes can escape. This part works by holding the door strike, which allows the door...
The lower front felt seal with adhesive, also known as a drum felt seal, is used in dyers and allows the drum to easily glide on the front panel. For this repair project, you will need the following t...
This kit contains two coils, one is a two-wire secondary coil and the other is a three-wire booster coil. Both coils in the ignition coil kit should be used together in the clothes dryer. Some of the ...
The upper felt seal for your dryer is attached to the top edge of the drum support area, and is held there by a high temperature adhesive. It creates a seal where the dryer door opens and closes, so t...
$19.64
In Stock
Questions And Answers for GLGR341AS4
Ask our experts a question about this model and we'll get back to you as soon as possible!
1 question answered by our experts.
Sort by:
< Prev
1
Next >
Search filter:
Clear Filter
Your search term must have 3 or more characters.
Keep searches simple. Use keywords, e.g. "leaking", "pump", "broken" or "fit".
Sorry, we couldn't find any existing answers that matched.Try using some different or simpler keywords, or submit your new question by using the "Ask a Question" button above!
Mark.
November 25, 2023
Door switch working opposite. Drum spins when door is open. Does not spin when closed. All sequences of the brown,blue,and red wires were tried to no avail. Does that mean the switch is bad?
For model number GLGR341AS4
Hi Mark, thank you for your question! We would suggest testing your door switch, part number PS2330880, to see if it is working correctly. It sounds like it is not. Good luck with your repair.
First thought the problem was a stretched drum belt or bad idler pulley. Ordered a new belt and idler assy plus spring. Replaced those items with relative ease following suggestions obtained at this site.However, problem persisted and I now suspected a bad drum bearing. Odered the bearing kit and replaced same using the following procedu
... Read morere. 1. Removed the cover from the back of the dryer (held in place via two phillip head screws) 2. Pushed down on the idler assy and removed the idler spring to release the drum belt. 3. Inserted flat tip screwdriver between the top panel and the dryer main body in the front of the dryer to pry the top loose from the two retaining clips. 4. used phillips screwdriver to remove the two retaining screws (one left, one right) that hold the front panel to the main body of the dryer. (about a foot down from the top of the dryer). 5. disconnected the wiring plug on the top right hand side at the top of the dryer. 6. lifted the front panel slightly removing it from the main body and placed it to the side. 7. lifted the rear of the drum to release it from the bearing bracket and removed the drum belt. 8. Pulled the drum through the front of the dryer body and moved it to an open work area. 9. Reached into the Dryer and loosened the two bearing bracket screws with a nut driver. Here's where another pair of hands would have come in handy. Holding the ground bar on the back of the drum with on hand, reached into the dryer and finished removing the bracket screws somehow managing not to drop the tiny grounding ball (size of a BB) Removed the badly damaged plastic bracket, grounding bar, and grounding ball and set them aside to be discarded later. 10. Used impact driver with phillips attachment to remove two of the three screws that hold the bearing to the back of the drum (these are on the inside) The third screw's head stripped out and I had a very difficult time removing it. Had it not been for that, the job would have taken less than an hour. 11. I had my wife hold the bearing in place while I started the three retaining screws. 12. My wife also got behing the dryer and held the grounding bar in place while I installed the new bearing bracket . (this kept me from loosing the grounding ball) I just reversed the rest of the procedures to install the drum belt, drum, front panel, etc. The dryer works like new now, doesn't squeal. Also replaced the on/off switch knob (just pulled the old one from the stem and slid the new one on.
1. Unplug dryer from outlet 2. Using Lg. flat screwdriver, pry under the front edge of the top and release two spring tabs 3. Lift up top and tilt back out of your way 4. Unscrew two phillips scews on inside of front panel 5. Lift up and out the front panel. Two spring clips at bottom. 6. Rlease tension on drum be
... Read morelt at the motor. Access panel at rear of dryer. 7.Unscrew 3 screws from inside, center rear of drum. 8. Remove drum through the front of the dryer. You may have to spread the sides apart a little bit for it to fit 9. Lift up on the rear drum bearing to remove it from the bearing retainer. ( U shaped plastic socket) 10. unsrew 2 screws and remove the bearing retainer, ground ball. Ball retainer is on outside of dryer. 11. Vacuum everything--duct, blower, lint trap, ect. 12. Intall new bearing retainer and grounding ball, an assistant is helpful at this time, one to hold ball retainer on rear of dryer, one to screw it in from the inside 13. reassemble remainder of parts in reverse order.