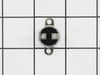
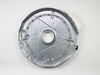
This rear drum bearing kit is designed for use with dryers. It supports the rear of the drum in your appliance as it tumbles your clothes during the drying cycle. If your drum will not tumble, or if i...
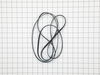
This drum belt, often referred to as a drive belt, is used in the assembly of dryers. It goes around the drum, the idler pulley, and the motor pulley. As the armature on the motor spins, this belt is ...
If your dryer does not tumble, will not start, is noisy, or is leaving marks on your clothing, you may need to replace the drum support bearing. The drum is supported at the rear by a bearing, which a...
This white drum glide is used in a clothes dryer to ensure the front of the dryer drum is supported as it does rotations. *Please note: these are sold individually, however there are two of these in y...
This dryer heating element produces heat to dry clothes and is located in the rear of a dryer. If the heater element is burned, the dryer does not heat or over heats, or clothes are taking too long to...
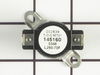
The dryer thermal limiter, also known as a thermal fuse, blows the fuse to cut off power to the dryer when the dryer begins to overheat. Once the dryer reached 220 degrees Fahrenheit, the heat cuts ou...
The door catch on your dryer is an important part as it keeps your dryer door closed, in order to ensure no air or clothes can escape. This part works by holding the door strike, which allows the door...
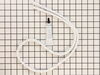
The lower front felt seal with adhesive, also known as a drum felt seal, is used in dyers and allows the drum to easily glide on the front panel. For this repair project, you will need the following t...
This high limit thermostat is used in a dryer and monitors the temperature to make sure it does not exceed 260 degrees Fahrenheit. When your dryer temperature reaches 260 it will cut it out and only c...
Located at the front of the dryer, this lint filter traps lint and debris from the exhaust air flowing out of the dryer drum. This part measures approximately 12 inches long x 7 inches high, has a pla...
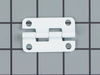
The door strike is attached to the door of your dryer and holds the door closed. If your dryer door is not closing, this might be due to the door strike needing to be replaced. This is a simple repair...
$16.13
In Stock
Questions And Answers for GLEQ2152ES0
Ask our experts a question about this model and we'll get back to you as soon as possible!
7 questions answered by our experts.
Sort by:
< Prev
1
2
Next >
Search filter:
Clear Filter
Your search term must have 3 or more characters.
Keep searches simple. Use keywords, e.g. "leaking", "pump", "broken" or "fit".
Sorry, we couldn't find any existing answers that matched.Try using some different or simpler keywords, or submit your new question by using the "Ask a Question" button above!
Alexa
January 29, 2020
All the lights just are blinking randomly. I start the dryer and within 10 seconds all lights just start flashing and random beeping.
For model number GLEQ2152ES0
Hi Alexa,
Thank you for your question. If the lights on the dryer are blinking randomly after you start the dryer, try unplugging the dryer for a few minutes to see if this helps reset it. If this does not help, you will need to check both the electronic control board and the heating element. Check the heating element with a multi-meter. Disconnect your dryer from the power source and locate the heating element. Depending on your model, you may need to open your dryer’s cabinet to access the heating element. Remove the heating element from the dryer and visually inspect it for signs of damage or burning. Set your multi-meter to the Rx1 setting and touch the probes to element terminals to test for continuity. If you receive a reading of infinity, you need a replacement heating element. You will need to check the electronic control board visually for signs of damage, wear or burn marks. If it shows any of these signs, it will need to be replaced. We hope this helps. Thank you and have a great day.
Dryer starts to run then stops and has a code of "e68"
For model number GLEQ2152ES0
Hello Timmy, Thank you for the question. The error code E68 is a stuck button. We suggest checking all of the buttons to be sure nothing is stuck and working properly. If the buttons are good, the Control Board, PartSelect Number PS12724036 will need to be replaced. We hope this helps!
The dryer will turn on, run for about 15 minutes, and then shut down. After shutting down, the led lights on the far right of the panel next to "drying", "cool down", "press saver", and "clean lint filter" blink on/off continuously. I have found several other people on the web with this same problem but no one has provided a solution to the problem. Any ideas? Thanks!
For model number GLEQ2152ES0
Hello Norm, Thank you for the question. This could indicate the Dryer is over heating or thinks it is over heating. We suggest to first clean out any lint build up in the Duct, Vent Hose and inside the cabinet. This can restrict the Air flow and cause over heating. If the issue continues you can test the Thermal Limiter. The reading should be close to 0 ohms if the limiter is working properly. The High Limit Thermostat will read zero ohms of resistance. We hope this helps!
Dryness lights will not light. Try to select and beeps three times and displays err. Taking very long time to dry and has heat.
For model number GLEQ2152ES0
Good Day Terry. Thank you for your question in regards to your unit (Model Number GLEQ2152ES0). Based on our research, we have found the following information that may explain why you are having this issue: 1) Lint screen is clogged with lint (Solution - Make sure all lint has been removed from the dryer lint screen before starting each cycle). 2) Exhaust duct requirements have not been met (Solution - Exhaust duct must be at least 4inches in diameter and made of rigid or flexible metal). 3) Electric dryer is connected to a 208 volt circuit (Drying time will be 20% longer than drying on a 240 volt circuit). 4) Outside exhaust hood or exhaust duct may be clogged or restricted (Solution - Clean out any obstruction). We hope this helps! Best Regards.
Was this helpful?
Thank you for voting!
Betty
January 16, 2020
Why might this model be making a screeching noise when it is running? Also now having an error code 68. It has been coming in and beeping when it is off. Thank you, Betty
For model number GLEQ2152ES0
Hi Betty,
Thank you for your question. The E64 error code is letting you know that there is a heater open circuit and the heating element or wiring is defective. Check heater coils and connections for open circuits. Replace heater and or wiring and retest. You will need to test the parts with a multimeter. Disconnect your dryer from the power source and locate the heating element. Depending on your model, you may need to open your dryer’s cabinet to access the heating element. Remove the heating element from the dryer and visually inspect it for signs of damage or burning. Set your multi-meter to the Rx1 setting and touch the probes to element terminals to test for continuity. If you receive a reading of infinity, you need a replacement heating element. We hope this helps. Thank you and have a great day.
Was this helpful?
Thank you for voting!
< Prev
1
2
Next >
✖
Ask a Question
Ask our experts a question on this model and we'll respond as soon as we can.
1. Unplug dryer from outlet 2. Using Lg. flat screwdriver, pry under the front edge of the top and release two spring tabs 3. Lift up top and tilt back out of your way 4. Unscrew two phillips scews on inside of front panel 5. Lift up and out the front panel. Two spring clips at bottom. 6. Rlease tension on drum be
... Read morelt at the motor. Access panel at rear of dryer. 7.Unscrew 3 screws from inside, center rear of drum. 8. Remove drum through the front of the dryer. You may have to spread the sides apart a little bit for it to fit 9. Lift up on the rear drum bearing to remove it from the bearing retainer. ( U shaped plastic socket) 10. unsrew 2 screws and remove the bearing retainer, ground ball. Ball retainer is on outside of dryer. 11. Vacuum everything--duct, blower, lint trap, ect. 12. Intall new bearing retainer and grounding ball, an assistant is helpful at this time, one to hold ball retainer on rear of dryer, one to screw it in from the inside 13. reassemble remainder of parts in reverse order.
Unplugged Dryer. Opened top of Dryer, over the drum. Removed Thermal Limiter. Tested the Thermal Limiter - found it was open. Checked all vents and exhaust tube for lint build-up. Replaced Thermal Limiter. Closed top of dryer. Plugged Dryer back. Tested Dryer - it works.