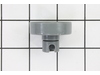
This is a replacement wheel and stud for your lower dish rack. This part is sold individually. The wheels are easy to replace, you just need to snap them in place after removing the old one.
$13.21
In Stock
Order within the next 6 hrs and your part ships today!
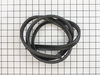
This part is the replacement tub gasket for your dishwasher. It is black in color and is made of rubber. The tub gasket fits around the circumference of your dishwasher tub, and creates a seal that pr...
$31.49
In Stock
Order within the next 6 hrs and your part ships today!
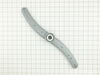
This door spring is approximately 7 inches long. The dishwasher door spring applies tension to the dishwasher door through the door hinge to prevent the door from dropping too quickly when the unit i...
We're sorry, but our Q&A experts are temporarily unavailable.
Please check back later if you still haven't found the answer you need.
1 question answered by our experts.
Sort by:
< Prev
1
Next >
Search filter:
Clear Filter
Your search term must have 3 or more characters.
Keep searches simple. Use keywords, e.g. "leaking", "pump", "broken" or "fit".
Sorry, we couldn't find any existing answers that matched.Try using some different or simpler keywords, or submit your new question by using the "Ask a Question" button above!
Melissa
June 14, 2022
My display window shows two dashes but when I try to start dish washer the buttons wont work how do I make the cotrolls work
For model number GLDT690J00WW
Hello Melissa, Thank you for your inquiry. This usually indicates a stuck key on the control board or an issue with the user display board. Check the connectors for any damaged wires and check the board for any visible damage. We hope this helps and if you need help placing an order, customer service is open 7 days a week. Please feel free to give us a call. We look forward to hearing from you!
We ordered a whole new set for the lower rack and even though they were smaller than the original ones, we replaced them all and now the rack slides in and out of the dishwasher with ease!
I had to buy the inner door assembly since the seal at the bottom was not available separately. $104 for a $10 part.
Before you take anything apart, shut off the power. There is 110V in the door, and it’s pretty unforgiving.
The inner door assembly is manufactured with razor sharp edges all around. It is fastened w
... Read moreith approximately 11,000 Phillips screws, all of which fall under the dishwasher upon removal. The outer door will fall to the floor to indicate you have removed all the screws. Or, you could support the outer door, if you are smarter than I am.
Putting the new inner door on isn’t too bad. Mine was bent a little in shipping, but I bent it straight again, pretty much. I had my 19 year old son help hold it in place, so I could learn how “lame” this activity was. Once a couple of screws are installed, he can go back to sleeping 15 hours a day. Make sure the lower seal is aligned as you tighten the bottom screws.
Once you’re done, turn on the power and run the dishwasher. You’ll learn that the leak is due to a clogged discharge hose, and you just burned an hour an $104.


 – Part Number: WD12X10319")