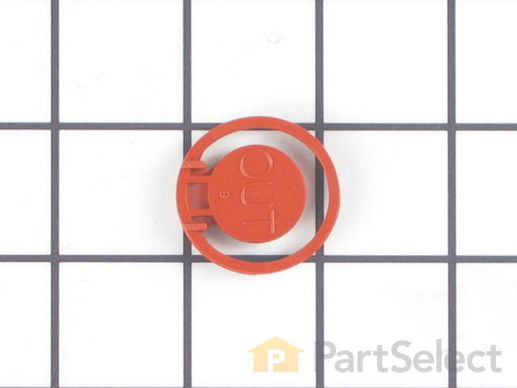
Part Location Diagram of WD01X10175 GE Check Valve Flapper
See part 328 in the diagram
Replacing your General Electric Dishwasher Check Valve Flapper
( Grid squares measure 1x1 inch )
Customer Service Representative

Get in touch, we're here to help!

Daily 8am - 9pm EST

customerservice@partselect.com

Check Valve Flapper WD01X10175

 Fits your GLC4100N10WW!
★★★★★
★★★★★
6 Reviews

Rated by 14 customers 

Easy 

30 - 60 mins 

Ratings submitted by customers like you who bought this part.

$ 14.61
  In Stock

Get this part fast! Average delivery time for in-stock parts via standard shipping: 1.8 days.

 Fits your GLC4100N10WW!
PartSelect Number PS258167
Manufacturer Part Number WD01X10175
Manufactured by GE
Product Description

Check Valve Flapper Specifications

This part allows the water to flow in the drain direction only and prevents the dirty water from coming back into the tub.
How Buying OEM Parts Can Save You Time and Money

How Buying OEM Parts Can Save You Time and Money

Part Videos

Replacing your General Electric Dishwasher Check Valve Flapper

Replacing your General Electric Dishwasher Check Valve Flapper
Troubleshooting
This part fixes the following symptoms:
Not draining | Leaking | Not cleaning dishes properly
This part works with the following products:
Dishwasher, Refrigerator.
This part works with the following products:
General Electric, Hotpoint.
Part# WD01X10175 replaces these:
AP3419048, 911985, WD01X10178, WD01X1486, WD1X10175, WD1X10178, WD1X1486, WH01X10235
Back to Top
Customer Reviews
Average Rating:
★★★★★
★★★★★
6 Reviews
5.0
Filter By Rating:
  • 5 Stars
    6
  • 4 Stars
    0
  • 3 Stars
    0
  • 2 Stars
    0
  • 1 Star
    0
Sort by:
  • 1
Sorry, we couldn't find any existing reviews that matched. Try using some different or simpler keywords.
  • 1
Customer Repair Stories
 Average Repair Rating: 3.0 / 5.0, 14 reviews. What's this?
Sort by:
  • 1
  • 2
Sorry, we couldn't find any existing installation instruction that matched.
Dishwasher would only 'partially' drain; dishes needed more rinsing.
Called repairman: announced that the drain pump was gone. Did not seem right. Went to the website. Found what I was looking for. 49% of the time it was a check-valve issue; only 26% of the time was the pump the problem. Took the unit from under the counter; got it on its side; removed the drain pump. Found my first check-valve, but thediagram showed a second lower one toward the sump. Having located both and purchased two valves and and the lower holder piece, I was ready to finish the job. Quarter-inch nut driver and a screw driver and the valves were in and the drain pump re-installed. Most difficult in my case was getting the dw back into its spot and lashed down! Thanks for the good guidance!
Other Parts Used:
SEAT CHECK VALVE Check Valve Flapper
  • James from SEDONA, AZ
  • Difficulty Level:
    Easy
  • Total Repair Time:
    1- 2 hours
  • Tools:
    Nutdriver, Screw drivers, Wrench (Adjustable)
2 of 3 people found this instruction helpful.
Was this instruction helpful to you?
Thank you for voting!
Would only drain intermittenly
Thought it might be check flapper valve on drain pump, so I replaced fairly easily, per instructions. When doing, I noticed the attached relay wires were not secure. When it was on the drain cycle one of the relay wires vibrated badly and loosened the connection enough to only work occasionaly. Would like to put new relay on the pump but they do not sell separately from the pump. (one assembly). I resecured connection and will wait till relay gives out and buy new assembly, but for now it's working perfectly!
  • C. from Lexington, KY
  • Difficulty Level:
    Easy
  • Total Repair Time:
    30 - 60 mins
  • Tools:
    Nutdriver, Screw drivers
1 person found this instruction helpful.
Was this instruction helpful to you?
Thank you for voting!
2" of water left in bottom after cycle
I could not have accomplished this repair without this site. It lead me not only to the problem but what parts would be needed. Since the pump worked okay I decided the water must be draining back from the hose since the bottom of the washer was lower than the discharge point of the drain hose. I thought there must be a check valve someplace. When I found PartSelect it was easy to go to the brand of dishwasher, model number, symptom and lots of advice from people with the same repair in the past. I decided to go with the piston and nut assemble (check valve) and the valve flapper. On the web site there was a blowup diagram that showed where the part was and advice on how to properly install the parts. When I looked at the old check valve and the new one you could easily see that was the problem. Replacing the flapper was added insurance.
Other Parts Used:
Piston and Nut Assembly Check Valve Flapper
  • Richard W from Lodi, WI
  • Difficulty Level:
    Easy
  • Total Repair Time:
    30 - 60 mins
  • Tools:
    Nutdriver, Pliers, Screw drivers, Wrench set
2 of 3 people found this instruction helpful.
Was this instruction helpful to you?
Thank you for voting!
Dishwasher wouldn't drain completely
Removed the dishwasher from the cabinet. Turned it on it's top side. Removed the exit hose from the pump with a nut driver and replaced the flapper. Reconnected the hose to the pump.
Other Parts Used:
Check Valve Flapper RACK SLIDE END CAP
  • William from Nacogdoches, TX
  • Difficulty Level:
    Really Easy
  • Total Repair Time:
    15 - 30 mins
  • Tools:
    Nutdriver, Wrench set
7 of 10 people found this instruction helpful.
Was this instruction helpful to you?
Thank you for voting!
About 4 inches of standing water in bottom of dishwasher
First I replaced the flapper valve of of off the water pump. That worked for a couple of days, then the standing water was back. After more research at your site I ran across other person who had the same problem and they ended up replacing the piston and valve assembly. After pulling the dishwasher out I was able to find where these parts were located. The piston's rubber part was half gone. I replaced it and the gasket and another flapper valve. This model has two flapper valves. One difficulty was that you have to replace the screen inside the dishwasher before you replace the housing that the piston fits in. Your site and other folks contributing their stories helphed me to solve our problem. The dishwasher works like new now. Thanks. Ralph Naddeo.
Other Parts Used:
Valve Body Gasket Piston and Nut Assembly Check Valve Flapper
  • Ralph from University Place, WA
  • Difficulty Level:
    A Bit Difficult
  • Total Repair Time:
    30 - 60 mins
  • Tools:
    Nutdriver, Pliers, Screw drivers, Socket set, Wrench (Adjustable), Wrench set
7 of 8 people found this instruction helpful.
Was this instruction helpful to you?
Thank you for voting!
dishwasher check valve
No Plumer could help me. No one heard of a dishwasher check valve. My dishwasher was an ISA. I was lost until i found the relationship to Kitchenaid. Then sears. Vuela!
The valve was there, but unavailable.
A few more links, and the term "flapper" came up.
Well, my dishwasher check valve HAD a flapper inside. Although a plastic pos, i could unscrew the two halves and see the flapper.
A little piece of rubber, about 1" in diameter
All suppliers gave me but two choices. One large (size given) one smaller.
After years of searching, all I needed was a flapper valve. Not the whole check valve.
I found it hear for under $10
  • ted from columbia, SC
  • Difficulty Level:
    Very Difficult
  • Total Repair Time:
    Less than 15 mins
7 of 7 people found this instruction helpful.
Was this instruction helpful to you?
Thank you for voting!
Standing water after cycle
Easy. I removed the dishwasher and all water from inside. After laying the dishwasher on floor, the valve flapper was installed using a pair of pliers. I then set the unit upright, and removed the rear screen from the inside back of the unit. This part has 4 nut screws, and runs the width of the unit. Under the screen, the Piston and Nut Assembly for Check Value simply unscrewed. When I looked at it, I knew this would do the trick. I simply screwed the new one in, and re-installed the dishwasher. After the first cycle, I smiled thinking of all the $$$ I saved.

Parts Select is great :)
Other Parts Used:
Piston and Nut Assembly Lower Spray Arm Assembly Check Valve Flapper
  • William from Broomfield, CO
  • Difficulty Level:
    Easy
  • Total Repair Time:
    30 - 60 mins
  • Tools:
    Screw drivers, Wrench (Adjustable), Wrench set
5 of 6 people found this instruction helpful.
Was this instruction helpful to you?
Thank you for voting!
3-4 inches water left in dishwasher after running
Removed 4 screws in washer then removed cover. Then piston and nut assembly which just needs turned loose.Pull out and then,put new one back in,tighten up, put cover back on put 4 screws back in. Then unhooked water line, power cord, drain hose. Pull washer out and drained water out of system with drain hose. put a towel down to catch excess water. Loosen nut at end of drain hose with a pliers, remove flapper put new one back in tighten drain hose . Put washer back in hook water, power and drain hose. Run thourgh cycle and it should work much better.
Other Parts Used:
Piston and Nut Assembly Check Valve Flapper
  • Kenneth from Lancaster, WI
  • Difficulty Level:
    Easy
  • Total Repair Time:
    15 - 30 mins
  • Tools:
    Nutdriver, Socket set
42 of 51 people found this instruction helpful.
Was this instruction helpful to you?
Thank you for voting!
Dishwasher was retaining water after completed wash cycle.
Changed check valve and valve flapper. Had to pull dishwasher out of cabinet to get to the backside. Removed check valve and replaced valve from inside dishwasher ( all the way at the back, large nut holds in)but had to remove lower assembly from rear in order to change out the gasket. Removed large black flexible tube and replaced flapper valve. Just be carefull sliding hose back over section containing flapper valve. Fairly easy switch out. Took care of problem.
Other Parts Used:
Valve Body Gasket Piston and Nut Assembly Check Valve Flapper
  • Thomas from Tallahassee, FL
  • Difficulty Level:
    Easy
  • Total Repair Time:
    15 - 30 mins
  • Tools:
    Nutdriver, Pliers, Wrench (Adjustable)
7 of 7 people found this instruction helpful.
Was this instruction helpful to you?
Thank you for voting!
dishwasher wouldn't drain.
First, I drained the water from inside the washer and removed it from under the sink. I wasn't sure if I had a clog in the drain line, so I dissasembled the drain under the sink and cleaned that as well. While cleaning under the sink my wife found her $4000 dollar ruby that fell out of her mothers ring a couple weeks earlier. It must have dripped out of the trap while I had water draining everywhere. Put drain back together and moved on to the dishwasher repair. Parts were easy to install after laying the dishwasher down on its front to access the bottom back side. Hooked everything back up and slid it back under the countertop and away it went. Had one small leak after running (water in line wasn't tight enough). A twist with a pair of pliers and that was resolved.
Fast shipping by the way! I paid a little more for the exit washer than I wanted to, but with shipping only from one source and delivery of parts at the same time made downtime as little as possible. I'm sure I saved $100 dollars or so by using this website for parts and tech info. And recovered a precious stone to boot.
Other Parts Used:
Piston and Nut Assembly Check Valve Flapper
  • Dennis from Gaylord, MI
  • Difficulty Level:
    Easy
  • Total Repair Time:
    30 - 60 mins
  • Tools:
    Nutdriver, Pliers, Screw drivers
4 of 5 people found this instruction helpful.
Was this instruction helpful to you?
Thank you for voting!
  • 1
  • 2
Questions and Answers

Ask our experts a question about this part and we'll get back to you as soon as possible!

3 questions answered by our experts.
Sort by:
  • 1
Sorry, we couldn't find any existing answers that matched.Try using some different or simpler keywords, or submit your new question by using the "Ask a Question" button above!
Tina
August 13, 2017
My dishwasher won't drain. How do I determine if the pump needs to be replaced or if I just need the valve?
For model number GLD4400N10BB
PartSelect logo
Hi Tina, Thank you for your inquiry. You can test both parts with a multi-meter to see if they are functioning correctly. A normal pump should read about 200 ohms when you are testing it. You will have to remove the pump and the valve from your appliance to test these parts. If you can not comfortable doing this yourself, I would suggest calling in a repair technician. Good luck with your repair.

2 people found this helpful.

Was this helpful?
Thank you for voting!
JOSEPH
February 3, 2018
Symptoms: Water stays on bottom. Some water stays on flipped placed upside-down dishes/glassware.Cycling good. Not sure if pump working or not. What do i need to buy to make sure it will solve the problem? Flapper? Pump? Thanks in advance
For model number PDW7880J01SS
PartSelect logo
Hello Joseph, Thank you for your inquiry. You can check the flappers for any cracks and damage and make sure it's not stuck closed. Make sure there are no clogs or cracks in the drain hoses. You can also test the pump with a multimeter to see if it has continuity. If you are unfamiliar with how a multimeter functions, there are YouTube videos available to assist you. Hope this helps!

2 people found this helpful.

Was this helpful?
Thank you for voting!
Rick
July 20, 2021
Partselect number ps258167 check valve flapper I see that there are (2) on this pump. In your videos it shows just the one being replaced which I did. I ran a cycle completed to heat drying and looked at the base of the tub with no standing water like before and figured all was solved. Later my daughter sent me a photo a couple hours since I had left and she opened the dishwasher to find it having standing water again? Could this be a result of the other flapper being bad too? Let me know.
For model number PDW8280J10SS
PartSelect logo
Hello Rick, Thank you for the question. If your model has two flappers, both should be replaced. We hope this helps!

2 people found this helpful.

Was this helpful?
Thank you for voting!
  • 1
You May Also Need ?
Model Cross Reference
This part works with the following models:
PartSelect Number: PS258167
Manufacturer Part Number: WD01X10175
Brand
Model Number
Description
General Electric
400810
Dishwasher
General Electric
400811
Dishwasher
General Electric
400812
Dishwasher
General Electric
400813
Dishwasher
General Electric
400850
Dishwasher
General Electric
400851
Dishwasher
General Electric
400852
Dishwasher
General Electric
400853
Dishwasher
General Electric
400870
Dishwasher
General Electric
400871
Dishwasher
General Electric
400872
Dishwasher
General Electric
400880
Dishwasher
General Electric
400910
Dishwasher
General Electric
400911
Dishwasher
General Electric
400912
Dishwasher
General Electric
400913
Dishwasher
General Electric
40201-0
Dishwasher
General Electric
402011
Dishwasher
General Electric
40205-0
Dishwasher
General Electric
402051
Dishwasher
General Electric
40206-0
Dishwasher
General Electric
402061
Dishwasher
General Electric
402070
Dishwasher
General Electric
403110
Dishwasher
General Electric
403111
Dishwasher
General Electric
405010
Dishwasher
General Electric
405011
Dishwasher
General Electric
405012
Dishwasher
General Electric
405050
Dishwasher
General Electric
405051
Dishwasher
Customer Service Representative

Get in touch, we're here to help!

Daily 8am - 9pm EST

Contact Customer Service