


Models
>
GFWS3505L0MV
GFWS3505L0MV General Electric Washer - Overview
Sections of the GFWS3505L0MV
[Viewing 4 of 4]


Manuals & Care Guides for GFWS3505L0MV
Click to downloadKeep searches simple, eg. "belt" or "pump".


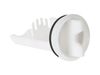
Door Strike
PartSelect #: PS2322437
Manufacturer #: WH01X10356
This part is the replacement door plunger or door strike for your washer. It is made of white plastic and is approximately 2 inches by 1.5 inches. The door strike attaches to the washer door and activ...
No Longer Available


Questions And Answers for GFWS3505L0MV
We're sorry, but our Q&A experts are temporarily unavailable.
Please check back later if you still haven't found the answer you need.
Common Symptoms of the GFWS3505L0MV
[Viewing 3 of 3]Leaking
Fixed by
these parts
these parts


Show All
Lid or door won’t close
Fixed by
these parts
these parts


Show All
Will Not Start
Fixed by
these parts
these parts
Show All

Keep searches simple. Use keywords, e.g. "leaking", "pump", "broken" or "fit".
"Door Locked" light always on. Washer would not run
Remove bottom kick plate of washer. Remove 4 screws behind door that hold the latch/lock assembly. Reach up inside the washer from underneath to unplug 3 wire connectors. (This is a very tight spot). Once wires are off, part comes right out. Connect wires to the new part - this is by far the most difficult part of the job because it
... Read more
is way up inside the washer. Replace all bolts.
Overall, pretty easy to do - just reconnecting the wires is a pain, but if you are patient it is not a big deal.
Overall, pretty easy to do - just reconnecting the wires is a pain, but if you are patient it is not a big deal.
Read less
Parts Used:
-
Robert from Dallas, PA
-
Difficulty Level:Easy
-
Total Repair Time:15 - 30 mins
-
Tools:Nutdriver, Screw drivers
36 of 56 people
found this instruction helpful.
Was this instruction helpful to you?
Thank you for voting!
Door plunger broken so could not lock.
Part came quickly, was exactly what I needed, 2 minutes later, washing clothes again.
Parts Used:
-
Scott from Spring Branch, TX
-
Difficulty Level:Really Easy
-
Total Repair Time:Less than 15 mins
-
Tools:Screw drivers
7 of 9 people
found this instruction helpful.
Was this instruction helpful to you?
Thank you for voting!
Door Latch Failure Code
Unplug machine.
Remove band from front bellows by prying the spring at 6:00 o:clock loose.
Pull back bellows on right side.
Remove 3 torx screws and gently pull door each lock assembly out. Unplug 3 wire harness connectors and plug into new latch lock in same order.
Screw new latch lock in place and replace bellows and ... Read more band.
Done
Read less
Parts Used:
-
John from BOULDER, CO
-
Difficulty Level:Really Easy
-
Total Repair Time:15 - 30 mins
-
Tools:Screw drivers
3 of 3 people
found this instruction helpful.
Was this instruction helpful to you?
Thank you for voting!