This pump helps expel water from the washing machine and is activated after the spin speed is maintained for a specific period of time. This pump has sound isolation mounting washers and a filter.
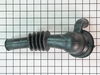
This is the replacement water inlet pipe or water inlet valve for your washer. It is made of white plastic and is approximately 8.5 inches by 3 inches, with an opening diameter of approximately 2.5 in...
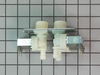
This is the replacement water valve for your washer. It has 2 inlets and 3 outlets. The water valve connects to the water source and solenoid wires, and ensures the tub has the right amount of water e...
This part is the replacement door plunger or door strike for your washer. It is made of white plastic and is approximately 2 inches by 1.5 inches. The door strike attaches to the washer door and activ...
Ask our experts a question about this model and we'll get back to you as soon as possible!
2 questions answered by our experts.
Sort by:
< Prev
1
Next >
Search filter:
Clear Filter
Your search term must have 3 or more characters.
Keep searches simple. Use keywords, e.g. "leaking", "pump", "broken" or "fit".
Sorry, we couldn't find any existing answers that matched.Try using some different or simpler keywords, or submit your new question by using the "Ask a Question" button above!
Roy
January 26, 2020
The rinse cycle water will not shut off time resets its self
For model number GFAN1000L2WW
Hello Roy,
Thank you for your question. Our sources suggest replacing the door lock latch under part PS1021459 for your model to fix the washers issues. We hope this helps.
Hello, my GE washer, model number GFAN1000L2WW, is rinsing with pure hot water instead of a warm water rince as usual. Do you know what would be causing this?
For model number GFAN1000L2WW
Hello Jim, thank you for contacting us. We would recommend checking the heater thermistor, part number PS1482383. It controls heat production by conveying temperature information to the washer board. Customer service is always available to help you place an order if you are having trouble doing so. Good luck with your repair.
Remove the front coverfrom the machine. This is done by removing the 3 screws at the bottom of the panel. The panel then drops down and pulls straight off. The pump is located on the front right wall of the of the machine. You will notice a 2-3 inch diamete threaded cap on the right side of the front wall of the machine. This is the f
... Read moreront of the pump and access to the filter. Place a large bucket under this cap and slowly loosen the cap. All of the water remaining in the machine will begin to drain (this could be a lot of water. Do not remove the cap completely so that you can quickly stop the flow of water if needed). Once all water is drained from the appliance, Disconnect the two hoses from the pump using a pair of pliers to looses the presure clamps, sliding the clamps back an then pulling off the hoses (be careful of any remaining water in the hoses). Then remove the two screws from the rear base of the pump that secure it to the bottom floor panel of the washer. Slide the pump slightly to the rear to free it from the fittings on the front wall of the machine and the lift the pump up. At this point, firmly pull out the wiring harness plugged into the top right side of the pump. Install the new pump by plugging in the wiring harness and resecuring the pump. Plug in the machine and run on the rinse and spin cycle to test.
I took the two drain hoses off with the pliers then only two screws that holds the pump. After that the two hot wires which are black and white. But remember to unplug you're washer since the pump is not grounded you don't want to risk being shocked. Hope thi helps. Plus i saved around 250.00 by repairing myself.
I called a repair person to check my 15 months old GE front loader washer that stopped in rinse mode. After his inspection he said it was a deffected computer board and it would be very expensive to replace the 3 computers boards inside and it would be cheaper to buy a new top loader washer. The next day I lifted the top cover and foun
... Read mored a taped plastic envelope with instructions titled “For service Technicians Only." On page 2, instruction on to how to enter the washer in to service mode and to test the washer: Press : Signal, Delay, Signal, Delay (within 30 seconds of plug in washer) Then rotate main knob to #102 and press Start:(the washer did a test for finding the problem) , and for me was : E22 , it means : replace solenoid valve assembly. So I order the part from Partselect.com for $58.00 and my Washer runs beautiful, thanks to the instructions inside.