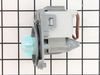
I had to buy the inner door assembly since the seal at the bottom was not available separately. $104 for a $10 part.
Before you take anything apart, shut off the power. There is 110V in the door, and it’s pretty unforgiving.
The inner door assembly is manufactured with razor sharp edges all around. It is fastened w
... Read moreith approximately 11,000 Phillips screws, all of which fall under the dishwasher upon removal. The outer door will fall to the floor to indicate you have removed all the screws. Or, you could support the outer door, if you are smarter than I am.
Putting the new inner door on isn’t too bad. Mine was bent a little in shipping, but I bent it straight again, pretty much. I had my 19 year old son help hold it in place, so I could learn how “lame” this activity was. Once a couple of screws are installed, he can go back to sleeping 15 hours a day. Make sure the lower seal is aligned as you tighten the bottom screws.
Once you’re done, turn on the power and run the dishwasher. You’ll learn that the leak is due to a clogged discharge hose, and you just burned an hour an $104.
This seal is not a “slide off and slide on” type like other dishwasher inner door assemblies because it’s stainless steel. CAUTION - THIS COMPONENT IS SHARP AND WILL SEVERELY CUT YOU - I DOUBLED UP ON LATEX GLOVES
1. Remove bottom rack from washer 2. Using Phillips screwdriver remove all screws from inner door area -
... Read moreplace towels under exterior of door because it will drop off when all screws are removed. ALSO - there are 4 screws that hold the hinges to the door frame - be careful because the hinges are spring loaded!! 3. Cut the 2 wires feeding the detergent release compartment ( you will have to strip and reconnect them using wire nuts - orange or blues) 4. Slide outer shell up to remove from inner door assembly 5. Remove vent assembly(adjustable pliers) and detergent compartment (4 phillips screws/2 brackets) BE CAREFUL NOT TO DAMAGE GASKETS (you will reuse when reinstalling them on the new inner door assembly).
REASSEMBLY 1. Remove protective film from entire door assembly 2. Install vent & detergent compartment DO NOT FORGET GASKETS 3. CAREFULLY - pull down door hinges far enough to place new inner door assembly in its designated place when in operation THEN allow hinges to slowly touch the inner door assembly 4. Wire up detergent compartment wires you cut earlier 5. Using some means of adhesive (duct tape, double back tape) place to styrofoam filler back in place 6. Slide the outer door assembly on while slowly opening door - pay attention to the outer door assembly door frame so that it goes over the inner door assembly - this is the difficult part and having a second set of hands will help with overcoming obstacles 7. Place all your screws back in place and put the bottom rack back 8. Run the dishwasher empty first through a full cycle so the water level can heat the gasket and check for leaks after running awhile
Removed leaking drain hose under the dishwasher from drain pump and sink drain pipe. Fed new hose behind dw connected with new clamps to dw drain pump and sink drain pipe. Put in high loop under sink.