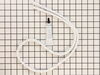
This rear drum bearing kit is designed for use with dryers. It supports the rear of the drum in your appliance as it tumbles your clothes during the drying cycle. If your drum will not tumble, or if i...
If your dryer does not tumble, will not start, is noisy, or is leaving marks on your clothing, you may need to replace the drum support bearing. The drum is supported at the rear by a bearing, which a...
This white drum glide is used in a clothes dryer to ensure the front of the dryer drum is supported as it does rotations. *Please note: these are sold individually, however there are two of these in y...
This dryer lint screen is for laundry centers.
Dryer lint screen captures lint and debris from the exhaust air flowing from the dryer.
Follow the instructions in the owner's manual when installing this part.
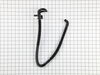
The door catch on your dryer is an important part as it keeps your dryer door closed, in order to ensure no air or clothes can escape. This part works by holding the door strike, which allows the door...
The multi-rib drum belt is also known as a drive belt and is a part for your dryer. The function of the drum belt is to attach to the motor pulley. It will then spin the drum as the motor rotates. Ove...
The lower front felt seal with adhesive, also known as a drum felt seal, is used in dyers and allows the drum to easily glide on the front panel. For this repair project, you will need the following t...
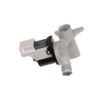
This kit contains two coils, one is a two-wire secondary coil and the other is a three-wire booster coil. Both coils in the ignition coil kit should be used together in the clothes dryer. Some of the ...
The upper felt seal for your dryer is attached to the top edge of the drum support area, and is held there by a high temperature adhesive. It creates a seal where the dryer door opens and closes, so t...
This is a screw in leveling leg for your washing machine. It supports the appliance by screwing in place to create a stable and flat surface. Take note that you are able to adjust the height of your a...
The door strike is attached to the door of your dryer and holds the door closed. If your dryer door is not closing, this might be due to the door strike needing to be replaced. This is a simple repair...
$16.13
In Stock
Questions And Answers for FFLG3911QW0
We're sorry, but our Q&A experts are temporarily unavailable.
Please check back later if you still haven't found the answer you need.
5 questions answered by our experts.
Sort by:
< Prev
1
Next >
Search filter:
Clear Filter
Your search term must have 3 or more characters.
Keep searches simple. Use keywords, e.g. "leaking", "pump", "broken" or "fit".
Sorry, we couldn't find any existing answers that matched.Try using some different or simpler keywords, or submit your new question by using the "Ask a Question" button above!
STEVEN
November 26, 2019
Stackable washer dryer .Start washer cycles for load tub fills then stops already changed lid switch no luck.Thanks steven
For model number FFLG3911QW0
Hello Steven, thank you for your question. If the unit is filling but won't move onto the next cycle and the lid switch has been replaced, the issue could be with the actuator or or the washer control board. I hope this helps!
1 person found this helpful.
Was this helpful?
Thank you for voting!
Carla
July 7, 2022
Is this dryer a gas dryer? TY
For model number FFLG3911QW0
Hello Carla, Thank you for the question. This model is showing to be a Gas appliance. If you need help placing an order, customer service is open 7 days a week. Please feel free to give us a call. We look forward to hearing from you!
1 person found this helpful.
Was this helpful?
Thank you for voting!
Shari
March 1, 2023
The washer lid that has a plug sensor that controls the wash cycle part the washer is not working right
For model number FFLG3911QW0
Hello Shari, thank you for reaching out. We have researched and found the part you are looking for is the Lid Lock, part number PS11703540. The washer lid lock prevents the washer lid from opening during the wash cycle and spin cycle. We hope that helps!
My Frigidaire washer starts to fill and it stops after about 10 min and will not continue the cycle. I unplug it for about 15 minutes and plug it back in. It will click and start and then stop again after a bit. Any idea what the problem is??? modelfflg3911qw0 serial 4e53413535. i checked the latch good, i checked the drain hose not clogged
For model number FFLG3911QW0
Hi Ed, thank you for your question. The issue might be in your water inlet valve. You may want to check that part first. The valve can be tested with a multi meter and should be reading between 500 - 1500 ohms of resistance. Good luck with your repair.
Was this helpful?
Thank you for voting!
Arthur
March 18, 2022
How do you open a locked lid switch
For model number FFLG3911QW0
Hello Arthur, Thank you for your inquiry. If you need access the lid switch, you can use a putty knife to release the two retaining clips securing the main top. You should now be able to lift the top and access the lid lock assembly to disconnect it. We hope this helps and if you need help placing an order, customer service is open 7 days a week. Please feel free to give us a call. We look forward to hearing from you!
1. Unplug dryer from outlet 2. Using Lg. flat screwdriver, pry under the front edge of the top and release two spring tabs 3. Lift up top and tilt back out of your way 4. Unscrew two phillips scews on inside of front panel 5. Lift up and out the front panel. Two spring clips at bottom. 6. Rlease tension on drum be
... Read morelt at the motor. Access panel at rear of dryer. 7.Unscrew 3 screws from inside, center rear of drum. 8. Remove drum through the front of the dryer. You may have to spread the sides apart a little bit for it to fit 9. Lift up on the rear drum bearing to remove it from the bearing retainer. ( U shaped plastic socket) 10. unsrew 2 screws and remove the bearing retainer, ground ball. Ball retainer is on outside of dryer. 11. Vacuum everything--duct, blower, lint trap, ect. 12. Intall new bearing retainer and grounding ball, an assistant is helpful at this time, one to hold ball retainer on rear of dryer, one to screw it in from the inside 13. reassemble remainder of parts in reverse order.
well, i started at the top and worked my way down. by taking the top off, it gave me more room to get the dryer tub out. took the two screw`s out of the vented plate on the back of the machine to undo the belt. this is a stackable washer-dryer combo, so next i took off the white plate on front between washer & dryer. took off the control
... Read morepanel, unpluged it, then took dryer door front off. then removed the two screw`s that hold that bracket on ,in the back of dryer, pulled the drum out & replaced the belt, but before replacing anything i took the shopvac to it , there was alot of lint in there.when replacing the Grounding Ball Clip & Grounding Ball, i took a one inch by two inch magnet and used it to hold the Grounding Ball & Clip in place so i could get the two screws started in the Drum Support Bearing & Bearing Bracket. after installing that i put the shaft in place & lined the dryer tub up with the 3 screw hole`s ,and boom, bang, pow...nothing to it. it`s easy...parts came very fast....Thx PartsSelect.com...i`ve told all my friend`s about PartsSelect
The top of the dryer was easily removed by prying the front up with a screwdriver then tipping it back and off of the mounting brackets. Then the front of the dryer was removed by unscrewing a single screw on each side that held the front to the side panels then pulling the front away from the dryer. Once the front was off, the coils we
... Read morere easily accessible on the bottom left side. A metal bracket held the coils on and was somewhat tough to get the two screws removed on it as they were stuck, but once they were removed the coils easily came out and I was able to replace them in minutes. The whole job took 15-20 minutes and I now have a dryer that heats through the entire drying cycle.