The surface burner plug-in block kit features a newer-style terminal block. This kit is designed for use with ranges and cooktops. This terminal block is how the coil element on your stove connects to...
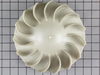
The blower wheel is a squirrel cage type wheel whose purpose is to move the air through the room or appliance. The blower wheel spins on the motor shaft to blow air through the dryer drum and out through the exhaust.
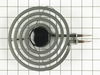
This is a delta frame surface unit, also known as coil element, for a stove, range, or oven. It is a 6-inch surface burner with a reinforced delta frame that carries 1250 watts and 240 volts. The burn...
This temperature sensor is used with self cleaning ovens. Its 1000 ohm resistance increases with temperature. This sensor has male leads and comes with ceramic wire nuts.
This surface burner control switch kit comes with screws, mounting plate, push on locking nut, shaft adapter, and instruction sheet. The burner switch is universal for 6 and 8 inch elements. It featur...
This is a burner surface element and is 8 inches in diameter and 2600 watts. The burner surface element functions as a cooking area on the cooktop of the range. The purpose of this part is to supply h...
Two screws remove the front of the sensor (put a pan under the sensor to catch the screws), One nut removes the rear cover to access the rear of the sensor. Separating the two halves of wiring harness takes a little dexterity. BIG TIP! Tie a string to the back of the sensor wire and pull the sensor out from the front making sure the strin
... Read moreg still shows thru the back. If you don't you have a 15 minute job trying to fish the wires at an angle thru the insulation (a very frustrating task). Untie the string from the old and tie it securely to the new. Pull the string from the back and Voila! your new sensor can be plugged in or wirer nutted to the old connection on the back of the stove. Replace the nut and the two screws and you're done!
couldn't get blower wheel off of the motor. really tight. rounded off the wheel's square hub while trying to hold it still as I turned the motor shaft out. No, I wasn't turning it the wrong way :) I ended up going to the back of the dryer and using the multimax to quickly cut the wheel away from the hub. I love that oscillating saw!
... Read moreJust for fun, I put the motor in a bench vise and got the wheel hub off (in pieces). VERY tight! Ordered new wheel, and the job was smooth sailing from there on. I am guessing that experienced repair people automatically order the motor and blower wheel at the same time(?) BTW both parts were perfect matches for the originals. Not surprised; this has always been my experience with partselect.com!
First i shut off the power since this is an electric cook top/range. I then removed the knob and the two screws that hold the burner switch in place. I removed the wires one at a time and connected each to the new switch. I then reattached the screws to the switch. The most difficult part to me was breaking off the switch stem at the
... Read moreright level. I got that done and finally selected the appropriate adapter for the stem/knob fit.