The relay switch may also be known as the door micro switch and is a part for your microwave. The function of this part is to monitor the door latch and communicate whether the door latch is open or c...
$45.04
In Stock
Order within the next 11 hrs and your part ships today!
This 20-watt lightbulb is most commonly found in the microwave. The lightbulb brightens the interior of the microwave while it is running so you can keep an eye on the food while it cooks. You will ne...
$11.57
In Stock
Order within the next 11 hrs and your part ships today!
This door release lever, also known as a door open lever, is an original manufacturer replacement for microwave/oven combos. When the door release button is pressed, the lever releases the door latch,...
$53.57
In Stock
Order within the next 11 hrs and your part ships today!
This is an exhaust damper assembly for a microwave, which is also known as a microwave vent damper. The damper directs air flow through the vent duct from the top or rear of your microwave, depending ...
$47.69
In Stock
Order within the next 11 hrs and your part ships today!
This mounting bracket is used to mount microwaves to the wall when installing the unit over a range. This metal, genuine OEM mounting bracket is approximately 31 inches long x 2 inches wide. If you no...
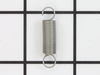
The microwave door latch spring creates tension, and engages the door latch when the door is closed. This spring is made completely of metal, and is approximately 1 inch long. If your microwave door w...
$48.25
In Stock
Order within the next 11 hrs and your part ships today!
I first removed the top plate above the microwave door (3 screws), then I removed the plate containing the buttons and clock. The microwave has 3 relay switches and they are in a little holder. The holder was too difficult to remove so I just removed the bottom switch and replaced. The microwave started right up.
was told buy a repair person to check the door micro switches as it was a common problem. removed the top plastic air grill to get access to the screw that holds in place the control cover. After unplugging the unit, i took out the (2) screws that held in the switches and removed them (3). One switch was a bit melted so i tested it with a
... Read more 12 volt battery and it was bad. Ordered a new one from Part select and got it fast . Works great .
After unplugging the unit remove the control face buy removing the screws. All three door switchs are on a bracket on the left. Remove the two screws holding the bracket in place and pull out. Disconnect the wires from the three switches and test each switch indivually to determine the bad one. I used a multimeter set on ohms.Replace the
... Read morebad switch with the new one and replace all the wires. Reassemble the unit and you are good to go.