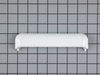
This authentic, white Drum Bearing Slide, also known as the bearing drum slide, glide, or pad, is a plastic, easy-to-install part for your dryer. It replaces the dryer's front drum slide to allow for ...
$18.62
In Stock
Order within the next 11 mins and your part ships today!
This original equipment manufacturer Drum Bearing Slide is a plastic, green, easy-to-install part for your dryer. It replaces the dryer's front drum slide to allow for easier movement. You'll know if...
$14.32
In Stock
Order within the next 11 mins and your part ships today!
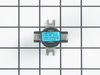
This Front Drum Bearing (Top Bearing, Dryer Drum Front Support Bearing, Drum Support Bearing, Dryer Drum Glide Bearing) holds the drum bearing and slides for the drum to turn on. The front drum bearin...
$34.20
In Stock
Order within the next 11 mins and your part ships today!
This is a duct felt seal for a dryer. The duct felt seal allows the front-load dryer drum to glide smoothly on the front panel. Your dryer will not function properly if the drum felt seal is compromis...
$11.58
In Stock
Order within the next 11 mins and your part ships today!
This Drive Belt is 89.5" long and comes in black, featuring four ribs on the inside for a better grip. This is a long belt that wraps all the way around the dryer drum, around a tension pulley, and th...
$36.20
In Stock
Order within the next 11 mins and your part ships today!
This set (Knob and Clip Assembly, Control Knob, Dryer Control Knob) allows you to replace the knob on your timer if it is damaged or missing. The plastic knob can break around its shaft, or the retain...
$40.55
In Stock
Order within the next 11 mins and your part ships today!
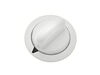
This timer knob is used to set the dryer cycle by advancing the timer. The plastic can become brittle with age and crack where it attaches to the timer shaft. You will need to replace this part if it ...
$38.88
In Stock
Order within the next 11 mins and your part ships today!
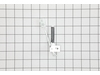
This clip ensures that the knob is securely fastened to the control shaft, allowing you to properly select the correct time and setting for your dryer. If your dryer will not start or shut off, the ti...
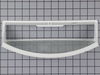
This is a lint filter screen that is used for many dryers. It has a metal screen with a white plastic frame, and is approximately 13 inches wide. This part is sold individually. The lint filter traps ...
$70.26
In Stock
Order within the next 11 mins and your part ships today!
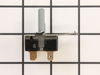
This replacement start switch is a genuine OEM part for your dryer. If your dryer will not start or shut off, you may need to replace this part. For this repair you will need a number 2 Phillips screw...
$21.48
In Stock
Order within the next 11 mins and your part ships today!
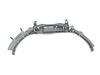
This rear drum bearing kit includes a shaft, ground strap, bearing, seven screws, and installation instructions. The bearing plate comes with a slot in it for the ground strap. This part helps keep yo...
$88.34
In Stock
Order within the next 11 mins and your part ships today!
This light bulb, also known as a drum lamp, illuminates and lights up the dryer drum when the door is open. If the light bulb in the dryer is burnt out or lighting is inconsistent, replacing it can so...
$9.27
In Stock
Order within the next 11 mins and your part ships today!
Questions And Answers for DX4500GG7WW
We're sorry, but our Q&A experts are temporarily unavailable.
Please check back later if you still haven't found the answer you need.
It was pretty easy. After already taking apart the dryer to install a new belt I knew exactly my plan of action. I removed the two screws that hold the top panel of the dryer to the front panel. I then removed the top panel and removed the screws that hold the front to each side panel. I than pulled the front away from the cabinet and
... Read more drum. I put the new slides in place and installed a new felt strip. I put it back together and that was that. Very easy.
Removed the 3 knobs. They just pull off. Removed 6 screws on the back side of the control panel. The front (plastic panel then just separates from the back). Then look at how the switch is mounted on the plastic panel. There should be 2 small pieces of plastic that holds it in. Carefully twist the switch in the appropriate direction s
... Read moreo it comes free. Before you remove any wires from the old switch remember what colors go where ! I used needle nose pliers to remove the connections from the switch. Make the new connections, mount the switch, put the screws back in the panel. BEFORE YOU DO ANYTHING. UNPLUG THE ELECTRICAL CORD !!!
I removed the two screws at the front above the drum opening (with the dryer door open). The top panel then lifts off. I removed the screw at each side that holds the front panel to the side panels, tilted the front panel forward, which disengages the front of the drum from the front drum glide bearing. I then lifted the front panel sl
... Read moreightly, unhooking the bottom of the panel from the dryer base, and swung the front panel aside. I removed the existing top drum bearing guide, which was disintegrated, and snapped in the new bearing guide, with the nylon slide strips installed in the bearing guide. Next pulled out the old felt strip, and pressed the new one in place. I then put the bottom of the front panel back into the bottom of the dryer front, and while lifting the drum to asure it fit over the bearing guide, pushed the front panel back to a vertical position to mate with the side panels. I then replaced the side panel screws, replaced the top, and replaced the front top panel screws.


 – Part Number: WE1M504")
 – Part Number: WE1M1067")


")
")


