Models > DNCK440EG0WC

DNCK440EG0WC General Electric Dryer - Overview

Sections of the DNCK440EG0WC

[Viewing 4 of 4]

Manuals & Care Guides for DNCK440EG0WC

Click to download
Keep searches simple, eg. "belt" or "pump".
Drum Bearing Slide - White (Sold individually) – Part Number: WE1M504
Drum Bearing Slide - White (Sold individually)
★★★★★
★★★★★
(157)
PartSelect #: PS755842
Manufacturer #: WE1M504
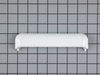
This authentic, white Drum Bearing Slide, also known as the bearing drum slide, glide, or pad, is a plastic, easy-to-install part for your dryer. It replaces the dryer's front drum slide to allow for ...
$18.58
  In Stock
Front Drum Bearing – Part Number: WE3M26
Front Drum Bearing
★★★★★
★★★★★
(85)
PartSelect #: PS960316
Manufacturer #: WE3M26
This Front Drum Bearing (Top Bearing, Dryer Drum Front Support Bearing, Drum Support Bearing, Dryer Drum Glide Bearing) holds the drum bearing and slides for the drum to turn on. The front drum bearin...
$34.14
  In Stock
Drive Belt – Part Number: WE03X29897
Drive Belt
★★★★★
★★★★★
(168)
PartSelect #: PS16542496
Manufacturer #: WE03X29897
This Drive Belt is 89.5" long and comes in black, featuring four ribs on the inside for a better grip. This is a long belt that wraps all the way around the dryer drum, around a tension pulley, and th...
$36.13
  In Stock
Duct Felt Seal – Part Number: WE09X27634
Duct Felt Seal
★★★★★
★★★★★
(42)
PartSelect #: PS12722961
Manufacturer #: WE09X27634
This is a duct felt seal for a dryer. The duct felt seal allows the front-load dryer drum to glide smoothly on the front panel. Your dryer will not function properly if the drum felt seal is compromis...
$11.56
  In Stock
Rear Drum Bearing Kit – Part Number: WE25M40
Rear Drum Bearing Kit
★★★★★
★★★★★
(24)
PartSelect #: PS267529
Manufacturer #: WE25M40
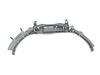
This rear drum bearing kit includes a shaft, ground strap, bearing, seven screws, and installation instructions. The bearing plate comes with a slot in it for the ground strap. This part helps keep yo...
$88.17
  In Stock
Lint Filter - White Frame – Part Number: WE18X25100
Lint Filter - White Frame
★★★★★
★★★★★
(62)
PartSelect #: PS11767017
Manufacturer #: WE18X25100
This is a lint filter screen that is used for many dryers. It has a metal screen with a white plastic frame, and is approximately 13 inches wide. This part is sold individually. The lint filter traps ...
$70.13
  In Stock
Door Handle - White – Part Number: WE01X20419
Door Handle - White
★★★★★
★★★★★
(63)
PartSelect #: PS9494490
Manufacturer #: WE01X20419
This part is on the outer door of the dryer.
$25.14
  In Stock
Idler Pulley Wheel – Part Number: WE12X83
Idler Pulley Wheel
★★★★★
★★★★★
(7)
PartSelect #: PS265721
Manufacturer #: WE12X83
A dryer's idler pulley wheel serves to help the belt to rotate the drum.
$34.79
  In Stock
Door Latch – Part Number: WE1M1011
Door Latch
★★★★★
★★★★★
(14)
PartSelect #: PS3502777
Manufacturer #: WE1M1011
This door latch is designed for your dryer, and is mounted to the dryer frame. The door latch holds the door of your dryer closed while the machine is operating. If your dryer door is not catching on ...
$11.38
  In Stock
Interlock Switch – Part Number: WD21X10261
Interlock Switch
★★★★★
★★★★★
(18)
PartSelect #: PS1481922
Manufacturer #: WD21X10261
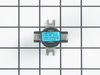
The interlock switch may also be referred to as a belt switch. This part is a simple on/off mechanism that prohibits the appliance from operating when the door is open. This is a part for your dryer. ...
$27.45
  In Stock
Drum Bearing Sleeve – Part Number: WE1M462
Drum Bearing Sleeve
★★★★★
★★★★★
(7)
PartSelect #: PS266777
Manufacturer #: WE1M462
Sold individually.
$24.20
  In Stock
Cycling Thermostat - 4 Wire – Part Number: WE4M181
Cycling Thermostat - 4 Wire
★★★★★
★★★★★
(8)
PartSelect #: PS267926
Manufacturer #: WE4M181
This thermostat helps to regulate the dryer's internal temperature. L210-30F
$62.85
  In Stock

Questions And Answers for DNCK440EG0WC

Be the first to ask our experts a question about this model!

Common Symptoms of the DNCK440EG0WC

[Viewing 8 of 8]
Noisy
Fixed by
these parts
Fixing Fixing Fixing
Show All
Marks left on clothes
Fixed by
these parts
Fixing Fixing Fixing
Show All
Door won’t close
Fixed by
these parts
Fixing Fixing Fixing
Show All
Will Not Start
Fixed by
these parts
Fixing
Show All
Drum Not Spinning
Fixed by
these parts
Fixing
Show All
Too hot
Fixed by
these parts
Fixing Fixing Fixing
Show All
Door latch failure
Fixed by
these parts
Fixing
Show All
Won’t Start
Fixed by
these parts
Fixing
Show All
Keep searches simple. Use keywords, e.g. "leaking", "pump", "broken" or "fit".
Heater element went out
First of all, unplug the dryer. I removed the two screws on the front of the cabinet to remove the top. I then took out the screws to remove the dial panel. Release the belt for the drum through the access hole in the rear of the dryer. Remove the front cover and pull the drum assembly out.

Remove the element disc from the rear of the housing, take note of the the wireing placement. Replace disc and reverse order of disassembly.

This job was easy for me as I am a tinkerer by nature. The hardest part of the whole job was waiting on the part, which by the way was ordered on a Sunday evening and I had the replacement in my hands and back in the dryer running by 1:00 PM on the following Tuesday!

I book marked this website and WILL refer it to others who simply need a repair, not a costly new appliance!
Parts Used:
Heating Element and Housing
  • Brian from Clinton, MO
  • Difficulty Level:
    Easy
  • Total Repair Time:
    15 - 30 mins
  • Tools:
    Screw drivers
183 of 218 people found this instruction helpful.
Was this instruction helpful to you?
Thank you for voting!
Drum belt broke
Removed the front Dryer panel. Left drum in place and lifted it up slightly to get access to motor drive. Slipped belt in place and put panel back on.
This was a first attempt ever at fixing an appliance and it was no big deal.
Parts Used:
Drive Belt
  • Adrian from Middletown, MD
  • Difficulty Level:
    A Bit Difficult
  • Total Repair Time:
    30 - 60 mins
  • Tools:
    Screw drivers
184 of 264 people found this instruction helpful.
Was this instruction helpful to you?
Thank you for voting!
original duct was broken
Dear PartSelect.com,

My repair went off without a hitch.

2 screws removed to remove top.
4 screws removed from inside to remove front panel w/ door.
4 screws removed from top of control panel, loosed and popped top right off.
Flathead screwdriver to pop off old plastic panel.
Removed old wire chase (plastic, approx 3” long).
Removed built-up lint, wiped down area for new duct.
Snapped new duct on.
Dryer works like new!!
Took about 35 minutes, most of time spent cleaning up inside of dryer from lint due to broken duct.

One problem was that salesperson sold me on a new felt strip to go with new duct. That felt comes already installed on the new duct so I did not need it. Cost me a few extra dollars I did not need to spend.

Other than that, easy ordering, fast shipment, and parts are as close to original as possible.

Thanks for all your help!
Parts Used:
Duct Felt Seal Dryer Lint Chute Assembly
  • Chad from Gilbert, SC
  • Difficulty Level:
    Easy
  • Total Repair Time:
    30 - 60 mins
  • Tools:
    Screw drivers
141 of 161 people found this instruction helpful.
Was this instruction helpful to you?
Thank you for voting!