


Models
>
DMT800RHS/XAA
DMT800RHS/XAA Samsung Dishwasher - Overview
Sections of the DMT800RHS/XAA
[Viewing 5 of 5]
Keep searches simple, eg. "belt" or "pump".

Lower Rack Roller with Mounting Clip
PartSelect #: PS4222532
Manufacturer #: DD66-00023A
$19.33
In Stock

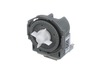
Drain Check Valve
PartSelect #: PS4222545
Manufacturer #: DD66-00045A
This part is the replacement drain check valve for your dishwasher. It is made of black plastic and is approximately 1-1/4 inches by 1-1/4 inches. The round section of the check valve is approximately...
$28.60
In Stock


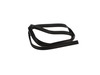
Dishwasher Drain Hose
PartSelect #: PS12085661
Manufacturer #: DD81-02331A
This drain hose is 80" long. The drain hose carries drain water from the dishwasher drain pump to the kitchen sink drain.
A/S-DRAIN HOSE OUT;ODM, DW3000MM
$58.77
In Stock


Dishwasher Chopper Blade
PartSelect #: PS4222578
Manufacturer #: DD70-01003A
The chopper blade spins to chop up the leftover food particles in the sump area.
$34.76
On Order

Assembly-SENSOR LEAK;DMT800,
PartSelect #: PS4222735
Manufacturer #: DD94-01062A
This is a leak sensor designed for use with a range of Samsung dishwashers. This sensor is designed to detect if water begins leaking from the water supply. If/when it detects a leak, it stops the wat...
$39.35
In Stock

;DMR78,POM – Part Number: DD61-00217A")
;DMT800, – Part Number: DD61-00273A")


Duct Nozzle
PartSelect #: PS4222560
Manufacturer #: DD67-00048A
DUCT-NOZZLE;DMT800,PP,T2
$188.80
In Stock
Questions And Answers for DMT800RHS/XAA
We're sorry, but our Q&A experts are temporarily unavailable.
Please check back later if you still haven't found the answer you need.
Common Symptoms of the DMT800RHS/XAA
[Viewing 2 of 2]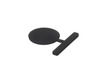
Keep searches simple. Use keywords, e.g. "leaking", "pump", "broken" or "fit".
The sump seal began to seep causing the leak detector to lock it out of service (which is good)
The install definitely takes a bit more than the video I watched but in the end all was fine. The electrical and hose connections are nothing but getting the three screws and retainers isn't as easy as shown in the video I watched and getting them back in is even worse. My hands aren't small but they're not huge either. You'll need multip
... Read more
le phillips head screwdrivers. All a #2 head, with one stubby, one about 6" and one long one with about 8" or more of shaft on the screwdriver to remove the screws. Also take pictures if possible with your phone for reconnecting all your wiring harnesses will prove helpful. The only other difficult part of doing it by yourself is compressing the new sump seal enough to get the three nylon retainer clips back into place. There is really need or room for two people on any part of this other than at that point. If you could have somebody push down on the pump unit from inside while you install the retainers it would make it so much easier but I managed. Other than that not a big deal. Good luck!
Read less
Parts Used:

-
Dale from Watertown, NY
-
Difficulty Level:A Bit Difficult
-
Total Repair Time:1- 2 hours
-
Tools:Pliers, Screw drivers
3 of 6 people
found this instruction helpful.
Was this instruction helpful to you?
Thank you for voting!
Dishwasher door seal leaking.
1. I always record the model number and serial number of every appliance I buy. Saves me aggravation later. For DIY-repair people, this is the most important, universal tip I can give.
2. With the model number in hand, I went to partselect.com and bought a new seal. For things like this, I actively avoid online superstores whose name ... Read more s sound like a really large river since I've received crappy parts from countries who names rhyme with "mynah" and the parts don't fit or I'm replacing them again in another year. Partselect items fit and work.
3. I put the new seal in a bowl of very warm water to make it more flexible. Since its a washer seal, I know it doesn't matter if it gets wet.
4. I put put a drop cloth (could use a sheet of cardboard from an old appliance box, or something similar) on the floor to cut down on the drippy mess. There's always a few drips.
5. I took several close-up pictures of the old seal while it's still in the appliance. Cell phones make this easy -- better to have a record of how it goes together. I do the same every time I'm disassembling appliances, but in this case the the door seal is right inside the the door, so I don't need many photos. But close-up photos of the ends will show how much overhang to expect during the replacement.
6. I partially pulled out the old seal. Took one more photo where it's partially pulled out to make sure I understand the orientation when I put it back in. Then finished pulling it out and set it aside.
7. Cleaned out the groove where the old seal was, and cleaned out the door edges well so the new seal can fit right. Old toothbrushes (don't throw them out, they're way too useful) and cotton swabs to clean any gunk out of crevices.
8. On this model, the door latch is in the center of the washer, so that's where the middle of the new seal goes.
9 Take the seal out of the water, shake off excess water, and stretch istlightly to help straighten it. Hold the ends of the seal together. where it folds in half is the midpoint. Grab it by that midpoint.
10, Press the seal into the groove starting with the midpoint directly below the latch so it will be even length from left to right.
11. Continued pressing the seal into place down the sides. Observe that if I've done this correctly, each end overhangs onto the bottom of the tub by approximately the same amount.
12. Using the HANDLE, and NOT the blade of a butter knife, pressed the seal into the groove firmly as all points along the seal. DO NOT use anything sharp to this step, you don't want to nick the seal. DID NOT **slide** the butter knife along, simply pressed it in repeatedly, moved a half-inch down the seal, and repeated. The goal is to NOT stretch the seal, but simply to make sure its fully in the groove.
13. Checked the dishwasher for anything out of place. Don't skip this step -- you have the appliance open and your tools out -- best time for preventative maintenance. Also a good time to verify that the dishwasher is properly leveled -- this influences leaks as well.
14. On this model, there is a vent in the door that lets air out when the washer fills, and lets air in when it empties. This was absolutely "gunked up" with soap sludge, and I spent more time cleaning the vent than I did in replacing the seal. But without a properly-functioning vent, pressure builds up inside the tub during filling, and water can be pushed out an otherwise-mediocre seal. I wonder if I had caught that first if I could have avoided replacing the seal.
15. Ran the washer on several "quick" cycles to ensure no leaks.
16. Put everything back together. Put away the tools. Went to the "toy store" and bought myself a new tool (an oscillating toolkit this time) as a reward for a job well done. Besides, the saw will get used when I re-tile the main bath, which I've been putting off.
Read less
Parts Used:
-
James from BALLSTON LAKE, NY
-
Difficulty Level:Really Easy
-
Total Repair Time:30 - 60 mins
3 of 7 people
found this instruction helpful.
Was this instruction helpful to you?
Thank you for voting!