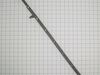
This is a lower rack roller for your dishwasher. It attaches in the lower roller assembly on the bottom of your rack to allow the rack to smoothly slide in and out. This replacement part is 1.5 inches...
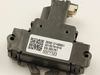
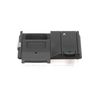
This is replacement door latch for your dishwasher. The door latch is attached to the tub frame, and connects to the door strike to keep your dishwasher door closed during operation. If you have a bro...
This mounting bracket is manufactured to secure your dishwasher to your countertop. Mounting brackets should be installed so the dishwasher doesn’t tip forward. You can fit the bracket to either the c...
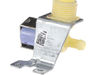
The detergent dispenser in your dishwasher stores the detergent until it is ready to be dispensed. If your dishes are not coming clean, or you notice the detergent is still in the dispenser at the end...
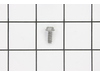
This is a genuine GE dishwasher leveling screw. It operates as a leg on the bottom of your dishwasher, and can be screwed in and out to raise and lower the height of the dishwasher. It is made of meta...
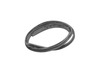
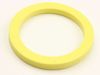
This part is a replacement middle spray arm bearing for your dishwasher. The spray arm bearing reduces friction and allows the spray arm to rotate during the operating cycle. If the spray arm is not r...
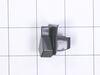
This dishwasher latch strike is a manufacturer-approved replacement part for your appliance. The latch strike is an important component in your dishwasher door assembly, and adds an extra layer of sec...
$8.06
In Stock
Questions And Answers for DDT700SGN3WW
Ask our experts a question about this model and we'll get back to you as soon as possible!
2 questions answered by our experts.
Sort by:
< Prev
1
Next >
Search filter:
Clear Filter
Your search term must have 3 or more characters.
Keep searches simple. Use keywords, e.g. "leaking", "pump", "broken" or "fit".
Sorry, we couldn't find any existing answers that matched.Try using some different or simpler keywords, or submit your new question by using the "Ask a Question" button above!
James
February 2, 2023
When the drain cycle starts, the pump runs for about 1/2 second, stops and displays 888. Could there be something stuck in the pump?
For model number DDT700SGN3WW
Hello James, thank you for writing. 888 usually means that the control board is confused. It could be an issue with the Drain Tube PS6011670. If not, then look at the Drain Pump PS12730507. We have a video of how to replace it on our site. We look forward to hearing from you.
Hello James, thank you for your question. To access the inside of the door you need to follow these steps. Using the drill driver unthread the two screws securing the toe kick and remove it. Use channel lock pliers to unthread the water supply line elbow fitting from the inlet valve. Unplug the wire harness and routing clip connected to the door. Unthread the screw to release the junction box cover. Untwist the wire nuts to disconnect the wires. Disconnect the drain hose from the sink drain or garbage disposal. Open the dishwasher door and lift off the hinges to remove and unthread the two-quarter-inch screws on the inner door. Now you will be able to see all parts inside the door. Good luck with the repair!
Was this helpful?
Thank you for voting!
< Prev
1
Next >
✖
Ask a Question
Ask our experts a question on this model and we'll respond as soon as we can.
1. Turn off breaker supplying power to dishwasher in electrical panel 2. Open dishwasher door 3. Unscrew the screws that secure the dishwasher to the counter. 4. Tip dishwasher forward. Identify the non-functioning door latch. It looks exactly like the replacement. Unclip the wire harness from the door latch. 5.
... Read more On the inside of the dishwasher, there are 2 screws directly under the door latch. Unscrew them and carefully set aside. 6. Remove old door latch. 7. Set new door latch in place. Holding securely, replace screws removed in step 5. Toward the end they get a little tougher to screw in. 8. Plug wire harness into new door latch. 9. Re-align dishwasher and re-secure to counter in previous position. 10. Test latch to make sure it closes properly. 11. Turn on breaker in electrical panel. The dishwasher should now function properly.
Decided it could be 1 of 3 things. Fuse on main circuit board that controls hot water. Main control board or drain pump failure. Was not able to find out how to do diagnostics on this unit as there is no "cycle control" feature and this is a top of the line unit. Replaced the fuse and dishwasher failed. Replaced the circuit board and dish
... Read morewasher failed the first time. Second time it went to completion and has worked properly since. You can go on line and find videos on removing the circuit board for GE dishwashers. This can be done without pulling the dishwasher out. Remove the lower black dust panel and insulation. Remove cover to electrical box - 1 screw and remove. Remove 2 to 4 screw on a sheet metal bracket that holds the circuit board. Notice where 2 metal hangers are located if you remove 4 screws on the left and right side of machine as they drop out. Remove black corded door sensor under circuit board. Work the sheet metal back and forth to remove from dish washer so that circuit board is exposed. Remove circuit board connectors and pull out unit to install new circuit board. Some have one screw and some have only plastic retainers. Re-install. I did not need the drain pump and the circuit board comes with a control board fuse. Washer was only 14 months old and 2 months out of warranty.
1. Pull out dishwasher (not all the way) 2. Open the door. 3. Remove the white rope holding the door hinge (both sides) 4. Remove the door by pulling up when the door is open about 4-8 inches. 5. Lay the door on the floor ( put something under the door so not to scratch the front. 6. Remove the small bolt at the bottom of the door (both
... Read moresides). 7. Slide the hinge back, up, then out. 8. Where the hinges were are another set of bolts, remove those (both sides) 9. Grab the top part of the door (the part with the buttons) and slide apart. 10. Remove the styrofoam carefully. 11. Disconnect the wiring harness. 12. Remove the 6 screws holding the Despenser tray in place. 13. Put in new Despenser tray and put everything back together.