


Models
>
DDE7000SBLWH
DDE7000SBLWH General Electric Dryer - Overview
Sections of the DDE7000SBLWH
[Viewing 4 of 4]


Manuals & Care Guides for DDE7000SBLWH
Click to downloadKeep searches simple, eg. "belt" or "pump".

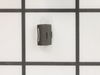
D-Shaped Knob Clip
PartSelect #: PS268493
Manufacturer #: WH01X10106
This clip ensures that the knob is securely fastened to the control shaft, allowing you to properly select the correct time and setting for your dryer. If your dryer will not start or shut off, the ti...
No Longer Available

Rear Drum Bearing Kit
PartSelect #: PS267529
Manufacturer #: WE25M40
This rear drum bearing kit includes a shaft, ground strap, bearing, seven screws, and installation instructions. The bearing plate comes with a slot in it for the ground strap. This part helps keep yo...
$88.17
In Stock

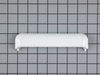
Door Handle - White
PartSelect #: PS9494490
Manufacturer #: WE01X20419
This part is on the outer door of the dryer.
$25.14
In Stock

Drive Belt
PartSelect #: PS2350043
Manufacturer #: WE12X10014
This belt has a length of 87 inches, width of 1/4”, flat, with 4 ridges.
$31.89
In Stock

Drum Slide
PartSelect #: PS267877
Manufacturer #: WE3X87
This slide is sold individually. Some dryers require up to three of these slides . Be sure to check to make sure you order the necessary amount for your dryer.
$21.04
In Stock

Idler Pulley Wheel
PartSelect #: PS265721
Manufacturer #: WE12X83
A dryer's idler pulley wheel serves to help the belt to rotate the drum.
$34.79
In Stock

Door Latch
PartSelect #: PS3502777
Manufacturer #: WE1M1011
This door latch is designed for your dryer, and is mounted to the dryer frame. The door latch holds the door of your dryer closed while the machine is operating. If your dryer door is not catching on ...
$11.38
In Stock

Lint Filter with Frame
PartSelect #: PS266269
Manufacturer #: WE18X54
This part may differ in appearance, but functions same as original.
$75.56
In Stock

Door Strike
PartSelect #: PS266893
Manufacturer #: WE1X1192
TThe door strike for your dryer is mounted on the dryer frame that the door shuts onto. It fits into the door catch on the door and keeps the door closed. If the door strike is damaged or missing, the...
$8.54
In Stock

Rear Drum Bearing
PartSelect #: PS267865
Manufacturer #: WE3X75
This part is the rear dryer drum bearing only. This part helps keep your dryer running smoothly as possible with as little noise as possible.
$18.69
In Stock

Adjustable Leveling Screw
PartSelect #: PS1021358
Manufacturer #: WE1M642
The adjustable leveling screws on the bottom of your dryer can be screwed in or out to lower or raise the leg level. If one of the leveling screws is stripped, damaged, or missing, you may not be able...
$16.51
In Stock

Rotary Start Switch
PartSelect #: PS268227
Manufacturer #: WE4X782
This is the replacement rotary start switch for your dryer. It is silver and black in color, with a white D-shaped shaft. The rotary start switch is found inside the dryer control panel, and when actu...
$48.94
In Stock
Questions And Answers for DDE7000SBLWH
We're sorry, but our Q&A experts are temporarily unavailable.
Please check back later if you still haven't found the answer you need.
Common Symptoms of the DDE7000SBLWH
[Viewing 5 of 5]Noisy
Fixed by
these parts
these parts


Show All
Door won’t close
Fixed by
these parts
these parts


Show All
Marks left on clothes
Fixed by
these parts
these parts


Show All
Too hot
Fixed by
these parts
these parts

Show All
Will Not Start
Fixed by
these parts
these parts
Show All


Keep searches simple. Use keywords, e.g. "leaking", "pump", "broken" or "fit".
dryer belt broke
first I took the dryer apart 1st thing i did was unplug the power supply (safety first) then I removed the top of the unit then removed the front cleaned all the lint from the inside of the cabinet I found the proper belt size on part select.com the next day I had my dryer belt delivered (which cost 1/3 the price of the local repair shop
... Read more
price)
then I placed the belt over the dryer drum and made sure it was in the general location it should be I then replaced the front cover and the top. then I removed the rear cover which was held on by six 5/16 sheet metal screws which gave me access to the drive pulley and belt tensioner the belt goes on by going under the tensioner then around the drive pulley
Then i rotated the drum by hand to make sure everything had clearance I then buttend everything up plugged it and started it up it workd fine and I figure Ill get another 8 years out of it
Thank you partselect.com
Read less
Parts Used:
-
Matt from La Belle, MO
-
Difficulty Level:A Bit Difficult
-
Total Repair Time:15 - 30 mins
-
Tools:Nutdriver, Screw drivers, Socket set
160 of 188 people
found this instruction helpful.
Was this instruction helpful to you?
Thank you for voting!
no heat
had to remove top of dryer 2 phillops screws at top in the door opening. flip top out of way take 2 screws out of insides that hold the front on. un hook all plugs and remove front of dryer. once u have did this you need to remove the drum by pulling it out of the bearing in the back un hook the belt from the motor and remove the drum thi
... Read more
s should expose the element 4 screws and 3 wire to remove it. installation is the same
Read less
Parts Used:
-
Joshua from Cardington, OH
-
Difficulty Level:Very Difficult
-
Total Repair Time:30 - 60 mins
-
Tools:Nutdriver, Pliers, Screw drivers, Socket set, Wrench (Adjustable), Wrench set
108 of 134 people
found this instruction helpful.
Was this instruction helpful to you?
Thank you for voting!
The dryer door handle broke off.
I pried out the remaining pieces of the handle out of the door with a screwdriver. When the new part arrived, I snapped it into place and it was done. It fit perfectly.
Parts Used:
-
Jim from North Richland Hills, TX
-
Difficulty Level:Really Easy
-
Total Repair Time:Less than 15 mins
-
Tools:Screw drivers
92 of 112 people
found this instruction helpful.
Was this instruction helpful to you?
Thank you for voting!