


Models
>
DCCB330EJ2WC
DCCB330EJ2WC General Electric Dryer - Overview
Sections of the DCCB330EJ2WC
[Viewing 6 of 6]


Manuals & Care Guides for DCCB330EJ2WC
Click to downloadKeep searches simple, eg. "belt" or "pump".
 – Part Number: WE1M504")
Drum Bearing Slide - White (Sold individually)
PartSelect #: PS755842
Manufacturer #: WE1M504
This authentic, white Drum Bearing Slide, also known as the bearing drum slide, glide, or pad, is a plastic, easy-to-install part for your dryer. It replaces the dryer's front drum slide to allow for ...
$18.58
In Stock

Drive Belt
PartSelect #: PS16542496
Manufacturer #: WE03X29897
This Drive Belt is 89.5" long and comes in black, featuring four ribs on the inside for a better grip. This is a long belt that wraps all the way around the dryer drum, around a tension pulley, and th...
$36.13
In Stock

Rear Drum Bearing Kit
PartSelect #: PS267529
Manufacturer #: WE25M40
This rear drum bearing kit includes a shaft, ground strap, bearing, seven screws, and installation instructions. The bearing plate comes with a slot in it for the ground strap. This part helps keep yo...
$88.17
In Stock

Lint Filter - White Frame
PartSelect #: PS11767017
Manufacturer #: WE18X25100
This is a lint filter screen that is used for many dryers. It has a metal screen with a white plastic frame, and is approximately 13 inches wide. This part is sold individually. The lint filter traps ...
$70.13
In Stock

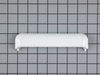
Door Handle - White
PartSelect #: PS9494490
Manufacturer #: WE01X20419
This part is on the outer door of the dryer.
$25.14
In Stock

Idler Pulley Wheel
PartSelect #: PS265721
Manufacturer #: WE12X83
A dryer's idler pulley wheel serves to help the belt to rotate the drum.
$34.79
In Stock

Door Latch
PartSelect #: PS3502777
Manufacturer #: WE1M1011
This door latch is designed for your dryer, and is mounted to the dryer frame. The door latch holds the door of your dryer closed while the machine is operating. If your dryer door is not catching on ...
$11.38
In Stock

Drum Bearing Sleeve
PartSelect #: PS266777
Manufacturer #: WE1M462
Sold individually.
$24.20
In Stock

Dryer Lint Chute Assembly
PartSelect #: PS11763093
Manufacturer #: WE14X25080
The lint chute assembly houses the lint filter and channels exhaust air from the drum to the blower wheel.
$108.72
In Stock

Door Strike
PartSelect #: PS266893
Manufacturer #: WE1X1192
TThe door strike for your dryer is mounted on the dryer frame that the door shuts onto. It fits into the door catch on the door and keeps the door closed. If the door strike is damaged or missing, the...
$8.54
In Stock

Door Switch
PartSelect #: PS2344321
Manufacturer #: WE4M415
A door switch is a simple on/off mechanism that prohibits the dryer from operating when the door is open.
$32.49
In Stock

Retainer O-Ring
PartSelect #: PS266776
Manufacturer #: WE1M461
This is a replacement O-ring for the drum bearing retainer on your dryer. The drum bearing is found at the back of the dryer drum. The O-ring is designed to create a seal on the drum bearing. The O-r...
$9.01
In Stock
Questions And Answers for DCCB330EJ2WC
We're sorry, but our Q&A experts are temporarily unavailable.
Please check back later if you still haven't found the answer you need.
Common Symptoms of the DCCB330EJ2WC
[Viewing 6 of 6]Noisy
Fixed by
these parts
these parts


Show All
Door won’t close
Fixed by
these parts
these parts


Show All
Marks left on clothes
Fixed by
these parts
these parts


Show All
Drum Not Spinning
Fixed by
these parts
these parts
Show All
Too hot
Fixed by
these parts
these parts


Show All
Won’t Start
Fixed by
these parts
these parts
Show All

")


Keep searches simple. Use keywords, e.g. "leaking", "pump", "broken" or "fit".
Drum belt broke
Removed the front Dryer panel. Left drum in place and lifted it up slightly to get access to motor drive. Slipped belt in place and put panel back on.
This was a first attempt ever at fixing an appliance and it was no big deal.
This was a first attempt ever at fixing an appliance and it was no big deal.
Parts Used:
-
Adrian from Middletown, MD
-
Difficulty Level:A Bit Difficult
-
Total Repair Time:30 - 60 mins
-
Tools:Screw drivers
184 of 264 people
found this instruction helpful.
Was this instruction helpful to you?
Thank you for voting!
The dryer door handle broke off.
I pried out the remaining pieces of the handle out of the door with a screwdriver. When the new part arrived, I snapped it into place and it was done. It fit perfectly.
Parts Used:
-
Jim from North Richland Hills, TX
-
Difficulty Level:Really Easy
-
Total Repair Time:Less than 15 mins
-
Tools:Screw drivers
92 of 112 people
found this instruction helpful.
Was this instruction helpful to you?
Thank you for voting!
Dryer would not start
The end repair was very simple and took minimal effort. The time and difficulty was all in the testing. I disassembled the dryer and removed the drum and then hard wired each thermo-fuse to determine where the fault was. After test all of those I was stumped. When I opened the door the light would not come on so I assumed it was a pow
... Read more
er fault closer to the source. However after all of my testing I couldn't find anything wrong. I then removed the light bulb and realized it was burned out which led me to the door switch being the fault. I removed the switch and soldered the three wire together and the dryer started right up! All I had to do was order a new $15 part, unsolder the wires and plug them in. Would have been so much simpler if that light bulb hadn't of been burned out causing me to over think my diagnosis. This was my first major appliance repair and I did it with only the help of the parts diagram provided on the website.
Read less
Parts Used:
-
Joshua from Dallas, TX
-
Difficulty Level:A Bit Difficult
-
Total Repair Time:1- 2 hours
-
Tools:Pliers, Screw drivers, Socket set
88 of 130 people
found this instruction helpful.
Was this instruction helpful to you?
Thank you for voting!