


Models
>
DBLR333GG8WW
DBLR333GG8WW General Electric Dryer - Overview
Sections of the DBLR333GG8WW
[Viewing 5 of 5]


Manuals & Care Guides for DBLR333GG8WW
Click to downloadKeep searches simple, eg. "belt" or "pump".
 – Part Number: WE1M504")
Drum Bearing Slide - White (Sold individually)
PartSelect #: PS755842
Manufacturer #: WE1M504
This authentic, white Drum Bearing Slide, also known as the bearing drum slide, glide, or pad, is a plastic, easy-to-install part for your dryer. It replaces the dryer's front drum slide to allow for ...
$18.58
In Stock
 – Part Number: WE1M1067")
Drum Bearing Slide - Green (Sold individually)
PartSelect #: PS6447706
Manufacturer #: WE1M1067
This original equipment manufacturer Drum Bearing Slide is a plastic, green, easy-to-install part for your dryer. It replaces the dryer's front drum slide to allow for easier movement. You'll know if...
$14.29
In Stock

Drive Belt
PartSelect #: PS16542496
Manufacturer #: WE03X29897
This Drive Belt is 89.5" long and comes in black, featuring four ribs on the inside for a better grip. This is a long belt that wraps all the way around the dryer drum, around a tension pulley, and th...
$36.13
In Stock

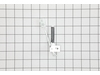
Control Knob and Clip - White
PartSelect #: PS9493075
Manufacturer #: WE01X20378
This set (Knob and Clip Assembly, Control Knob, Dryer Control Knob) allows you to replace the knob on your timer if it is damaged or missing. The plastic knob can break around its shaft, or the retain...
$40.47
In Stock

Timer Knob
PartSelect #: PS1482197
Manufacturer #: WE1M654
This timer knob is used to set the dryer cycle by advancing the timer. The plastic can become brittle with age and crack where it attaches to the timer shaft. You will need to replace this part if it ...
$38.81
In Stock

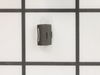
D-Shaped Knob Clip
PartSelect #: PS268493
Manufacturer #: WH01X10106
This clip ensures that the knob is securely fastened to the control shaft, allowing you to properly select the correct time and setting for your dryer. If your dryer will not start or shut off, the ti...
No Longer Available

Duct Felt Seal
PartSelect #: PS12722961
Manufacturer #: WE09X27634
This is a duct felt seal for a dryer. The duct felt seal allows the front-load dryer drum to glide smoothly on the front panel. Your dryer will not function properly if the drum felt seal is compromis...
$11.56
In Stock

Rear Drum Bearing Kit
PartSelect #: PS267529
Manufacturer #: WE25M40
This rear drum bearing kit includes a shaft, ground strap, bearing, seven screws, and installation instructions. The bearing plate comes with a slot in it for the ground strap. This part helps keep yo...
$88.17
In Stock

Lint Filter - White Frame
PartSelect #: PS11767017
Manufacturer #: WE18X25100
This is a lint filter screen that is used for many dryers. It has a metal screen with a white plastic frame, and is approximately 13 inches wide. This part is sold individually. The lint filter traps ...
$70.13
In Stock

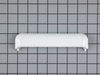
Door Handle - White
PartSelect #: PS9494490
Manufacturer #: WE01X20419
This part is on the outer door of the dryer.
$25.14
In Stock

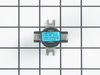
Push-to-Start Switch
PartSelect #: PS3487190
Manufacturer #: WE4M416
This switch is used to activate the dryer.
$18.20
In Stock

Door Latch
PartSelect #: PS3502777
Manufacturer #: WE1M1011
This door latch is designed for your dryer, and is mounted to the dryer frame. The door latch holds the door of your dryer closed while the machine is operating. If your dryer door is not catching on ...
$11.38
In Stock
Questions And Answers for DBLR333GG8WW
We're sorry, but our Q&A experts are temporarily unavailable.
Please check back later if you still haven't found the answer you need.
Common Symptoms of the DBLR333GG8WW
[Viewing 10 of 10]Noisy
Fixed by
these parts
these parts


Show All
Marks left on clothes
Fixed by
these parts
these parts
Show All
Door won’t close
Fixed by
these parts
these parts


Show All
Will Not Start
Fixed by
these parts
these parts


Show All
Drum Not Spinning
Fixed by
these parts
these parts

Show All
Too hot
Fixed by
these parts
these parts

Show All
Won’t Start
Fixed by
these parts
these parts

Show All
Door latch failure
Fixed by
these parts
these parts
Show All
Touchpad does not respond
Fixed by
these parts
these parts
Show All
Not Heating
Fixed by
these parts
these parts
Show All

")
")


Keep searches simple. Use keywords, e.g. "leaking", "pump", "broken" or "fit".
Due to over loading of the dryer the drum ruined the slides and was making a bad noise due to plastic rubbing plastic
It was pretty easy. After already taking apart the dryer to install a new belt I knew exactly my plan of action. I removed the two screws that hold the top panel of the dryer to the front panel. I then removed the top panel and removed the screws that hold the front to each side panel. I than pulled the front away from the cabinet and
... Read more
drum. I put the new slides in place and installed a new felt strip. I put it back together and that was that. Very easy.
Read less
Parts Used:
-
Matthew from Plainfield, IL
-
Difficulty Level:Really Easy
-
Total Repair Time:15 - 30 mins
-
Tools:Screw drivers
791 of 899 people
found this instruction helpful.
Was this instruction helpful to you?
Thank you for voting!
Timer knob cracked twice. Found out the timer switch was bad.
Removed the 3 knobs. They just pull off. Removed 6 screws on the back side of the control panel. The front (plastic panel then just separates from the back). Then look at how the switch is mounted on the plastic panel. There should be 2 small pieces of plastic that holds it in. Carefully twist the switch in the appropriate direction s
... Read more
o it comes free. Before you remove any wires from the old switch remember what colors go where ! I used needle nose pliers to remove the connections from the switch. Make the new connections, mount the switch, put the screws back in the panel. BEFORE YOU DO ANYTHING. UNPLUG THE ELECTRICAL CORD !!!
Read less
Parts Used:

-
Jeffery from Waterford, MI
-
Difficulty Level:Easy
-
Total Repair Time:15 - 30 mins
-
Tools:Screw drivers
720 of 765 people
found this instruction helpful.
Was this instruction helpful to you?
Thank you for voting!
Knob broke
Pulled off old knob and aligned new knob and pushed on. Videos sent with order was very clear and great customer service tool.
Parts Used:
-
Daniel from Chantilly, VA
-
Difficulty Level:Easy
-
Total Repair Time:Less than 15 mins
501 of 536 people
found this instruction helpful.
Was this instruction helpful to you?
Thank you for voting!