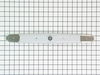
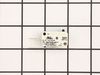
This door latch, used in dishwashers, is located at the top of the door and locks the door shut when the dishwasher is working. If the door will not close or is damaged, changing the latch could be th...
This spray arm is located on the lower half of your dishwasher. Water is forced through this spray arm by the unit's pump and motor assembly. The force of the water propels the spray arms, spraying wa...
I went to PartSelect and found the parts pictorial. A replacement motor was listed for 3 series of the dishwasher. The series can be identified by the first 2 digits of the dishwasher serial number. Mine was 22 so I needed parts for the series 20 dishwasher.
According to the pictorial it looked like the motor seals were include
... Read mored with the replacement motor. When the motor arrived, I found the seals were not included. I called PartSelect and they shipped the seals to me with free overnight delivery.
I had no trouble disassembling the wash manifold and spray parts using the instructions provided with the replacement motor and the instructions from the Maytag repair manual that I found online. The motor is removed from the inside of the tub.... very nice. You don't need to remove the dishwasher from under the counter in order to get at the motor.
I made a mental note of the orientation of the faulty motor before I removed it. I installed the replacement motor with the same orientation along with the wash parts. The dishwasher worked successfully.
The first thing I did was read the all of repair stories that others had submitted. Then I set the timer and chucked up the Torx bit in my electric drill/screwdriver. There are 10 Torx screws on the inside of the dishwasher door and they came out very quickly. The top two screws hold the latch in place. I lifted the inside stainless steel
... Read more cover to get acces to the latch. There was enough slack in the wire that I was able to remove the latch from where it was and extend it above the door. This let me lay the stainless steel liner back onto the inside of the door without removing or disconnecting the soap dispenser. Thus exposed, disconnecting the connectors from the old latch and reconnecting them to the microswitches on the new latch was a breeze. Once connected, I reinstalled the latch assembly, repositioned the liner correctly and replaced the ten screws. The entire job, including putting my tools away and cleaning up took eight minutes. I did it on my lunch break. The eight minutes included pulling the circuit breaker and reconnecting it (very important, that step). The new latch/handle assembly completely fixed the problem.
I turned off the electricity at the circuit breaker. Sitting in a chair in front of the opened dishwasher with the partially opened door resting on my knees, I removed the 10 screws lining the inside of the door (setting them in order on the cabinet above -- 2 are different length so this helps keep them in order. I tilted the inner
... Read morecover on the door up (which is what the screws had been holding). With the door not fully open because it was on my knees, I was able to position the cover so that I did not have to remove the connection to the soap dispenser. The two middle screws removed earlier were the screws that held the latch in place, so the assembly was already loose at this point. I put a black mark on the assembly to mark the side that the black wires were attached. Then with the pliers removed the plugs that were connected to the switches on either side of the assembly. Then marked the replacement assembly with the black mark on the same side as the one removed. I attached the plugs to the the replacement assembly using the black mark as reminder for which side was which. I lined up the latch on the door where it goes, lowered the lid (lifting the lower edge over the base a little), lined up and started the latch screws (middle 2), then started all of the other screws and then tightened them all. Closed the lid and tested the latch. It was closing correctly now. I turned on the electricity and tested to make sure all was now working properly.