This drip bowl is used for electric cooktops and ranges, it is designed to sit under a 6-inch surface burner. It catches the drips and spills coming from the cookware on the surface burner. This drip ...
$6.96
In Stock
Order within the next 1 hr and 29 mins and your part ships today!
The surface burner plug-in block kit features a newer-style terminal block. This kit is designed for use with ranges and cooktops. This terminal block is how the coil element on your stove connects to...
$13.42
In Stock
Order within the next 1 hr and 29 mins and your part ships today!
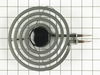
This is a delta frame surface unit, also known as coil element, for a stove, range, or oven. It is a 6-inch surface burner with a reinforced delta frame that carries 1250 watts and 240 volts. The burn...
$50.86
In Stock
Order within the next 1 hr and 29 mins and your part ships today!
This temperature sensor is used with self cleaning ovens. Its 1000 ohm resistance increases with temperature. This sensor has male leads and comes with ceramic wire nuts.
This 10-32-inch hex nut works with multiple appliances in your home as a fastener. This specific model is sold individually. Hex nuts usually have 6 even sides and together they are used with bolts an...
$8.04
In Stock
Order within the next 1 hr and 29 mins and your part ships today!
This is a burner surface element and is 8 inches in diameter and 2600 watts. The burner surface element functions as a cooking area on the cooktop of the range. The purpose of this part is to supply h...
$124.97
In Stock
Order within the next 1 hr and 29 mins and your part ships today!
Two screws remove the front of the sensor (put a pan under the sensor to catch the screws), One nut removes the rear cover to access the rear of the sensor. Separating the two halves of wiring harness takes a little dexterity. BIG TIP! Tie a string to the back of the sensor wire and pull the sensor out from the front making sure the strin
... Read moreg still shows thru the back. If you don't you have a 15 minute job trying to fish the wires at an angle thru the insulation (a very frustrating task). Untie the string from the old and tie it securely to the new. Pull the string from the back and Voila! your new sensor can be plugged in or wirer nutted to the old connection on the back of the stove. Replace the nut and the two screws and you're done!
I unplugged the stove from the outlet, then removed the two burners I was going to be working on and the drip pans. Then I raised the top part of the stove and removed the screws holding the plug-in blocks to the stove. Then I cut the two wires going to the old plug-in block and stripped the wires back to match the new wire parts. Then I
... Read moreplaced the sleeves over the new wires, then I placed the new wire beside the wire I stripped on the stove and screw on the wire cap making sure it was tight. I repeated this three more times, once I had all four wires connected I then placed the sleeves over the connections and heated them up until they were formed around the connection. Once I had all the connections done I placed one wire at a time into the plug-in block until it locked into place ( I looked at my old plug-in blocks first to make sure I placed the new wires in the correct way ).I then used the metal mounting bracket that matched my old ones and snapped the correct one onto each plug-in block. Before mounting them onto the stove I compared them to my old ones to make sure they were correct. Then I used the new screws to mount them to the stove. I took a second look at everything I had done before closing the top cover of my stove. After lowering the cover back into place I put both the drip covers in place and then installed the burners.I then plugged the stove back into the outlet and tried the burners. This was very simple and the video on the web site shows this very well which made my job very simple.
Thought we was going to have to replace the range all together, due to most parts not being available for this model anymore. Since this is an expensive model, we did not look forward to having to replace it. So I thought just by chance I would check to see if anyone had parts to help in repairing it. Part Select did happen to have the
... Read more Surface Plug-in block kit that was needed. After going at least a year with this problem, I am sooooo happy to say it is finally fixed and working great! Thanks much Parts Select.