


Models
>
CTX18BABARAA
CTX18BABARAA Hotpoint Refrigerator - Overview
Sections of the CTX18BABARAA
[Viewing 6 of 6]


Keep searches simple, eg. "belt" or "pump".

Retainer Bar End Cap - Left or Right Side
PartSelect #: PS299562
Manufacturer #: WR2X9144
Sold individually.
$32.83
In Stock

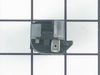
Light Switch
PartSelect #: PS8758429
Manufacturer #: WR23X10725
The interior light of your refrigerator is controlled by a switch that is activated when the door is opened and closed. If your refrigerator light will not turn on, there could be an issue with the sw...
$8.56
In Stock

Light Bulb - 40W
PartSelect #: PS217532
Manufacturer #: 40A15
This 40-Watt light bulb is sold individually and is a genuine OEM replacement option for your home appliances. It is specially designed to withstand extreme temperatures, so this bulb is compatible wi...
$11.02
In Stock

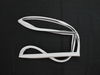
Door Shelf Retainer Bar
PartSelect #: PS305127
Manufacturer #: WR71X10080
This part is a replacement door shelf retainer bar for your refrigerator. The shelf retainer bar connects to the end cap on either side, and the end caps connect it to the refrigerator door. The retai...
$33.85
In Stock

Screw
PartSelect #: PS1020128
Manufacturer #: WR01X10590
This refrigerator door handle mounting screw connects your refrigerator door to the handle. The part is less than 1 inch in length, and can come in both silver and gold colors. When installing this sc...
$8.06
In Stock

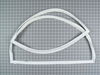
Fresh Food Door Gasket
PartSelect #: PS296973
Manufacturer #: WR24X450
This fresh food door gasket is used to seal the refrigerator door when closed to keep the cool air inside and the room air out.
$140.86
In Stock

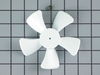
Evaporator Fan Blade Kit
PartSelect #: PS304684
Manufacturer #: WR60X114
This kit features a 5-blade plastic evaporator fan blade that rotates CCW and measures 4.5-inches in diameter and has a 3/8-inch-tall shaft. This kit also has a metal compression ring that secures the...
$26.55
In Stock

Fill Tube Grommet
PartSelect #: PS299055
Manufacturer #: WR2X8474
This fill tube grommet is used on the icemaker.
$31.95
In Stock

Sheet Metal Screws - 12 per pack
PartSelect #: PS294565
Manufacturer #: WR1X1726D
This is a replacement pack of sheet metal screws for your refrigerator. These are Phillips-head screws, and are approximately ¾ of an inch long. This package contains 12 screws. These screws are typic...
$30.96
In Stock

EVAPORATOR FAN MOTOR KIT
PartSelect #: PS12583205
Manufacturer #: WR60X30349
This evaporator fan motor operates in a counter clockwise fashion. This motor's shaft is 3/8 of an inch and the motor has two right side terminals. NOTE: Harness wires NO longer come with the part.
$53.42
In Stock


Questions And Answers for CTX18BABARAA
We're sorry, but our Q&A experts are temporarily unavailable.
Please check back later if you still haven't found the answer you need.
Common Symptoms of the CTX18BABARAA
[Viewing 10 of 10]Light not working
Fixed by
these parts
these parts

Show All
Fridge too warm
Fixed by
these parts
these parts


Show All
Noisy
Fixed by
these parts
these parts

Show All
Leaking
Fixed by
these parts
these parts

Show All
Will Not Start
Fixed by
these parts
these parts

Show All
Door Sweating
Fixed by
these parts
these parts
Show All
Freezer section too warm
Fixed by
these parts
these parts
Show All
Freezer not defrosting
Fixed by
these parts
these parts
Show All
Ice maker not making ice
Fixed by
these parts
these parts
Show All
Fridge runs too long
Fixed by
these parts
these parts
Show All


Keep searches simple. Use keywords, e.g. "leaking", "pump", "broken" or "fit".
Sticking Light Switch
I applied some tips learned by reading other reviews. So before I started I grabbed my trusty vise grip pliers and a small screw driver. I locked onto the switch actuator, the part that the refrigerator door pushes in, with the vise grips and pulled on it just hard enough to get the screw driver inserted in the right side to push in the c
... Read more
atch clip so the switch could be pulled out further each time the catch clip was depressed to the next detent. Then I used the screw driver on the left site to encourage the switch past the detents on the left and very quickly the switch was out of the mount. The wires from the refrigerator pulled out with the old switch. I unplugged the old switch from the wires and plugged in the new switch and shoved the new switch back into the mount, wiggled it a couple of times to make sure it was secure and the job was done. Once I applied the vise gripes at first, the whole job took less than a minute.
Read less
Parts Used:
-
Jonathan from Lilburn, GA
-
Difficulty Level:Really Easy
-
Total Repair Time:Less than 15 mins
-
Tools:Pliers, Screw drivers
116 of 144 people
found this instruction helpful.
Was this instruction helpful to you?
Thank you for voting!
Relay
Removed back panel. Opened cover to relay attached to the compressor and pulled off replacing with new relay. No problem.
Better than paying $250 for someone else to do it.
Better than paying $250 for someone else to do it.
Parts Used:

-
John H from Austin, TX
-
Difficulty Level:Really Easy
-
Total Repair Time:15 - 30 mins
41 of 52 people
found this instruction helpful.
Was this instruction helpful to you?
Thank you for voting!
it appears some one damaged the gasket in the front
First, I removed the old gasket by ripping it out of front,
Second, I cleansed the rust (no idea how that get there, maybe it's a cheap fridge)
Third, I took some boiling water from the water boiler and dip the new gasket in it to "smooth" out the gasket and make it more "pliable" (really, it didn't seem like much h ... Read more appened, nonetheless, I did it to make sure I don't have to struggle if it comes to that)
Forth, I slap the new gasket in the top corner (inner edge closes to the fridge) and work across then down. But somehow after everything is accomplished, the gasket at the bottom appears bulged so I re-did it from the bottom up. and double checked on the firmness by checking with a flash light w/ the fridge closed (I made sure I did this near night time lol)
Lastly, I did love to thank PartSelect for shipping it out so quick. I ordered on Sunday, they shipped it on Monday and I received it on Tuesday morning at work. Incredible speedy service that even RadioShack overnight service took 3 "overnights" to recieve.
Read less
Parts Used:
-
Kah Po from San Francisco, CA
-
Difficulty Level:Really Easy
-
Total Repair Time:15 - 30 mins
36 of 40 people
found this instruction helpful.
Was this instruction helpful to you?
Thank you for voting!