This an authentic OEM 40-Watt replacement light bulb, used in a number of household appliances. It is specially designed to withstand extreme temperatures, which is why these replacement bulbs are mos...
The flat style oven igniter kit is used in gas ovens and ranges. It is what provides the heat needed to open the gas valve, and it ignites fuel for the burner assembly. This part can be used for both ...
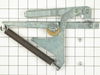
This is a leveling leg for your oven, range, or stove. The leveling legs on your oven allow your appliance to sit perfectly flat. The new one may be longer in length than your original, but will work...
The temperature sensor on your oven detects the temperature within the oven cavity. If you notice your oven is too hot, not hot enough, or does not heat evenly, the short oven sensor kit may need repl...
The burner head cap with spark electrode directs the gas to the front and back burner heads and will equally distribute the gas across cooking areas. This part can help the following symptoms: if your...
This is a replacement oven rack and it is designed for use with ranges and ovens. This is a genuine OEM replacement part. The rack provides a level and stable surface for cookware inside of your appli...
This is a multi-use and multi-appliance screw. It can be used on a microwave, refrigerator, range/oven, air conditioner, dehumidifier, washer, or dryer. The measurements of this screw are 8 x 1/2 inch...
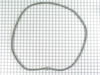
The oven door gasket on your range functions as a seal between the warm interior of your oven, and the outside. It prevents heat from fleeing your oven when the door is closed. Before making any repai...
This part may differ in appearance, but functions same as original part. : This part sends enough current to the igniter to create a spark to the bottom of the burner cap.
The light cover lens in your oven is designed to protect the light bulb. If your light cover lens is damaged, you will need to replace it. This part is made of clear glass and is roughly 3 inches in d...
Ask our experts a question about this model and we'll get back to you as soon as possible!
2 questions answered by our experts.
Sort by:
< Prev
1
Next >
Search filter:
Clear Filter
Your search term must have 3 or more characters.
Keep searches simple. Use keywords, e.g. "leaking", "pump", "broken" or "fit".
Sorry, we couldn't find any existing answers that matched.Try using some different or simpler keywords, or submit your new question by using the "Ask a Question" button above!
Bruce
March 2, 2020
Light panel indicators are too dim to read
For model number CHG9800BAB
Hello and thank you for writing.
It certainly sounds like it could be a faulty control board PS11743983 you should check the part(s) for signs of damage such as burn marks as an indicator of shortage or test with a multimeter, and replace the part(s) as needed. You might need to consider a defective display board, however this part is NLA, there is ways you could try to fix the board if you are handy with electronics.
Step 1
Unplug the oven from its power source and remove the front plate holding the display in place. You will have to use a screwdriver to take out the screws holding this part of the oven frame in place.
Step 2
Take out the display unit from your oven, unscrewing any screws securing it within the oven. You will also have to disconnect the wires running from it.
Step 3
Find the capacitors on the control board of the display, which looks like the circuit board of a computer. The capacitors look like small, cylindrical batteries.
Step 4
Remove the solder holding each of the capacitors in place with a soldering pump and soldering iron.
Step 5
Place the tip of a heated soldering iron against the solder you want to remove until the solder is hot and liquid. Quickly place the pump nozzle against the melted solder and release the handle to suck it up.
Step 6
Repeat this for each capacitor until they can all be easily released, then take them to the store to buy replacement capacitors.
Step 7
Insert each of the new capacitors into the holes left by the unsoldered old capacitors. Solder the new ones in place with the soldering iron.
Step 8
Reconnect the display carefully, just as it was when you took it out. Put the oven frame back together and plug it back into the power.
We hope this helps. Please contact us anytime if you require further assistance.
Hello Robert, thank you for your question. To access the spark module for the burners on the surface, you will need to go in through the Burners. Remove the nuts that hold the burner heads Remove the burner heads. Pull the control knobs off of the burner control valves. Remove the screws that secure the main top to the top of the burner orifice holders. Lift the main top off of the cooktop and set it aside. Take note of how the wires are attached to the existing spark module, so you can connect them correctly to the new spark module. The Spark Module - Surface Burners is part PS2003170. If you need help placing an order, customer service is open 7 days a week. Please feel free to give us a call. We look forward to hearing from you.
The oven had been working intermittently for a while and after repeated threats of starvation from my spouse I finally took a look even though it was summer and the grill was working fine. The Igniter would glow red when the oven was turned on but the gas would not flow to it no matter what the temperature setting. I searched online and f
... Read moreound this site that explained it was possible for the igniter to glow but if it was not drawing the correct amperage (because its resistance was too high) then the main brain would not allow the gas valve to open. So I took a look at the broiler and it had the same igniter. I measure the resistance of both of them and the oven igniters resistance was higher (don't rememeber the reading) then I moved the Igniter from the broiler to the oven and the oven worked from there it was just a matter of ordering the part. End of story except for I am still doing all the cooking on the barbecue outside.
Repair tech checked oven and said the control panel was bad and needed to be replaced. The new control panel would cost over $450.00! I found that the oven sensor was bad and replaced it for $30.00. The old oven sensor had failed following a self cleaning cycle. I found that the wires coming out of it were burnt.
Replacing
... Read morethe oven sensor was very easy. I removed the back panels 6 screws to gain access to the sensor's connection. I then removed the 2 screw that hold the sensor in place inside the oven and pulled the old sensor out through the oven. I reversed this process to place the new sensor in the oven.
In most cases if your oven won't light or takes a long time to light you may have a bad igniter even if it glows. To check the igniter use a voltmeter to check for 120 A/C volts going to the igniter and3.5 A/C volts going between the ingniter and the gas valve. My bad ingniter glowed but had only only 3.0 A/C volts going to the gas valve
... Read morefor the oven. The new igniter took only 45 minutes to install and supply's 3.6 A/C volts to the gas valve and the oven works fine.


 Diagram and Parts List for Maytag Range")