This OEM 40 watt appliance light bulb is used for some ranges, refrigerators, freezers, and microwaves. Simply locate the existing bulb, unscrew it from its socket, and replace with new light bulb. If...
This handle mounting screw works with your oven or range, and bolts the door handle to the door. It is approximately 2 inches in length and is an OEM part sourced directly from the manufacturer. If yo...
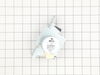
Terminal block kits are also known as terminal boards, or terminal strips, and they are found in a wide variety of household appliances. Most often in ranges, wall ovens, and dryers. This kit attaches...
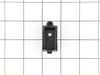
This is a part for your range. This switch controls the stovetop surface burner. If you notice that your stove top is not turning on or is not adjusting to the corresponding desired heat, it is mostly...
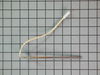
The temperature sensor detects the temperature within the oven cavity. If there is a limited amount of heat, it is not heating evenly, or the oven will not start, this might indicate that your tempera...
The Frigidaire light bulb lens covers the interior light bulb in an oven. No tools are necessary to replace this item. After unplugging the appliance, slide off the wire bracket to remove the existing...
This rear drawer glide, also known as a storage drawer glide, is used in ranges. This helps hold the front side of the storage drawer and allows the drawer to easily slide in and out of the range. If ...
This tempered glass is supplied by the original manufacturer and measures 20 inches by 13 inches. It is an inner door glass, designed for use in ranges/ovens and has several purposes which include pro...
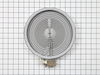
This is a six-inch radiant element with limiter. It works in conjunction with your stove top range. The purpose of this part is to heat up the cooking area that is located on top of the range, also kn...
The anti-tip bracket kit comes with one metal bracket and two installation screws, and is sourced directly from the genuine manufacturer. It prevents the freestanding oven, range, or stove from tippin...
$11.25
In Stock
Questions And Answers for CGLEF379DSJ
Be the first to ask our experts a question about this model!
✖
Ask a Question
Ask our experts a question on this model and we'll respond as soon as we can.
Cut off power at fuse panel. pulled stove out from wall went behind stove removed back panels in area of sensor that I could see from the front side, inside oven. Located sensor from rear & unpluged senser from wiring bundle reached inside oven & removed screws from sensor. Pulled sensor out & threaded wire through hole. Took old & new
... Read more sensors to bench in shop. Plug on new not the same as old. Had to change plug Cut and stripped wires. Wire is very small, need to use a good stripper. Twisted wire together & soldered connection, used shrink wrap to insulate wire. Took part inside and reinstalled in reverse order. Used 1/4 inch nutdriver on total job start to finish.
PF alarm appeared on display. Noticed clicking when cord was moved. Had arced for some time and melted original block. New part slightly different. Only has 3 lugs, old one had six. Stack using washers provided. Take note of colors before disassembly. Use caution while working through access opening. The edges are sharp. Only tools neede
... Read mored are phillips screwdriver, deep socket for lug nuts. Nut driver optional. Hope this is helpful.
First we removed two screws under the rim of the range top to open the lid. Lifted the lid and removed the screws from the bracket that holds the elements, Be careful with the clips that hold the element in, if you break them or bend them there aren't any more! Also note which holes they were in, they are marked according to the differ
... Read moreent sizes of elements. Disconnected the wires, needed needlenose pliers to grip them...connected new element, popped it back in place, replaced bracket, closed top ...Easy peasy!!!