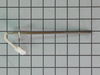
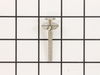
This genuine OEM oven probe is also known as an oven temperature sensor or range probe. This part is manufactured for a range, stove, or oven to detect the temperature within the oven cavity. The prob...
This OEM 40 watt appliance light bulb is used for some ranges, refrigerators, freezers, and microwaves. Simply locate the existing bulb, unscrew it from its socket, and replace with new light bulb. If...
This kit is used to convert your appliance to liquid propane. This liquid petroleum gas conversion kit contains seven orifices, each under an inch long.
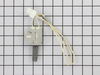
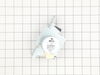
The oven burner igniter simply ignites the gas so it can heat the oven burner. The igniter does this by drawing electrical currents through the oven safety valve to open it. If the element shortens ou...
This part is found inside your oven. This oven rack comes in the color chrome and measures 24 inches in width and 16 inches in length. This is an extremely simple repair that requires no tools. The pa...
The Frigidaire light bulb lens covers the interior light bulb in an oven. No tools are necessary to replace this item. After unplugging the appliance, slide off the wire bracket to remove the existing...
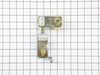
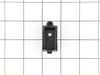
This rear drawer glide, also known as a storage drawer glide, is used in ranges. This helps hold the front side of the storage drawer and allows the drawer to easily slide in and out of the range. If ...
The surface Meduim 9.5K burner cap is located on the top of the burner head and is used in ranges and ovens. The burner cap helps spread out the burner flame for even heating, and protects the burner...
The anti-tip bracket kit comes with one metal bracket and two installation screws, and is sourced directly from the genuine manufacturer. It prevents the freestanding oven, range, or stove from tippin...
Ask our experts a question about this model and we'll get back to you as soon as possible!
1 question answered by our experts.
Sort by:
< Prev
1
Next >
Search filter:
Clear Filter
Your search term must have 3 or more characters.
Keep searches simple. Use keywords, e.g. "leaking", "pump", "broken" or "fit".
Sorry, we couldn't find any existing answers that matched.Try using some different or simpler keywords, or submit your new question by using the "Ask a Question" button above!
Mike
November 20, 2023
How do I replace the left top two burner spark igniters , the right is still sparking but not the two on the left side of the stove top
For model number CFGF3053LSC
Hi Mike, thank you for getting in touch. It is less common that both igniters stopped sparking at the same time. We would recommend checking the spark ignition switch and harness, part number PS3409148, to fix the issue. To replace the spark ignition switch and harness, follow these steps: Be sure to unplug the power cord or shut off the power supply. Shut off the gas supply as well. Lift off the three grates, remove all the burner caps, and lift the center burner base straight up to remove. Using a socket or nut driver, unthread the mounting screws securing the front and rear burner bases. With the screws unthreaded, lift each base straight up to remove. Next, use a socket or nut driver to unthread all the screws securing the orifice holders to the maintop. Pull off the control knobs. You can use string or wire to help pry them off. Open the oven door and use a screwdriver to unthread the two mounting screws securing the valve control panel. Remove the panel. Unthread the screws securing the main top. You can now pull the main top forward and lift up to remove. Disconnect the spark switch wire from the spark module. Reach behind the rear brace and lift up the black spark switch wire so you can disconnect it. Next, release the ties securing the switch wires to the manifold. You can now detach the four spark switches from the burner valves to remove the old harness. Install the new spark switch harness by snapping each switch onto the appropriate burner valve. Use the ties to secure the wires to the manifold. Feed the black wire through the hole in the brace and connect it. Connect the wire to the spark module. Reinstall the main top by aligning the rear edge under the retaining tabs. Confirm that the orifice holders and igniters protrude through the holes in the top. Thread the two screws to secure. Reinstall the valve control panel by aligning the slots at the top with the bracket tabs. Then, thread the mounting screws. Replace the control knobs. Thread all the screws to secure the orifice holders to the maintop. Reposition the burner bases so the igniter aligns with the notch in the base. Thread the mounting screws to secure the front and rear bases. Realign all the burner caps. Reinstall the grates. Turn the gas supply back on. Plug the power cord back in or restore the power supply, and your gas range should be ready for use. We hope this solves your problem!
I followed the simple instructions that were included in the kit. I started by replacing the 5 orifices on the top burners. The orifices are well labeled with numbers and colors. Next, I tightened the broiler burner orifice and the oven burner orifice with a 1/2 inch wrench. I had to tighten them pretty good to get the flame down where it
... Read more is supposed to be. Then, I checked for leaks and I was then ready to cook.
I called a repair place. They charged $54 to diagnose, (said it needed a new latch motor) then wanted $220 to complete the repair. I checked online prices and did it myself for about 15 minutes work and the latch motor itself ($44?).
Was necessary to uplug the range, pull it away from the wall and remove the back panel sheet m
... Read moreetal, then 3 screws that mount the motor. Replace motor, reattach sheet metal. Plug in. Done. Ready to bake cookies.