


Models
>
CDM
CDM - Overview
Models starting with CDM
Click on the best match to narrow your results.
- CDM2000RW419 General Electric Dryer
- CDM2000RW429 General Electric Dryer
- CDM2000RW439 General Electric Dryer
- CDM2000RW449 General Electric Dryer
- CDM2000RW459 General Electric Dryer
- CDM2000SW419 General Electric Dryer
- CDM2000TW419 General Electric Dryer
- CDM2000TW429 General Electric Dryer
- CDM2000VW419 General Electric Dryer
- CDMW07B (CBKEDOM) LG Range (Oven-Range)
- CDMW07B (KBKEDOM) LG Range (Oven-Range)
- CDMW07S LG Range (Oven-Range)
- CDMW07S ( KSLEDOM ) LG Range (Oven-Range)
- CDMW07W (CWHEDOM) LG Range (Oven-Range)
- CDMW07W (KWHEDOM) LG Range (Oven-Range)
- CDMW10MB ( BKEDOM ) LG Range (Oven-Range)
- CDMW10MB ( CBKEDOM ) LG Range (Oven-Range)
- CDMW10MB1 (B1EDOM) LG Range (Oven-Range)
- CDMW10MB1 (CB1EDOM) LG Range (Oven-Range)
- CDMW10MW ( CMWEDOM ) LG Range (Oven-Range)
- CDMW10MW-MW LG Microwave (LG Microwave Model CDMW10MW-MW (CDMW10MWMW, CDMW10MW MW) Parts)
- CDMW10MW1 (CM1EDOM) LG Range (Oven-Range)
- CDMW10MW1 (M1EDOM) LG Range (Oven-Range)
- CDMW12B ( CBKEDOM ) LG Range (Oven-Range)
- CDMW12B ( KBKEDOM ) LG Range (Oven-Range)
- CDMW12MB LG Microwave (LG Microwave Model CDMW12MB Parts)
- CDMW12MB ( KBKEDOM ) LG Range (Oven-Range)
- CDMW12MW ( KWHEDOM ) LG Range (Oven-Range)
- CDMW12MW LG Microwave (LG Microwave Model CDMW12MW Parts)
- CDMW12S ( KBVEDOM ) LG Range (Oven-Range)
- CDMW12S ( CBVEDOM ) LG Range (Oven-Range)
- CDMW12W ( KWHEDOM ) LG Range (Oven-Range)
- CDMW12W LG Microwave (LG Microwave Model CDMW12W Parts)
- CDMW12W ( CWHEDOM ) LG Range (Oven-Range)
- CDMW14B (CBKEDOM) LG Range (Oven-Range)
- CDMW14B (KBKEDOM) LG Range (Oven-Range)
- CDMW14W LG Range (Oven-Range)
- CDMW14W ( CWHEDOM ) LG Range (Oven-Range)
Keep searches simple, eg. "belt" or "pump".

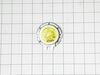
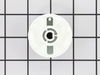
Selector Knob with Clip
PartSelect #: PS271094
Manufacturer #: WH1X2721
The selector knob is what you use to start the dryer. This replacement knob comes with a retaining clip. This is a very easy repair, the only tool you may need is a pair of needle nose pliers. Remove ...
$14.42
In Stock

Rear Drum Bearing Kit
PartSelect #: PS267529
Manufacturer #: WE25M40
This rear drum bearing kit includes a shaft, ground strap, bearing, seven screws, and installation instructions. The bearing plate comes with a slot in it for the ground strap. This part helps keep yo...
$88.17
In Stock

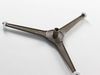
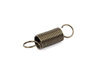
Idler Pulley Wheel
PartSelect #: PS265721
Manufacturer #: WE12X83
A dryer's idler pulley wheel serves to help the belt to rotate the drum.
$34.79
In Stock
 – Part Number: WE3M51")
Drum Glide Bearing - White (Sold individually)
PartSelect #: PS4704230
Manufacturer #: WE3M51
If your dryer is excessively noisy when operating, is not tumbling, or is leaving marks on your laundry, it may be time to replace the drum glides. The drum glide bearing is a genuine OEM part for you...
$13.17
In Stock

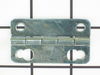
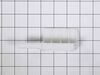
Door Latch
PartSelect #: PS3502777
Manufacturer #: WE1M1011
This door latch is designed for your dryer, and is mounted to the dryer frame. The door latch holds the door of your dryer closed while the machine is operating. If your dryer door is not catching on ...
$11.38
In Stock

GRID ASM
PartSelect #: PS16762559
Manufacturer #: WE22X35337
This is a replacement lint filter slide for your dryer. It is approximately 14 inches long and 5 inches wide. It is made of white plastic and is sold individually. The slide mounts to your dryer and a...
$53.90
In Stock

Door Strike
PartSelect #: PS266893
Manufacturer #: WE1X1192
TThe door strike for your dryer is mounted on the dryer frame that the door shuts onto. It fits into the door catch on the door and keeps the door closed. If the door strike is damaged or missing, the...
$8.54
In Stock

Micro Switch
PartSelect #: PS3522738
Manufacturer #: 3B73362F
This microwave door switch provides power to the various components in the microwave when the door is in a closed position, and interrupts power when the door is open. This door switch is approximatel...
$11.28
On Order

Heating Element and Housing
PartSelect #: PS265565
Manufacturer #: WE11M23
Note: The insulators on the housing are NOT sold separately.
$176.47
In Stock

Switch,Micro
PartSelect #: PS3529293
Manufacturer #: 6600W1K001C
This micro-switch is designed for use in your microwave. The function of this part is to monitor the door latch position and communicate to the electronic control board whether the latch is open or cl...
$10.64
On Order

Switch,Micro
PartSelect #: PS3529294
Manufacturer #: 6600W1K001D
The door switch, often referred to as a primary interlock switch, provides power to the various components in the microwave when the door is in a closed position, and interrupts power when the door is...
$11.28
In Stock

High Limit Thermostat - L315-65
PartSelect #: PS267900
Manufacturer #: WE4M137
This part is the replacement high-limit thermostat or safety thermostat for your dryer. The high-limit thermostat is found on the upper right-hand side of the heater housing, and it cuts off power to ...
$87.83
In Stock
Common Symptoms of models starting with CDM
[Viewing 11 of 11]Noisy
Fixed by
these parts
these parts


Show All
Door won’t close
Fixed by
these parts
these parts


Show All
No heat
Fixed by
these parts
these parts


Show All
Won’t turn on
Fixed by
these parts
these parts

Show All
Tray won’t turn
Fixed by
these parts
these parts
Show All
Doesn’t shut off
Fixed by
these parts
these parts

Show All
Marks left on clothes
Fixed by
these parts
these parts
Show All
Door not closing properly
Fixed by
these parts
these parts
Show All
Door stuck closed
Fixed by
these parts
these parts
Show All
Too hot
Fixed by
these parts
these parts


Show All
Will Not Start
Fixed by
these parts
these parts
Show All
")


Keep searches simple. Use keywords, e.g. "leaking", "pump", "broken" or "fit".
Replaced broken START knob on dryer.
Slid off the old START knob, then pushed on the new START knob.
I created and printed a label on my computer for use with the time selector dial, which must be set at or beyond 10 minutes, before turning the START knob.
I made a label that says "Minimum" with a red arrow that points past the 10 minute setting on the ... Read more time selector dial.
My teenage daughter was not setting the time selector dial, to a point past 10 minutes. When she turned the START knob, the dryer would not come on, because the time selector dial was not set past the 10 minute setting.
My daughter had continually twisted the START knob until it broke. I am hoping she will be able to see the large printed label I put on the dryer near the time selector, saying "Minimum" with a large red arrow pointing past 10 minutes.
I am very pleased that I was quickly able to find the exact matching START knob for my dryer and the exact same color, from PartSelect.Com
Read less
Parts Used:
-
SAM from ROCK HILL, NY
-
Difficulty Level:Really Easy
-
Total Repair Time:Less than 15 mins
502 of 513 people
found this instruction helpful.
Was this instruction helpful to you?
Thank you for voting!
The inside of the Selector Knob was stripped
Removed the damaged knob and replaced it with the new knob. Very ease
Parts Used:
-
Frank from Irvine, CA
-
Difficulty Level:Really Easy
-
Total Repair Time:Less than 15 mins
383 of 389 people
found this instruction helpful.
Was this instruction helpful to you?
Thank you for voting!
Heater element went out
First of all, unplug the dryer. I removed the two screws on the front of the cabinet to remove the top. I then took out the screws to remove the dial panel. Release the belt for the drum through the access hole in the rear of the dryer. Remove the front cover and pull the drum assembly out.
Remove the element disc from the ... Read more rear of the housing, take note of the the wireing placement. Replace disc and reverse order of disassembly.
This job was easy for me as I am a tinkerer by nature. The hardest part of the whole job was waiting on the part, which by the way was ordered on a Sunday evening and I had the replacement in my hands and back in the dryer running by 1:00 PM on the following Tuesday!
I book marked this website and WILL refer it to others who simply need a repair, not a costly new appliance!
Read less
Parts Used:
-
Brian from Clinton, MO
-
Difficulty Level:Easy
-
Total Repair Time:15 - 30 mins
-
Tools:Screw drivers
183 of 218 people
found this instruction helpful.
Was this instruction helpful to you?
Thank you for voting!